
DIY Plastic Spoon Garden Markers
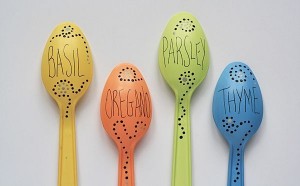
I love gifts that are handmade, useful, cute, and CHEAP! This Plastic Spoon Garden Markers tutorial is written to look just like their spoons, but it would also be very cute to use kids’ decorations and handwriting – for a gift for grandparents or parents, it would mean more that way. If you don’t have little ones handy, just follow the tutorial below. For visuals, click the link above.
What You’ll Need:
- 4 white plastic spoons
- Multi-Surface Satin paint in Gray, Brown, plus 4 others in your choice of colors (Note: You can use any type of paint if you choose to use clear top coat spray instead)
- Sandpaper
- Paintbrush
- Toothpick
- Fine point black art pen
- Clear enamel top coat spray (MUST for regular paint, or Optional: To seal in finished paint for the multi-surface)
Directions:
- Sand each spoon to knock off the shine. This will make the spoon easier to paint.
- Paint each spoon with a thin coat of paint, leaving the bottom 2″ of the handles unpainted. This is where the spoon will go into the ground.
- When dry, paint a second coat and allow to dry completely.
- Use art pen to write herb names on the spoons.
- Use a toothpick to dot on designs using the gray and brown paints.
- Spray with top coat sealing spray on both sides and all areas of the spoon, paying special attention to the deeper parts and painted areas. Allow to dry for an hour, then spray again.
- Let these dry for a full 48 hours before exposing to the outdoor elements.
Teacher Appreciation Crayon Wreath
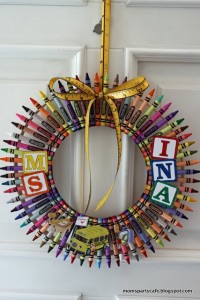
Next week is Teacher Appreciation Week, and I read that teachers love receiving gift cards for school supplies and things with their names on them. This Crayon Wreath would be an inexpensive way to say thank you to your child’s teacher. Thanks to Moms’ Party Cafe for the super cute and imaginative idea!
What You’ll Need:
- 12″ embroidery hoop, or basketry hoop (or a styrofoam wreath cut in half thickness or cardboard cut into a wreath shape, both covered with fabric or painted to cover their colors)
- 8″ embroidery hoop or basketry hoop (or same choices as above)
- box of 64 crayons
- printouts of what you need from this template
- hot glue
- ribbon
Directions:
- Place the 8″ hoop in side the 12″ hoop with equal distance between all edges.
- Arrange the crayons along the 2 hoops. Hot glue the crayons to the hoops. TIP: Keep the unglued crayons arranged on the hoops to keep the spacing accurate.
- Tie the bow around the 2 crayons that you want at the top.
- Create a separate loop and glue the edges together to create the hanging loop.
- Personalize with the teacher’s name and hot glue them on.
- If very careful with the wreath, it should last for years to come!
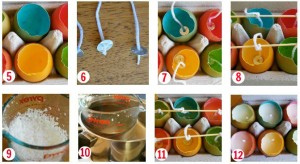
DIY Eggshell Votive Candles

Happy Easter!!! I hope everyone had a wonderful day with their families! Use those leftover Easter eggs on this cute craft. Save those hard boiled eggs for tomorrow by putting them back in the refrigerator. I’ll be sharing the highest rated egg salad recipe on the whole internet!
What you need:
- eggshells
- paper towel
- soy candle wax
- candle wick with metal tab
- hot glue gun
- double boil sauce pan
- wooden skewers
Directions:
- Crack open dyed hard boiled egg at the pointed end and break the shell down 1/3 (leaving about 2/3 of the shell behind) and take the egg out, placing in a container to be stored in refrigerator.
- Carefully rinse the inside of the egg to be used as a votive. Allow to air dry on a paper towel.
- Cut a piece of wick to about 10 cm in length and thread it through your metal tab.
- Secure the metal tab & wick to the bottom of the eggshell using a hot glue gun.
- Tie the pieces of wick to a wooden skewer to keep the wick out of the wax.
- Place your soy candle wax into a Pyrex jug (or a double boiler saucepan).
- Place jug in boiling water on the stove and wait until it melts. It will become clear when it’s ready. Take it off the heat as soon as it has melted.
- Pour the melted wax into the eggshells as carefully as possible.
- Leave your eggshell candles to dry for a few hours. Once the wax is hard you can remove the wooden skewers and trim the wick.
- You can place the eggshell votive candle holders or any other decorative holder. These would also be great to save for gifts for next spring/Easter!
DIY Plastic Easter Egg Wreath
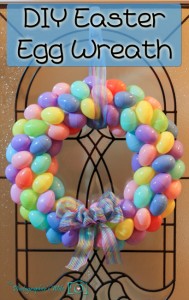
This wreath was featured on the Good Housekeeping website and for good reason. Isn’t it super cute? It’s incredibly simple and inexpensive, too. You can do so many things to this to make it more uniquely yours. You can use a premade bow, make the hanging ribbon the decorative bow and hanger in one, not use a ribbon at all, different kinds of decorative eggs, add washi tape or spray glitter to decorate the plastic eggs, glue in plastic Easter grass or flowers, add a bunny or a message to it – The possibilities are endless. Or you can leave it just like this and it’s perfect!
What You’ll Need:
- Styrofoam wreath form (or cut a wreath shape from a strong piece of cardboard)
- Long, and wide ribbon (for hanging and decorative bow, so buy a full roll of ribbon, preferably with wire)
- 4-5 bags of plastic eggs (your choice of colors & sizes: pastel, brightly colored, etc.)
- Hot glue gun with many hot glue sticks
- Craft glue (like Elmer’s)
- Optional: Ribbon or fabric to cover styrofoam wreath prior to applying eggs
Note: You will want to buy too many eggs at one time at the same store. This will assure that you do not run out mid-craft and have to buy more. If that happens, you run the risk of having use a different size and different shade of eggs to continue the wreath.
Directions:
- This first step is optional: The white of the styrofoam will show through between the plastic eggs, so if this will bother you, glue ribbon or fabric of your choice around the styrofoam fully.
- Open all the bags of eggs, open them, and glue them closed using craft glue so they stay closed.
- Decorating only the parts that will be visible (meaning so it can lie flat against the wall or door), draw a long line of hot glue down each egg then sticking to the styrofoam form. You’ll want to move fast so it doesn’t cool before you stick it to the wreath. If you can predict where you will place the next egg, place some hot glue onto the egg where it will touch other eggs before placement. This will help with the strength and stability of your wreath.
- Glue each consecutive egg like shown in the picture, without the same color touching (if you can help it) and as close together as possible so the least amount of the base shows under the eggs.
- Once finished, hold up and make sure that there aren’t any eggs that are loose and need more securing.
- To finish, create a bow of your choice (if you aren’t sure how, just Google a tutorial), and hot glue it on where you would like. Then cut a long piece of ribbon, tie into a knot, hide the knot behind the wreath, then hang by the ribbon.
DIY Eggshell Planters & Gardens

From Better Homes & Gardens
Eggshells contain an abundance of natural vitamins and minerals that help plants of all kinds grow stronger and live longer. One way to use the shells is to just throw them in a food processor and throw them in your garden’s soil, but also a great way to start a garden is inside of eggshells! Many people start this little project right after Easter – perfect timing with spring and to reuse the eggshells from Easter eggs!
Empty the shell completely by cracking the pointed end and breaking the shell down to where 2/3 to 3/4 of the shell is still there. Rinse the insides of spare egg residue, crack the bottom of the shell (for the roots to grow through and for oxygen), and stick it back in the carton. Fill the shell with planting soil, poke a hole with your finger for the seed or plant, and continue with more eggshells. Make sure to set your new garden near sunlight water as needed.
Martha Stewart Living Magazine says this is how to know when to move them from the shell to the real garden, “The first leaves to sprout will be the cotyledons or seed leaves, which supply nutrients to the young plant until the first true leaves (resembling those of the parent plant) appear. When plants have grown to about 3 inches and have at least two sets of true leaves, they are ready to be transplanted to the garden. (Remove them from the eggshells first.)”