
Homemade No-Sew Fall Leaves Headband
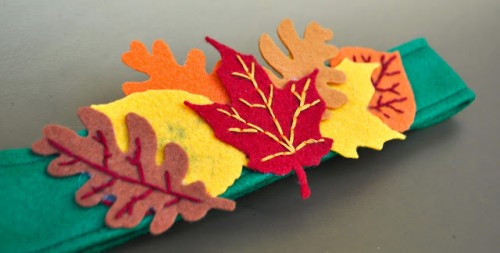
Want to get a little festive before Thanksgiving? Make these adorable and SIMPLE Fall Headbands — No sewing is required! Kids will love making these to wear for Thanksgiving.
What You’ll Need:
- Pre-cut felt leaves from art supply stores (or you can use different colors of felt and cut yourself)
- Embroidery floss and a needle (optional, or draw the veins on with a sharpie)
- Felt (for the headband)
- Glue gun
- Velcro
- Sewing machine (optional: helps it stay together better, but not necessary)
Directions:
- Stitch veins on 3-5 leaves (or draw them on with sharpie markers).
- Measure your child’s head and cut the headband out of felt. Make sure it’s about 4″ tall and leave about 2″ of overlap for the velcro. Fold over in half and hot glue or sew the headband together.
- Hot glue or sew the velcro to the ends of the headband.
- Hot glue the leaves however you’d like to the front of the headband. Use many different colors and leaf designs to make it super unique. Stitch on if you’d like for extra support.
Thanks to Make Life Lovely for the great idea!
DIY Elastic Hair Ties
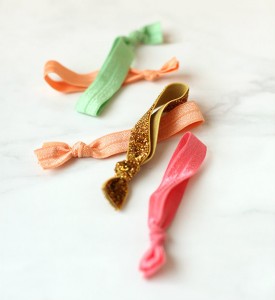
Elastic hair ties are such a popular hair accessory right now. They’re great because you can pull your hair back without leaving a huge dent, plus they’re really cute and you can wear them on your wrist. These little pieces of elastic can run you $5-$10 EACH depending on the brand and the color/decorations. You can make them yourself for a buck each or less!
What You’ll Need:
- 5/8″ foldover elastic (1 yard will make four hair ties)
- Scissors
- Measuring tape or ruler
Directions:
- Measure and cut a 9″ strip of elastic.
- Fold the strip of elastic in half.
- Tie the ends in a knot.
- Repeat.
Thanks to Minted for the tutorial! Be sure to check out their awesome website: http://www.minted.com/party-decorations
How to Make a Hair Bow Picture Frame Holder
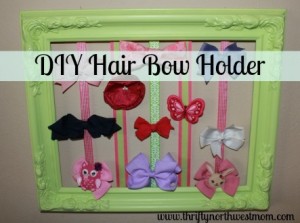
Picture via Thrifty NW Mom
Here is what you will need:
- Hot Glue
- Scissors
- Fabric (enough to cover the picture frame)
- Spools of ribbon (all sizes & textures)
- Spray paint (your choice of color)
- A sturdy picture frame
*Choose whatever size you want, I chose a big one because we have so many bows to put on it. I also have several smaller ones throughout the house. The basic wooden frames at the dollar store will work if you want to keep it simple. I found mine at a thrift store and it was falling apart when I bought it. See pic*
*You will also notice my fabric and ribbon aren’t matchy matchy :) You can choose a theme color, or you can be crazy. Ex. Hot pink and Zebra.


Here is a picture of my picture frame before I did any work to it. Yes, it was falling apart when I bought it! I still knew it would work for what I wanted.
The first thing you want to do is take your frame apart and sand it. After you sand it and wipe it down, spray paint it. I gave mine several coats and because it was an old frame with a lot of dings in it, I used a sand paper strip to give it a distressed looked after the paint dried.
The next step is to get your fabric and cut it to size. Place the fabric on the ground and place the inside of the frame (whether it’s the cardboard, glass, or wood) on top. You want to leave a few inches all the way around so it will fold over to the back where you will hot glue it into place.
After you have cut fabric, make sure the front of the fabric is facing the ground. Have the inside of the picture frame on top and start to hot glue. You will go through several hot glue sticks depending on the size of your frame. Put the glue on the edge and press the fabric to it.
Once the hot glue has dried and the fabric is secured, you can start putting the ribbon on. The purpose of the ribbon is for the hair bows to clip to it for show. You can place the ribbon horizontally, vertically, crisscrossed, or all of the above. Be creative. I did my ribbon crazy! Place a dab of hot glue on the back, put the end of the ribbon on it, then bring it across the front. Put another dab of glue on back and place the other end of the ribbon on it. Repeat this step until the frame is full of ribbon running across the front.
Place the center back into the frame and secure it. If you are using a small frame, place extra fabric or felt on the back to cover the ribbon ends. (It gives it a polished look!)
Now you are ready to add the bows! Check out my hair bow tutorials so you can constantly add to your collection!


DIY Tiara of Queen Elsa from Frozen
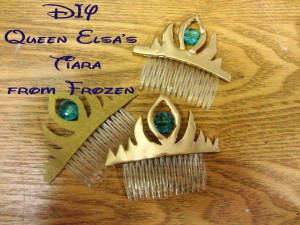
Unless you live under a rock, you know of the amazing Disney movie, Frozen. It’s the hottest animated movie of all time and literally every Frozen-themed item is either completely sold out or being sold for 4 to 10x the original price. People are even upset they can’t buy beach towels! I’m here to help with that, at least a little bit. You can make a Queen Elsa of Arendelle tiara yourself in about half an hour and for about $10 (yay!).
What You’ll Need:
- Wax paper
- Hot glue gun (and LOTS of glue sticks)
- Metallic gold spray paint
- Blue, faceted aqua colored beads
- Wire cutters
- Floral wire
- Plastic hair piece comb
- Print the template
- Scissors
- Xacto Knife
- Optional: For easier versions, use felt or cardboard cut out instead of glue
Directions:
- Print out the PDF of the template from Instructables, then tape it to the back of some waxed paper. (For the easier felt versions, tape the template to some felt and trace it onto the felt by holding it up to a light source, or trace and cut out cardboard).
- Hot glue all over the stencil showing through the wax paper and put the comb into the bottom so it will be nice and strong. Try to complete a whole section at once so the glue will be even and not show layers.
- Once glue is cooled. cut it out using some sharp scissors to get really clean edges. Refine the shape with an Xacto knife to get sharp tips on the tiara,
- Once the crown is as you like, spray with gold spray paint.
- For the jewel, cut a length of wire that will reach from one side of the middle of the teardrop center to the other. Put the jewel on the wire and hot glue the wire to the tiara.
- Do your hair up like Queen Elsa on Coronation Day, and you’ve got yourself some happy kids!
DIY Elastic FOE Headbands Tutorial
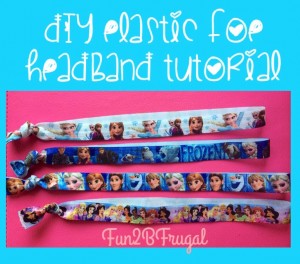
You can either spend $3 or more for one headband on Etsy or other shop, OR you can follow my directions to make adult and/or children’s sized elastic headbands for about $1 or less and in the design of color of your choice. I chose to do it on my own when I found an epic deal on Frozen and Disney Princess FOE for literally less than $1 per yard shipped on a Groopdealz or Jane steal, so I had to figure it out to surprise my girls and use my own pictures as the tutorial! The headbands literally took me less than 2 minutes to make 2-3 and look exactly like what you buy at the stores – and this is my first time making them :)
You can also make your own elastic hair ties with the tutorial I posted previously, and you can make ties with leftover FOE.
Note: Some shops take a long time to ship, so order in plenty of time if you are (or your child is) going to need to wear the headband for a special occasion.
What You’ll Need:
- Fold Over Elastic (FOE) ordered with the designs or colors you want (1 headband: 18″ for big kids & adults, 16″ for baby/toddler)
- Scissors
- Ruler or measuring tape
- Optional: Lighter or matches
Directions:
- Gather all supplies and decide which sized headbands you are making – adults and kids 4+ wear 18-in long FOE, while toddlers and babies wear 16-in long FOE. Use your best judgement on each. It’s better to cut too long then crop down than to cut too short and have to make them into hair ties.
- Measure out your first length of FOE. DO NOT STRETCH THE ELASTIC WHILE MEASURING! This will make the length inaccurate. Double check the length measurement again, then cut the elastic.
- Using the elastic you just cut as your guide, cut as many pieces of the FOE as you’d like to make into headbands.
- Fold in half the first headband and line up the edges. If they aren’t straight, cut them into a straight line.
- Now is the time you can decide to use a lighter or a match to melt the edges together to prevent fraying in the future. I didn’t do it, but I may choose to do it later.
- Holding both ends, tie the headband ends together as closely to the end as you can and tighten into as small of a knot as you can.
- Repeat 4-6 until you are finished with all your headbands. This should only take you a few minutes to make 10 or more headbands!