
DIY Glowing Fairies in a Jar
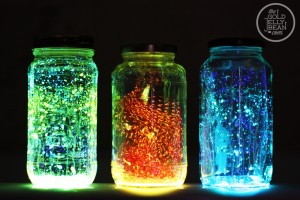
Most of us have seen the picture of fairies in a jar that went viral last year. We all found out that it was fake and photoshopped, much to many kids’ dismay. Here’s a REAL way to do it, no photoshop needed. BIG thanks to The Gold Jelly Bean for helping to make so many kids’ days brighter with this tutorial!!
What You’ll Need:
- Glass jar (cleaned one from spaghetti sauce or similar, or you can buy them at the dollar store)
- Glow sticks
- Rubber gloves
- Scissors
- Eye protector (like goggles or glasses)
- White tulle (optional, but looks better!)
Directions:
- Cut the tulle into a larger size than the jar and stick it inside. The tulle helps it look like the fairies are suspended in the jar, not just stuck on the sides of the glass.
- Put on rubber gloves and crack the glow stick to get the glow to activate, then stick the end of the glow stick into the jar and cut the top off. Be careful with this! There are glass and chemicals inside the stick, so be sure to not touch your eyes.
- Shake the stick all over the inside of the jar. This will take a while because it doesn’t just pour out, it may even get clogged. Use a new one, don’t try to get the glass out.
- After putting in the amount of glow liquid you want, put the cap on and shake. It will probably take 2-3 necklaces or 3-4 bracelet glow sticks to get the right amount.
- Turn out the lights and watch the amazement in your kids’ eyes!
Recipe: “Stained Glass” Sugar Cookies

This is the coolest and most creative use of hard candies I’ve seen since the DIY Christmas platters using peppermint candies I posted back in December. They’re beautiful, fun to look at, easy to make, and completely, 100% edible! Make them for your next potluck, for holidays, or just for fun. I can’t wait to hear how you like them!
Ingredients & Tools:
- Jolly Ranchers Hard Candies (Any hard candy will work, but cannot be sugar-free candy)
- Your favorite sugar cookie recipe (either premade or made from scratch, both work)
- 2 sizes of cookie cutters (these were hearts, but you can use your choice of 2 of the same shape, but different sizes)
- Baking sheet
- Wire racks
- Waxed paper
Directions:
- Roll out sugar cookie dough and cut out the cookies with a large cookie cutter. Use a spatula to move them to the baking sheet.
- Using the small cookie cutter, remove the centers of the large cookies that are on the baking sheet.
- Place 2 Jolly Ranchers (or other hard candy) of different colors inside the new empty center of the cookies. Choosing 2 different colors gives the stained glass look.
- Bake cookies with candy centers according to your cookie recipe’s instructions.
- Let the cookies cool on the baking sheet for 5 minutes to allow the candy center to harden before you then transfer them to wire racks to cool completely.
- Once fully cooled, you can move them onto a plate or into a storage container, but to prevent the hard candies from sticking together place waxed paper between layers of cookies. Enjoy!
DIY Cereal Box Stencil Halloween Candy Tote Bags
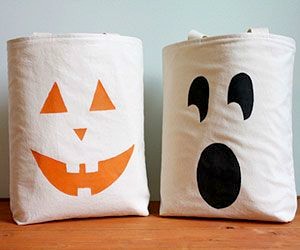
Update a classic fabric tote with easy-to-make stencils and sponge painting with this tutorial from Parents Magazine. Make these adorable tote bags and reuse them for years to come!
What You’ll Need:
- Fabric tote (get at any art supply store such as JoAnn’s or Michaels)
- Fabric paint
- Stencil brush or sponge
- Cereal box
- Crafts knife and cutting mat
- Masking tape
Directions:
- Cut one of the largest rectangles out from your cereal box.
- Either you or your child can sketch jack-o’-lantern shaped faces onto the box. Using a craft knife, an adult will now cut out the jack-o’-lantern shapes on a cutting mat.
- Next, tape your rectangle template with the faces cut out onto the fabric bag. Have your child dab on the paint using a stencil brush or sponge painting it as evenly colored as possible. You could also use the end of a sponge paint roller. NOTE: The trick to getting the paint on neatly is to hold the brush or sponge end perpendicular to the surface.
- Let dry fully for at least 12 hours (overnight would be best). To be safe, spray with waterproofing spray and then can be used in any Halloween weather for many years to come!
DIY Tiara of Queen Elsa from Frozen
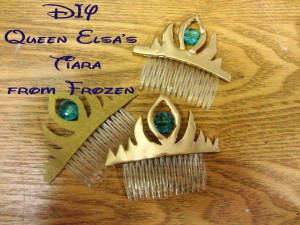
Unless you live under a rock, you know of the amazing Disney movie, Frozen. It’s the hottest animated movie of all time and literally every Frozen-themed item is either completely sold out or being sold for 4 to 10x the original price. People are even upset they can’t buy beach towels! I’m here to help with that, at least a little bit. You can make a Queen Elsa of Arendelle tiara yourself in about half an hour and for about $10 (yay!).
What You’ll Need:
- Wax paper
- Hot glue gun (and LOTS of glue sticks)
- Metallic gold spray paint
- Blue, faceted aqua colored beads
- Wire cutters
- Floral wire
- Plastic hair piece comb
- Print the template
- Scissors
- Xacto Knife
- Optional: For easier versions, use felt or cardboard cut out instead of glue
Directions:
- Print out the PDF of the template from Instructables, then tape it to the back of some waxed paper. (For the easier felt versions, tape the template to some felt and trace it onto the felt by holding it up to a light source, or trace and cut out cardboard).
- Hot glue all over the stencil showing through the wax paper and put the comb into the bottom so it will be nice and strong. Try to complete a whole section at once so the glue will be even and not show layers.
- Once glue is cooled. cut it out using some sharp scissors to get really clean edges. Refine the shape with an Xacto knife to get sharp tips on the tiara,
- Once the crown is as you like, spray with gold spray paint.
- For the jewel, cut a length of wire that will reach from one side of the middle of the teardrop center to the other. Put the jewel on the wire and hot glue the wire to the tiara.
- Do your hair up like Queen Elsa on Coronation Day, and you’ve got yourself some happy kids!
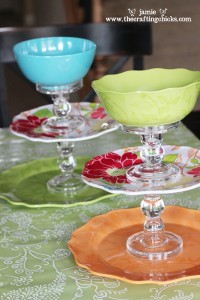
DIY $3 Dessert & Treat Stand
I showed you how to make one for Christmas, but why only have these simple and cheap stands for the holidays? You can make them and use them year round! Get everything either at the Dollar Store or Thrift Store, mix and match the colors, designs, and materials for your tastes and make them shabby chic! You can make them with a plate or a bowl on top, or you can make it with only 2 tiers instead of three. Thanks to Jamie at The Crafting Chicks for the cute and easy tutorial!
What You’ll Need:
- 2 candlestick holders
- A larger plate or platter
- A slightly smaller plate
- A bowl or another platter
- Permanent craft glue (like E6000 or Gorilla Glue)
Directions:
- Use a liberal amount of glue on the bottom of the first candlestick holder and stick it to the bottom plate in the middle (either measure to find exact middle or eyeball).
- Glue top of candlestick holder and place the littler plate on it.
- Repeat with the next candlestick holder and bowl.
- Allow to dry for an hour before use, then enjoy!
HAND WASH AND DRY ONLY!