
DIY Elastic FOE Headbands Tutorial
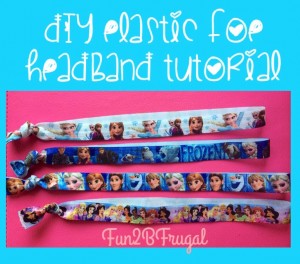
You can either spend $3 or more for one headband on Etsy or other shop, OR you can follow my directions to make adult and/or children’s sized elastic headbands for about $1 or less and in the design of color of your choice. I chose to do it on my own when I found an epic deal on Frozen and Disney Princess FOE for literally less than $1 per yard shipped on a Groopdealz or Jane steal, so I had to figure it out to surprise my girls and use my own pictures as the tutorial! The headbands literally took me less than 2 minutes to make 2-3 and look exactly like what you buy at the stores – and this is my first time making them :)
You can also make your own elastic hair ties with the tutorial I posted previously, and you can make ties with leftover FOE.
Note: Some shops take a long time to ship, so order in plenty of time if you are (or your child is) going to need to wear the headband for a special occasion.
What You’ll Need:
- Fold Over Elastic (FOE) ordered with the designs or colors you want (1 headband: 18″ for big kids & adults, 16″ for baby/toddler)
- Scissors
- Ruler or measuring tape
- Optional: Lighter or matches
Directions:
- Gather all supplies and decide which sized headbands you are making – adults and kids 4+ wear 18-in long FOE, while toddlers and babies wear 16-in long FOE. Use your best judgement on each. It’s better to cut too long then crop down than to cut too short and have to make them into hair ties.
- Measure out your first length of FOE. DO NOT STRETCH THE ELASTIC WHILE MEASURING! This will make the length inaccurate. Double check the length measurement again, then cut the elastic.
- Using the elastic you just cut as your guide, cut as many pieces of the FOE as you’d like to make into headbands.
- Fold in half the first headband and line up the edges. If they aren’t straight, cut them into a straight line.
- Now is the time you can decide to use a lighter or a match to melt the edges together to prevent fraying in the future. I didn’t do it, but I may choose to do it later.
- Holding both ends, tie the headband ends together as closely to the end as you can and tighten into as small of a knot as you can.
- Repeat 4-6 until you are finished with all your headbands. This should only take you a few minutes to make 10 or more headbands!
Recipe: Frozen Strawberry Crunch Cake
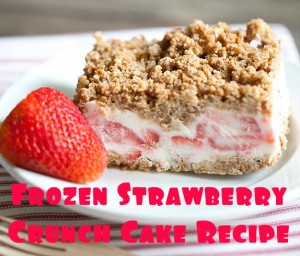
This simple take on an ice cream cake will be a big hit at your next family get together, or even just for dessert tonight! The Frozen Strawberry Crunch Cake from Spoonful calls for Nature Valley bars, but regular granola would work just fine as well.
Ingredients:
- 1 box Nature Valley Granola Bars
- 1/3 cup brown sugar
- 1/2 cup flour
- 6 tablespoons melted butter
- 2 egg whites
- 1/2 cup sugar
- 1 cup heavy whipping cream
- 1 lemon
- 4 ounces cream cheese
- 1 1/2 cups freshly chopped strawberries
Directions:
- Unwrap and put the Nature Valley granola bars (or regular granola) in a food processor until you it becomes a course crumb.
- In a large bowl, add crumbs, brown sugar, flour, and melted butter, then mix together. Spread into an 8×8″ pan covered with parchment paper.
- Bake at 350ºF for 20 minutes. Let cool completely, then divide in half and set aside.
- In a mixing bowl, combine eggs whites and sugar, then mix on high. Add the heavy cream and continue to mix for another 5 minutes.
- Add the lemon juice and softened cream cheese to mixture, then mix on low speed until completely combined.
- Fold the strawberries into the cream mixture until as evenly mixed as possible.
- In a glass cake pan that has been buttered fully, press half of the crumb crust mixture to the bottom, then top with strawberry mix, then add the rest of the granola crumbs to the top.
- Cover and freeze for at least three hours. ENJOY!
Fun 2-Ingredient Cloud Dough
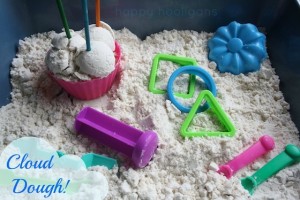
Sensory play is so much for for kids and they can find it in various ways. Some of the best ways are with flour, sand, playdoh, water, and this great idea that Happy Hooligans thought up called Cloud Dough (some call it Moon Dough). All you need is a bag of flour and baby oil! It has a great soft texture and has an added bonus of making skin nice and soft when playing with it!
In a large bowl, pour 1 cup of baby oil into 8 cups of flour. Stir well with a wisk or spoon. Have the kids help if you don’t mind getting a little flour on them. Put into a large container and give the kids all sorts of toys to manipulate the dough (Happy Hooligans has some great ideas). Store in a sealed container and it will last a long time! If it seems to harden a bit, just add a bit more baby oil. Have fun!
Homemade Ice Cream in a Bag Recipe
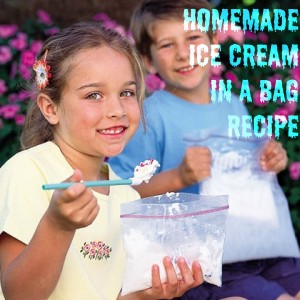
Its finally warm outside and the kids can get all their energy out by playing outside. Use this to your advantage and your whole family can make ice cream in bags by running around! Note: This recipe is enough for ONE serving, so you’ll need all of the listed ingredients for each person.
Ingredients & Other Things You’ll Need:
- Ice cubes (enough to fill each gallon-size bag about half full)
- 1 cup half and half
- 1/2 cup salt (The bigger the granules, the better. Kosher or rock salt works best, but table salt is fine.)
- 2 tablespoons sugar
- 1/2 teaspoon vanilla extract
- 1 pint-size ziplock bag (this can also be done in tupperware type containers)
- 1 gallon-size ziplock bag
- Your favorite ice cream toppings or ingredients, like chocolate chips, cereal, fruit, marshmallows, etc.
Directions:
- Combine the sugar, half and half, and vanilla extract in the pint-size bag and seal it tightly. Double check it’s sealed completely.
- Place the salt and ice in the gallon-size bag, then place the sealed smaller bag inside as well. Seal the larger bag. Now shake the bags and/or have the kids run around while shaking their bags until the mixture hardens which is about 5 minutes. Feel the small bag to check when it’s hardened enough.
- Take the smaller bag out of the larger one, add toppings, and eat the ice cream right out of the bag. Toss the bag when you’re done eating – super easy cleanup!
DIY Bouncing Bubbles
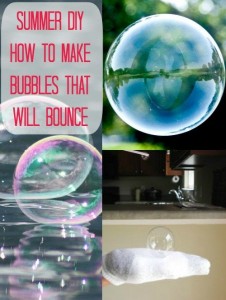
Kids love bubbles, and they are a huge part of summer play. Try something new with the kids and make them amazing bouncing bubbles! Skip the “Deluxe Bouncing Bubbles Kit” that costs $35 or more. You can make it at home with just a few ingredients with the tutorial from Play at Home Mom.
- 1 C distilled drinking water
- 1 Tablespoon dish soap
- 1 Teaspoon of glycerin (you can buy at craft stores or in the first aid aisle)
- something to blow bubbles with (straw, yarn, bubble blower wands, etc.)
- 1 clean glove (or sock to keep the bubbles from popping)
Mix ingredients together and let stand for at least 24 hours. Have fun!