
Easy DIY Kids’ Turkey Shirt

Don’t go to Etsy and buy your kids a shirt to wear at Thanksgiving! Instead of paying $30 per shirt, you can make this adorable 2-sided turkey shirt for just a couple of dollars. You can personalize it with different colors and add a bow for a girl if wanted.
Supplies Needed:
1 Shirt or Onesie
6 different prints of scraps of fabric
Piece of cardboard
Fusible interfacing (this is wonder under)
Turkey Template
Buttons (if desired)
Sewing Machine
Iron
Thread
Damp towel
Directions:
1. Iron the fabric onto the template and cut them out. Leave 1 of the designs of fabric as the turkey’s body.
2. Peel the fabric from the interfacing and arrange as you desire.
3. Place a piece of cardboard between the 2 layers of shirt and a damp towel on top of the turkey and iron everything well.
4. Stitch around the feathers and body. Add buttons for the eyes, stitches for feet, and a piece of cloth for a beak if you want to add more detail.
Thanks to Dwellings By DeVore for the directions and cute picture!
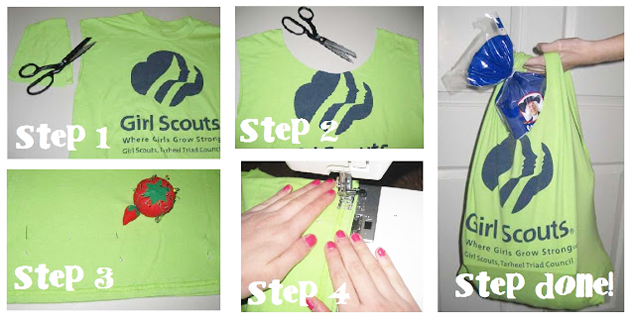
DIY Recycled T-Shirt Bag Tutorial
This GENIUS and nearly free recycled t-shirt bag from One Good Thing by Jillee and Instructables would be a fun thing to make for gifts, to use at the grocery store, or just to carry a lunch instead of a paper bag.
What You’ll Need:
- Heavy weight cotton T-shirt (heavy weight fabric is best)
- 3- 5 straight pins
- Pencil or pen
- Dinner plate
- Scissors
- Sewing machine
Here is a picture tutorial. If you want the full step-by-step tutorial, visit Instructables.
DIY Dollar Store Rose Petal Skirt

Spring and summer weddings, Mother’s Day, and fun family parties are all coming up soon. Why not make yourself or your daughter(s) this really cute rose petal skirt that was created by Fave Crafts? It would be adorable with different colored petals, made into dresses, or a tunic. Be sure to check out her website to see a step-by-step picture tutorial to help with creating your new skirt!
What You’ll Need:
- 1-2 XL white men’s undershirt (brand new is best if you’re doing a white skirt, used but very clean is okay for other colored petals)
- Bagged fabric rose petals (buy at dollar or craft stores)
- Scissors
- Ruler
- Pins
- Sewing machine
Directions:
- Lay your t-shirt flat and cut off the bottom for your skirt piece. Cut a piece that’s long enough to make a skirt. She suggests to measure it against a skirt you already own that’s a length you like. The skirt will already has a hem since it’s made from the bottom of the t-shirt, so you hardly have any work left.
- Next, sew the petals onto the skirt piece. Place one petal at a time, sewing them in a straight line, one right next to each other. Keep going until your skirt is covered completely by petals.
- For the top row, sew the petals upside down the iron them down so that the stitching doesn’t show.
- Now you need to make a waist band. To make this foldover waistband, first measure a pair of foldover pants you already own (if you have them) or measure another pair of pants.
- Now, cut more fabric from your t-shirt to use as your waistband. Cut double the width that you want your waistband to end up being (she cut 6 inches wide to make a 3 inch waistband). The length of your is what you measured from your pants.
- Sew this newly cut fabric into a tube, then fold the tube in half over itself so that the wrong sides are facing each other.
- Now put your skirt piece around yourself or whoever the skirt is going to be wearing it. If it’s way larger than your waistband, sew a basting stitch all the way around the top of your skirt piece and pull the threads to gather it until the circumference of your skirt’s waist is the same as your waistband.
- Put the skirt inside of the waistband so the raw sides of the waistband and gathered edge of the skirt are together, and the top of the waistband is facing down. Now, pin the waistband to the skirt.
- Sew around the top of your skirt to attach the waistband to the skirt piece. Then flip the waistband right side up, remove the basting stitch (if it’s showing), and enjoy!
Simple Upcycled T-Shirt Produce Bag Tutorial

Going to the local farmer’s market is a great way to get fresh produce and support local growers, but you definitely need produce bags to keep your food safe. Instead of pay $5 or more per bag, create your own using old t-shirts and very little sewing. All you need is a t-shirt, scissors, a sewing machine, and a pen.
This amazing and simple tutorial comes from Delias Creates. She has a visual, step-by-step tutorial for extra help if you need it.
- Turn an old, clean t-shirt inside out, then draw a shape for the bad you like – square or round – and as large as you want it. You can make 2 out of one t-shirt if you make them small, or a large one out of a whole t-shirt.
- Sew the 2 sides together using either a straight stitch or narrow zig-zag going around the edges, leaving 1 side open.
- Flip it right side out, then finish the seams by straight stitching around the edges again.
- Now, draw lines sporadically across the bag in lines about 2-3″ long, spaced at least an inch between each line both sideways and on top and bottom apart.
- Draw the shape of a hole for your handle at the top of the fabric.
- Now, cut the lines and handle through the 2 layers. Be careful to not cut too far and combine 2 cuts together.
- Now, stretch the fabric out and it’s ready to use! So simple!
Ridiculously Easy No Sew Boot Cuff Tutorial

These boot cuffs are all the rage right now. You can buy a pair for $13 or more, OR you can make them yourself without needing to sew at all! Take an old sweater you don’t wear anymore (or buy one at a thrift store), cut the sleeves off, and put them on over your pants/socks. If you want to make sure it doesn’t unravel, use fabric glue to cuff the part where you cut. That’s it! SO CHEAP AND SO EASY!