
DIY Glitter Ballet Flats
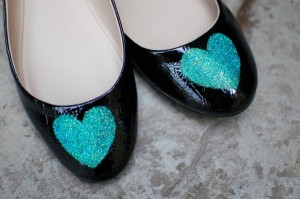
Don’t spend $50 on a pair of glitter flats, especially when you can buy cheap, plain ones and Mod Podge the sparkles onto them yourself for a couple of bucks! Follow this super simple tutorial from She Knows for your own pair.
What You’ll Need:
- Shoes (plain or some ones that might be a little scratched up and you can cover it!)
- Mod Podge
- Glitter
- Clear Con-Tact paper
- 2 paintbrushes
- Utility knife
- Bowl
- Acrylic spray sealer (optional)
Directions:
- Find a design or shape that you like and print it out. Lay the contact paper over it and tape it down to keep it secure.
- Using a utility knife, cut the shape out of the center. You will be using this interior part as the shape onto the shoe.
- take the back off the contact paper and lay it over where you want it to be on your shoe. Make sure they are straight and even with the one on the other shoe.
- Mix the Mod Podge with the glitter you want to use in about a 1 to 1 ratio. Paint a thin and even coat over the template.
- Allow to dry completely, then repeat as necessary to make sure it is fully opaque.
- Use an acrylic spray to seal the glitter on or use another thin coat of just mod podge.
- Remove the contact paper and allow to dry again. All done! A few minutes and you’ve got truly unique and adorable shoes!
Easy Dia de los Muertos (Day of the Dead) Lantern Tutorial
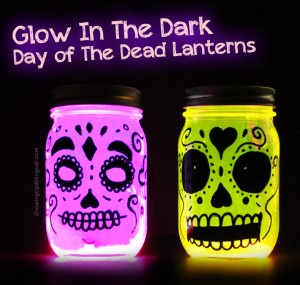
As many know, Dia de los Muertos (or the Day of the Dead) is celebrated on November 1st every year in Mexico. It’s been celebrated for over 4,000 years – long before Mexico existed! It is a celebration of life and it is a loved tradition with beautiful decorations and altars, parades and music.
If you want to teach your children about Dia de los Muertos (or learn about it yourself) this website is full of information on the history, traditions, and current celebrations. Then create these Day of the Dead lanterns to celebrate the lives of loved ones in your life that have passed on with this tutorial from Growing Up Bilingual.
What You’ll Need:
- glass mason jars
- black sharpie or other permanent black marker
- glow in the dark sticks
Directions:
- To make these lanterns, just paint a fun sugar skull or calavera design on the front of the mason jar. You can Google ideas for inspiration.
- Cut a glow in the dark stick and pour the glow in the dark liquid inside the mason jar. Close the jar tightly and shake it making sure that the liquid covers all the inside of the mason jars. Put them out in the dark and enjoy the glowing calaveras!
Note: Make sure that you use gloves when you cut the glow in the dark sticks and do not let children handle them or cut them as the chemicals inside the glow stick can irritate skin and eyes. Some glow sticks also have glass inside so be careful when handling as there might be glass shards inside the glow stick. Proper safety materials like safety glasses and gloves should be used when recommended to protect eyes and skin.
Homemade 3-Ingredient Toilet Bowl Cleaner
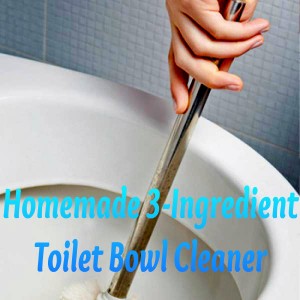
A lot of people use bleach or other cleaners in their bathroom, but some feel that they want to control the ingredients they use around their families. By combining the fizzy power of baking soda and tea tree oil in this toilet bowl cleaner recipe from All You, you can clean your toilet naturally, in about 2 minutes, and spend almost nothing (only $.48 per cleaning)!
What You’ll Need:
- Measuring cup
- Toilet brush
- 1/2 cup baking soda
- 10 drops tea tree oil
- 1/2 cup distilled white vinegar
Directions:
- Pour baking soda directly into the toilet. Immediately add oil then vinegar—in that order exactly.
- Let water fizz for several minutes.
- Scrub bowl with brush until clean.
- Flush.
DIY Window Cleaner Tutorial
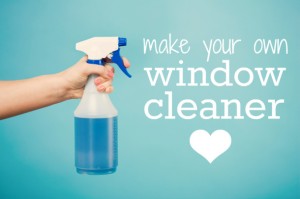
You don’t have to buy window cleaner from the store for $4 or more and have it filled with a bunch of chemicals you’ve never heard of. You can make your own, super effective window cleaner for just pennies!
What You’ll Need:
- 2 cups of water
- 3 tablespoons of vinegar
- 1/2 teaspoon of laundry detergent
- A spray bottle
Directions:
Simply combine all the ingredients into the spray bottle. Shake gently to mix so to not create too many bubbles. You’re ready to clean your glass and windows!
How to Make a Hair Bow Picture Frame Holder
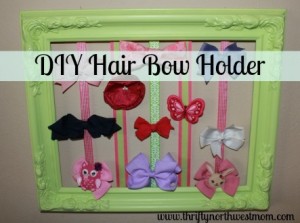
Picture via Thrifty NW Mom
Here is what you will need:
- Hot Glue
- Scissors
- Fabric (enough to cover the picture frame)
- Spools of ribbon (all sizes & textures)
- Spray paint (your choice of color)
- A sturdy picture frame
*Choose whatever size you want, I chose a big one because we have so many bows to put on it. I also have several smaller ones throughout the house. The basic wooden frames at the dollar store will work if you want to keep it simple. I found mine at a thrift store and it was falling apart when I bought it. See pic*
*You will also notice my fabric and ribbon aren’t matchy matchy :) You can choose a theme color, or you can be crazy. Ex. Hot pink and Zebra.


Here is a picture of my picture frame before I did any work to it. Yes, it was falling apart when I bought it! I still knew it would work for what I wanted.
The first thing you want to do is take your frame apart and sand it. After you sand it and wipe it down, spray paint it. I gave mine several coats and because it was an old frame with a lot of dings in it, I used a sand paper strip to give it a distressed looked after the paint dried.
The next step is to get your fabric and cut it to size. Place the fabric on the ground and place the inside of the frame (whether it’s the cardboard, glass, or wood) on top. You want to leave a few inches all the way around so it will fold over to the back where you will hot glue it into place.
After you have cut fabric, make sure the front of the fabric is facing the ground. Have the inside of the picture frame on top and start to hot glue. You will go through several hot glue sticks depending on the size of your frame. Put the glue on the edge and press the fabric to it.
Once the hot glue has dried and the fabric is secured, you can start putting the ribbon on. The purpose of the ribbon is for the hair bows to clip to it for show. You can place the ribbon horizontally, vertically, crisscrossed, or all of the above. Be creative. I did my ribbon crazy! Place a dab of hot glue on the back, put the end of the ribbon on it, then bring it across the front. Put another dab of glue on back and place the other end of the ribbon on it. Repeat this step until the frame is full of ribbon running across the front.
Place the center back into the frame and secure it. If you are using a small frame, place extra fabric or felt on the back to cover the ribbon ends. (It gives it a polished look!)
Now you are ready to add the bows! Check out my hair bow tutorials so you can constantly add to your collection!

