
How to Style Elsa’s Braid from Frozen Tutorial

Girls around the world are obsessed with Frozen, and most are particularly in love with Queen Elsa. Make your daughter/niece/neighbor’s or your own day by doing this Elsa’s braid tutorial from Makeup Wearables. It’s a lot simpler than it looks! She has another version of Elsa’s braid, videos, and TONS of gorgeous hair tutorials. I’m glad I discovered it! 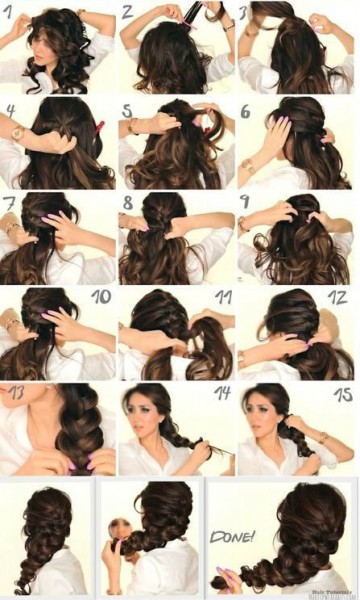
- If our hair is straight, you need to curl it to give it extra body and texture. They used a 1.5″ curling-wand and pinned the curls up to keep the curls stronger for longer.
- Apply hair powder to help with teasing later because it makes your hair sticky.
- Tease your roots everywhere really well, and make sure to use a strong hairspray to set it.
- (Optional) Attach hair-extensions and a couple of hair padding at the back of your head to create Elsa’s cartoon volume. If you don’t have a hair padding, just tease your hair more.
- Gather the back of your crown and make a half-up ponytail, but Leave out the front of your hair.
- Start a normal 3-strand braid with the half-up ponytail.
- Start adding in hair to the side strands to start a French braid: First section, take from the crown, and add it to the right strand, before crossing both strands over the middle strand. (See picture or video for clarification.)
- Take a section of hair from the left side and add it to the left strand, before crossing it over the middle strand.
- Repeat until all the hair is in one big braid.
- After putting the braid in an elastic band, pull out the sides to make the braid bigger.
- Grab a small piece of hair at the end with one hand, and pull up the braid with the other hand towards the crown to scrunch it. This will instantly create more volume in the braid and look more like Elsa’s.
- Tug on the sides to adjust the size and to make the braid even, then spray well with holding hairspray. TAKE PICTURES!!
DIY Glitter Sandals Tutorial

Have a pair of boring sandals that aren’t getting worn enough? This tutorial will teach you how to easily and very inexpensively glam your sandals up and make sure you’ve got sparkly feet this summer!
What You’ll Need:
- A pair of basic flat sandals
- Glitter (a large container of glitter in the color of your choice)
- Tacky glue (from the craft store)
- Foam brush
- Clear sealant
Directions:
- Use a brush to apply a layer of glue over the areas of the sandal you are going to apply glitter. Do 1 sandal at a time.
- Sprinkle glitter generously over the glued area while the glue is still wet. Be sure to put pour the glitter on the sandal over newspaper, paper, or other way to collect the leftover glitter.
- Gently shake off extra glitter. To keep the remaining glitter in place, spray on a light coat of clear sealant. Or if you’re out of sealant, use a light coat of clear fingernail polish.
- Repeat steps 1-3 on the other sandal.
- Allow your sandals to dry fully overnight, then admire your new glitzy footwear!
DIY Chevron Striped Flip Flops
![]()
I love flip flops! I have at least six pairs. The prices for plain colored ones can be only $1 in a lot of stores at various times of the spring and summer (Old Navy is especially known for this sale). If you want ones that have the footbed decorated, they’re going to be at the very least $5 each pair, but likely more. For only a few minutes of your time and some paint markers, you can can decorate your own flip flops to go with any outfit! If you need a visual tutorial, visit Teen Vogue.
What You’ll Need:
- One pair of foam flip flops (your choice of color)
- Blue painters or regular artist tape with a 3/4-inch width
- Scissors
- Oil-based paint markers in your choice of colors (Sharpie makes a large variety of colors and are easy to use)
Directions:
- Cut the painters or artist tape into 15 pieces about 1.5 inches in length. Make the cut at a right angle to the tape edge so that the pieces look like rectangles.
- Starting at the toe of the shoe, place a piece of tape at an angle. Press down firmly around all the edges to be sure it’s secure.
- Place the next piece of tape overlapping the first piece. The long side of the second piece should lay flat over the short side of the first piece. Press firmly around the edges again.
- Continue this tape placement across the shoe creating a chevron stripe.
- Leaving a small gap from the first stripe, start the next row the same way as the first. Continue adding rows and even spacing between each until you’ve covered the footbed.
- Once the footbed is covered, starting in the enter of the toe area of the side of the flip flop, line the edge of the tape with the edge of the footbed, and press tape firmly onto the “wall” or “lift” of the shoe. If the tape is wider than the height of the shoe, then make sure to fold it under the sole of your flip flop, not onto the footbed. Also wrap tape around the part of the strap that connects to the footbed.
- Color in the first stripe with one of the paint markers – you don’t have to be extraordinarily neat. Repeat on the rest of the stripes, alternating your colors or do them all one color. Make it your own!
- Allow the paint to dry, and go over any dull or missed areas with a second marker coat. Some lighter colors may need two coats, and you may want to do a second coat just to have it last a little longer under your feet. Allow to dry fully once the paint is how you like.
- Carefully pull the tape off your flip flop. Allow to dry for a couple of hours to make sure the edges that were touching the tape are fully dry, then enjoy! Try many different designs and color combinations! These would make great gifts, too.
Homemade Sidewalk De-Icer (Without Salt!)
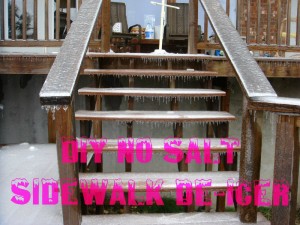
Rock salt or other ways to de-ice your sidewalks, driveways, and steps going into your house can get expensive! Here’s a way to make your own de-icer without the salt that erodes at the cement and wood.
For icy steps and sidewalks in freezing temperatures, mix 1 teaspoon of regular blue Dawn dishwashing liquid, 1 tablespoon of rubbing alcohol, and 1/2 of a gallon hot/warm water and pour over walkways. Just double or triple these ingredients for larger areas. They won’t refreeze!
DIY $3 Wall Projector
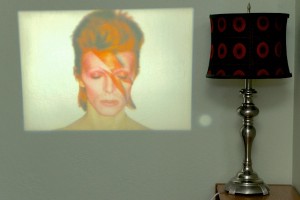
Watching a huge movie on the side of a garage or inside on a large wall is so much fun. It’s just like going to a drive-in, but not everyone has hundreds of dollars to buy one. Here’s a genius hack that only costs $3 and uses your smartphone. If you want visuals on this tutorial click that link above.
What You’ll Need:
- Shoebox or small box
- Small magnifying glass
- Paperclip
- Smartphone Stanley knife
- Duct tape
- Optional: Black paint
Directions:
- Figure out the center of your box. Place your magnifying glass in the middle of the “height side” of the box (where the heel or toes would be) and trace around the lens.
- Use the knife to cut out the circle.
- Stick the magnifying glass into the hole from the inside and duct tape it in securely. Tape all the way around the edges of the circle, too. This will prevent light from getting in.
- To prevent even more light from getting inside the box, paint the inside black until completely opaque and allow to dry.
- Poke a hole at the back of the box and stick your phone charger through it.
- Using a pair of pliers, bend the paperclip into a stand for your phone, or use one you already have.
- The picture of your phone will appear upside down on the wall since it’s reflected through the magnifying glass. To fix it: For an iPhone go to Settings > General > Accessibility and turn on Assistive Touch. Then touch the floating orb thing that’s on your screen and select Device > Rotate Screen. For Android, Screen Rotation Control app or the Ultimate Rotation Control app will flip it correctly.
- Dim the lights,place your phone on its stand in the box, then move the phone back and forth in the box to find your focus point.
- Close the box, turn out the lights, and watch the movie on the large, flat area of your choice! SIMPLE!