
How to Style Elsa’s Braid from Frozen Tutorial
Girls around the world are obsessed with Frozen, and most are particularly in love with Queen Elsa. Make your daughter/niece/neighbor’s or your own day by doing this Elsa’s braid tutorial from Makeup Wearables. It’s a lot simpler than it looks! She has another version of Elsa’s braid, videos, and TONS of gorgeous hair tutorials. I’m glad I discovered it! 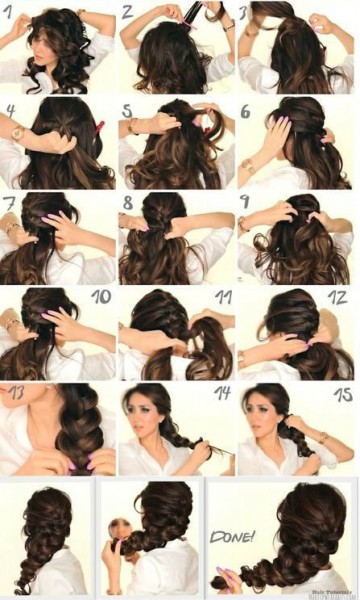
- If our hair is straight, you need to curl it to give it extra body and texture. They used a 1.5″ curling-wand and pinned the curls up to keep the curls stronger for longer.
- Apply hair powder to help with teasing later because it makes your hair sticky.
- Tease your roots everywhere really well, and make sure to use a strong hairspray to set it.
- (Optional) Attach hair-extensions and a couple of hair padding at the back of your head to create Elsa’s cartoon volume. If you don’t have a hair padding, just tease your hair more.
- Gather the back of your crown and make a half-up ponytail, but Leave out the front of your hair.
- Start a normal 3-strand braid with the half-up ponytail.
- Start adding in hair to the side strands to start a French braid: First section, take from the crown, and add it to the right strand, before crossing both strands over the middle strand. (See picture or video for clarification.)
- Take a section of hair from the left side and add it to the left strand, before crossing it over the middle strand.
- Repeat until all the hair is in one big braid.
- After putting the braid in an elastic band, pull out the sides to make the braid bigger.
- Grab a small piece of hair at the end with one hand, and pull up the braid with the other hand towards the crown to scrunch it. This will instantly create more volume in the braid and look more like Elsa’s.
- Tug on the sides to adjust the size and to make the braid even, then spray well with holding hairspray. TAKE PICTURES!!
Leave a Comment