
DIY 4th of July Pinwheels
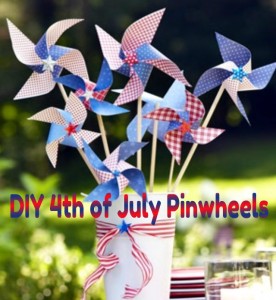
Sparklers can cause some pretty nasty burns on little hands, so instead of sparklers this year, make them these pretty 4th of July pinwheels – or just make them for fun and decorations!
What You’ll Need:
- Double-sided patriotic patterned scrapbook paper
- Wooden dowels
- Straight pins
- Beads
- Hot glue gun and hot glue
- Double-sided tape
- Scissors
- Star stickers
- Spray adhesive (if needed)
- (Optional: Plain white scrapbook paper to decorate yourself or by kids)
Directions:
- To create dual-sided pinwheels, gather your double-sided scrapbook papers in patriotic colors, or create your own (better yet, have the kids decorate them and have them involved in the celebration!). Use the spray adhesive to adhere them together.
- Cut paper into square shapes – 8-in and 6-in squares – to create different sized pinwheels.
- Fold squares in half diagonally to create a triangle, then press to crease.
- Open the triangle and fold diagonally the opposite way, then press to crease.
- Open up the triangle and flatten out the square.
- Cut along each diagonal fold three-quarters of the way to the center.
- Pull the tip of every other corner toward the center. Use double-sided tape or white craft glue to adhere the first tip to the center, then each folded-in tip on top of each other. When you finish, you’ll have the pinwheel shape.
- If you want your pinwheel to spin, skip to step 10. If not and will be used for decorations only, hot glue the pinwheel to your wooden dowel. Skip cutting down wooden dowels from the hardware or craft store and use inexpensive flag dowels (removing the flags, of course).
- Finish your pinwheel with a decorative star sticker in the center.
- If you want your pinwheel to spin, you’ll need to push a pin through the center (a straight pin works), then a bead beneath the pinwheel. You’ll drive the pin into your dowel with a hammer.
- If needed, fold over (or cut and then fold over) any part of the pin that sticks through to the back to prevent injuries.
DIY Freeze Pop Cozies Lightsabers
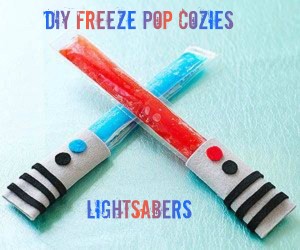
Feel the force with these adorable felt cozies to keep your little ones’ hands warm and clean(ish) while they are enjoying their freeze pops this summer with this quick tutorial from Family Fun. Instructions are for 1 cozy, and they’re very simple, so just repeat with as many as you’d like to make!
- Cut a 3″x4″ rectangle from gray felt.
- Fold it over a freeze pop and use fabric glue to seal the side and bottom edges.
- Clamp the fabric closed with binder clips or clothes pins (optional, but gives a stronger hold to the glue).
- Slip the felt off the pop.
- Glue on stripes and dots of black and colored felt (or use fabric paint if you want it even simpler!).
- Allow to dry fully, then you’re able to battle the dark side! Enjoy!
Recipe: Teddy Bear Beach Bums “Dirt” Cups

We all loved dirt cake growing up, the one with crushed Oreos and gummy worms, but here is a summertime change to the usual dirt cake that everyone will love!
All you have to do is using clear plastic cups, put use blue pudding or jello on the bottom half of the cup. Top the blue dessert with crushed vanilla cookies or vanilla Oreos ( looks like sand). Add sour tape candy cut into strips (the picture shows Airhead Extremes Sour Belts) with a Teddy Graham lying on top enjoying the sunshine. Add a cocktail umbrella and enjoy!
Recipe: Lucky Rainbow Chex Mix

I saw this picture floating around my Pinterest page and I said literally aloud in front of my kids, “Oh no!” What I mean by that is, “Oh, no. That looks so amazing and if I make it, then it won’t make it beyond a day in this house.” So, instead, here’s the recipe from Tablespoon for YOU ALL. Lucky you, and just in time for St. Patrick’s Day!
Ingredients:
- 1 box (11.5 oz) Lucky Charms® cereal
- 6 cups Rice Chex® or Corn Chex® cereal
- 2 bags (12 oz each) white vanilla baking chips (4 cups)
- 1/4 cup multicolored candy sprinkles
Directions:
- Pour box of Lucky Charms and pick out all the marshmallows (about 2 cups). DO NOT EAT THEM. Okay, you can eat a couple. But set aside the rest to add to the mix later. Measure 2 cups of the remaining Lucky Charms cereal (without the marshmallows) into large bowl, add Chex cereal.
- Line cookie sheet with foil or waxed paper. In medium microwavable bowl, microwave white vanilla baking chips uncovered on High about 2 minutes, stirring every 30 seconds, until chips can be stirred smooth. Pour over cereal mixture in large bowl; toss to evenly coat.
- Spread mixture in single layer on cookie sheet. Immediately sprinkle with candy sprinkles. Let stand until set, about 20 minutes. Gently break up mixture; toss in reserved marshmallows. Store in airtight container and should last about a month (yeah right!).
Recipe: Pretty Princess Heart Cookies
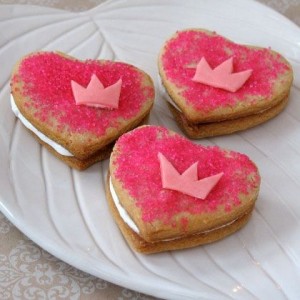
Fit for any princess (or prince!), these adorable princess cookies are perfect for Valentine’s Day or princess-themed party.
Ingredients:
- Batch of sugar cookie dough, homemade or store-bought (Note: For store-bought dough, you may need to add flour to stiffen it so the cookies will hold their shape while baking.)
- Rolling pin, spatula, and cooling rack
- Heart-shaped cookie cutter (a 2 1/4-inch-wide cutter works best)
- Pink colored sugar
- White or pink cookie icing
- Butter knife
- A few pieces of pink taffy or pink StarBurst candies
- Waxed paper
- Kitchen scissors or knife
Directions:
- Roll out the cookie dough and cut out an even number of heart-shaped cookies. Sprinkle half of the cookies with colored sugar. Bake the cookies according to the recipe or package directions.
- Transfer the baked cookies to the rack to cool.
- Turn one of the plain cookies upside down so that the flat bottom faces up. Spread on cookie icing and then set one of the sugar-topped cookies down on top of it. Repeat this step until you’ve assembled all of the sandwich cookies.
- Now it’s time to crown off the cookies with Tiana’s special valentine emblem. Use the rolling pin to roll the taffy or Star Burst candies between waxed paper until it is very thin. (If the candy is too hard to roll, you can soften it in the microwave for 4 to 5 seconds.) Then use kitchen scissors or a knife to cut out a small candy crown for each cookie (a parent’s job).
- Top each cookie with a candy crown, using a small dab of cookie icing to hold it in place.