
Recipe: Valentine’s Day Trail Mix

Easy to make and can easily be modified for food allergies, Valentine’s Day trail mix is a healthier alternative to bagged candy for handing out to friends or to have at a party.
All you need is Valentine’s M&Ms, Sweethearts Conversation Hearts, pretzels, raisins, caramel corn, and peanuts (if allowed). Other options include marshmallows, Chex Mix, and Cheerios.You can substitute for Gluten-Free or Dairy-Free versions of these foods instead and this snack will still be a hit. Mix all together, fill in bags of your choice, and VOILA! Done! :)
Recipe: Valentine’s Day Marshmallow Pops
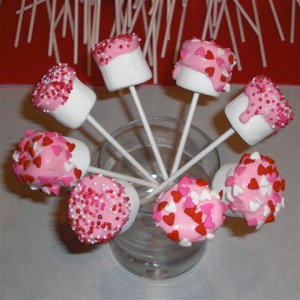
Change up the regular Valentine’s hearts lollipops or cake pops, and make these super simple Valentine’s Day Marshmallow Pops in just a few minutes. Would be great for a child’s school party, too!
Just stick a lollipop stick through a marshmallow, then dip it into melted chocolate (add food coloring to white chocolate for different colors). Before it hardens, dip the marshmallow with the chocolate into different sprinkles, then put it into a glass, stick down. Do this over and over again, and when you put it into a glass, be sure they don’t touch each other (like in the picture). That’s it, it’s that simple! Kids would love to decorate their own marshmallow pops. Do this for birthdays, Easter, Christmas, any holiday!
Recycled Magazine Bows Tutorial
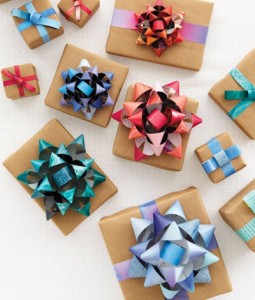
Instead of recycling your magazines, reuse them! Here is an easy tutorial for bows that you can use year round.
What You Need:
- 1 page of magazine per bow you plan on making
- Double-sided tape
Directions:
- Cut the page lengthwise into nine 3/4-inch wide strips of these heights: 3 at 11 inches long, 3 at 10 inches long, 2 at 9 inches long, and 1 at 3 1/2 inches long.
- Twist each strip to form loops at both ends and make a circle out of the smallest.
- Secure the ends with double-sided tape.
- Layer and stick, starting with the longest strips. End with the circle in the center.
Thanks to Whole Living for the tutorial. For pictures of each step, go here.
DIY Holiday Serving Tray

Don’t spend $20 on serving trays for the holidays! You can make your own standing serving trays for less than $2 each (seriously!), and you can decorate them the way you want! You can also give them away with your cookies to friends and neighbors. It’ll blow their mind that you “spent so much” even though you know you didn’t! :)
Just got to Dollar Tree or your local dollar store and look for a matching bowl and plate (or mix and match!). Turn the bowl upside down so the bowl is open to the table and hot glue the bottom of the bowl to the bottom of the plate. Let it sit for a minute, and that’s it!
Thanks to The Tip Garden for the idea!
Birthday Name Cake
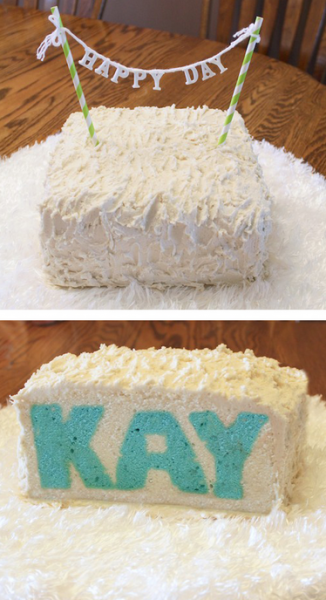
How cute is this idea! Personalize your next cake with the name of that special birthday person. It looks complicated, but it is actually pretty simple. Get step by step instructions HERE.
Thanks, Project Denneler for this awesome idea!