
DIY Duct Tape Rose Pen Tutorial
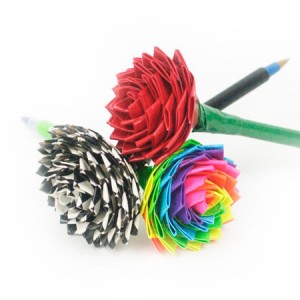
If you aren’t aware, there are dozens of designs in duct tape now. People are using it more than for just fixing pipes – they’re making projects like these really cute flower pens! This is like origami for duct tape. Make these for gifts, fun teacher presents, for decorations, and with tons of different combinations! Thanks to CraftFoxes for the tutorial. There is a visual tutorial if it will help with your craft! What You’ll Need:
- Green duct tape (for stems and leaves)
- Designed or colored duct tape (for petals)
- Plain pen
Directions:
- Take your pen and cover it in green tape lengthwise. This works best if you roll the pen across the tape, sticky-side up.
- To make petals, cut several strips of 2-inch long squares out of the colored or designed tape. Fold one edge over itself sticky side up, leaving some stickiness exposed on the side and bottom. It ends up looking like a sail on a boat because of the sticky edge left out instead of a perfect triangle.
- Take the other edge and fold it over, leaving only stickiness on the bottom of the strip.
- Wrap the petal tightly around the top of the pen stem.
- Repeat steps 2-5 with duct tape, wrapping the petals around the top. Continue until you’ve reached the size of rose you want.
- For the leaves under the base of the rose, repeat steps 2 – 4 with the green duct tape. Wrap these pieces around the stem at the base of the flower to cover up the tape edge.
How to Clean a Microfiber Couch
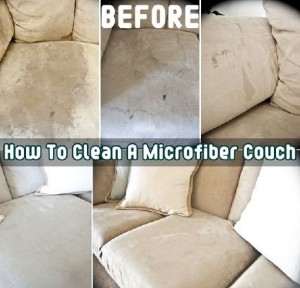
We have microfiber couches we bought right after our oldest daughter was born. She had severe GERD, then food issues, then twins were born right after that… anyway, our couches are beyond help. We need new ones, but maybe if we had seen this awesomeness, we could have saved our expensive microfiber couches, that we were assured were stain resistant. HAHA! Save yours after the stomach flu! Here’s how, for a couple of bucks with all items you can get at the dollar store!:
What You’ll Need:
- Empty spray bottle (you can get these at the dollar store)
- Several WHITE sponges (ONLY white – any other color will transfer onto your couch and make a worse stain)
- WHITE bristle brush scrubber (ONLY WHITE – see above)
- Plain rubbing alcohol (water stains microfiber, as we know, and alcohol evaporates faster so it won’t stain)
Directions:
- Pour alcohol into spray bottle, then spray the rubbing alcohol onto the microfiber, completely saturating the stained area.
- Using the white SPONGE (not brush), start scrubbing the stain right away. Scrub hard!! It will take muscle to get the stain out of microfiber. You will start to see the stain coming off onto the white of the sponge if you’re doing it well.
- If the sponge is dirty on both sides, move on to another, clean white sponge. If you continue to use a dirty one, you’ll just transfer the stain back into the microfiber.
- Once the stain is onto your sponge and off the fabric (using your best guess since it will be wet and hard to see if it’s stain or just wet), allow the fabric to dry fully. It will be hard to the touch, but that’s okay. Leave it for now.
- If the area that was stained is still dirty, repeat #1-4 until the stain is completely gone.
- Once the stain is gone and fabric is completely dry, using a swirling motion, fluff back up the microfiber fabric until it looks normal again.
EASY right? Almost too easy. I am so glad to have found this and happy to be able to share it with you! :)
Homemade Air Freshener Gel

This homemade air freshener gel is so easy to make and would make a great gift!
What You’ll Need:
- 3-4 jars, capable of holding 1/2-cup of fluid each (this site used 4 baby food jars which hold 1/2 cup of mixture)
- Food Coloring
- Essential Oil or Room Fragrance drops
- 2 cups of water, divided into two 1 cup amounts
- 4 envelopes of unflavored gelatin
- 1 tablespoon of salt
- Kitchen equipment: whisk, a pan to boil water, funnel, and spoons
Directions:
- Pour a few drops of food coloring into each jar.
- Pour 1 teaspoon (minimum) of essential oil into each jar. The more you pour, the stronger the scent.
- Bring 1 cup of water to a rapid boil.
- Add all 4 of the gelatin to the water and whisk until fully dissolved (about 1 minute).
- Add the other cup of water to the pan and the salt. Stir to dissolve the salt.
- Remove the pan from the heat. Pour the mixture into the jars within a couple of minutes of removing from the heat.
- Use a funnel to pour an equal amount into each jar.
- Stir the mixture quickly before it solidifies.
- Let cool and solidify for at least 24 hours. The gel air freshener should last between 4-6 weeks and you can do it again!
Thanks to Instructables for the awesome idea and instructions!
DIY 4th of July Pinwheels
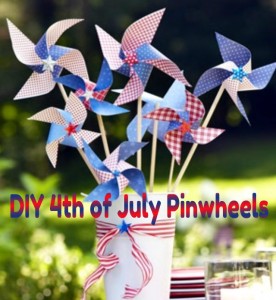
Sparklers can cause some pretty nasty burns on little hands, so instead of sparklers this year, make them these pretty 4th of July pinwheels – or just make them for fun and decorations!
What You’ll Need:
- Double-sided patriotic patterned scrapbook paper
- Wooden dowels
- Straight pins
- Beads
- Hot glue gun and hot glue
- Double-sided tape
- Scissors
- Star stickers
- Spray adhesive (if needed)
- (Optional: Plain white scrapbook paper to decorate yourself or by kids)
Directions:
- To create dual-sided pinwheels, gather your double-sided scrapbook papers in patriotic colors, or create your own (better yet, have the kids decorate them and have them involved in the celebration!). Use the spray adhesive to adhere them together.
- Cut paper into square shapes – 8-in and 6-in squares – to create different sized pinwheels.
- Fold squares in half diagonally to create a triangle, then press to crease.
- Open the triangle and fold diagonally the opposite way, then press to crease.
- Open up the triangle and flatten out the square.
- Cut along each diagonal fold three-quarters of the way to the center.
- Pull the tip of every other corner toward the center. Use double-sided tape or white craft glue to adhere the first tip to the center, then each folded-in tip on top of each other. When you finish, you’ll have the pinwheel shape.
- If you want your pinwheel to spin, skip to step 10. If not and will be used for decorations only, hot glue the pinwheel to your wooden dowel. Skip cutting down wooden dowels from the hardware or craft store and use inexpensive flag dowels (removing the flags, of course).
- Finish your pinwheel with a decorative star sticker in the center.
- If you want your pinwheel to spin, you’ll need to push a pin through the center (a straight pin works), then a bead beneath the pinwheel. You’ll drive the pin into your dowel with a hammer.
- If needed, fold over (or cut and then fold over) any part of the pin that sticks through to the back to prevent injuries.
DIY Spoon Planter Hooks
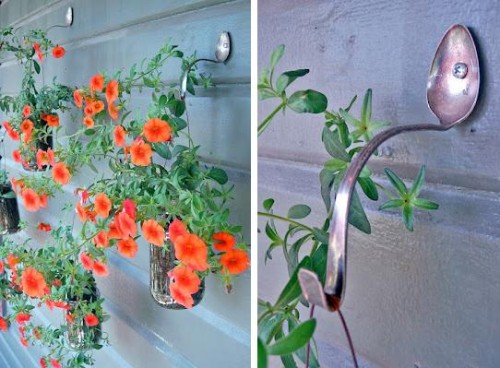
Looking for a creative way to hang some small plants either outside or indoors? Check out these DIY Spoon Planter Hooks. Learn How to bend the spoons properly from WikiHow HERE. Then hang in desired location and display small plants around your house! What a wonderful idea. May be a great way to display your herbs in the kitchen! Have fun with it!