
DIY Easy Fall Rosette Wreath
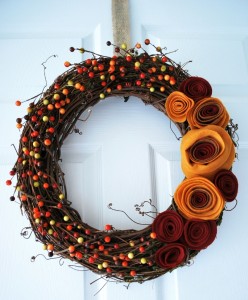
Make this colorful seasonal wreath for less than $10!
Here’s how:
- Start by downloading this rosette template from to cut swirl shapes out of felt.
- Tightly roll the ends of each flower together and secure them with double-sided tape.
- Arrange your rosettes on a grapevine wreath and attach them with a hot glue gun.
- Add sprigs of fall berries and secure with hot glue to complete the look.
For the full tutorial, visit Crafting Mom!
Fall Owl Wreath Tutorial
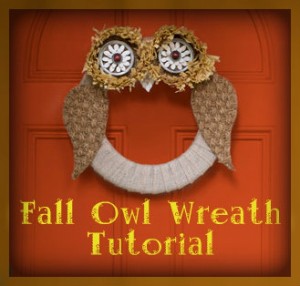
Try something new for your Fall decorations this year by making this simple owl wreath from Country Living. Here’s how:
Wreath base: Wrap burlap ribbon around a 16″ Styrofoam wreath form.
Eyes:
- For the first eye, using utility scissors, cut a 5″ circle from a sisal linen doormat.
- Trim a 2″ strip from the edge of a raffia table skirt, then hot glue along the outer edge.
- Next, hot glue the outer ring of a 4 1/2″-inch Mason jar lid inside the raffia, securing it to the sisal circle.
- Hot glue a metal bottle cap at the center of the ring and glue the circle with dried pumpkin seeds.
- Hot-glue a red wood bead inside bottle cap.
- Repeat for second eye.
Wings: Cut two 8″x 5″ teardrop shaped pieces from the sisal linen doormat.
Beak: Cut a 3″ triangle from the doormat, then hot glue with dried pumpkin seeds.
Assembly: In this order, attach the beak, then the eyes, and then wings, with hot glue. Enjoy your new Fall wreath!
DIY Easy Acorn Napkin Ring Tutorial
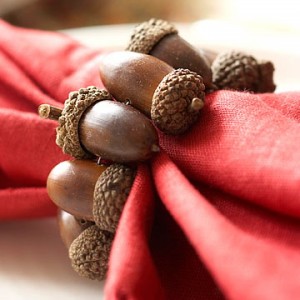
Now that Halloween is over, it’s time to start thinking of how you want to decorate for the rest of Autumn and for Thanksgiving!
This super simple napkin ring from BHG is made from real acorns and takes only a couple of minutes to make. Doesn’t it look really difficult? It will impress guests for sure, plus they can be used year after year!
To make this natural napkin ring, drill tiny holes through the sides of nine or 10 acorns. Using wire, thread the acorns together, alternating the acorns top-to-bottom so they nestle together tightly. When you get to the end, just tie the wire in a little twist and hide behind an acorn. All set and ENJOY!
Easy Dia de los Muertos (Day of the Dead) Lantern Tutorial
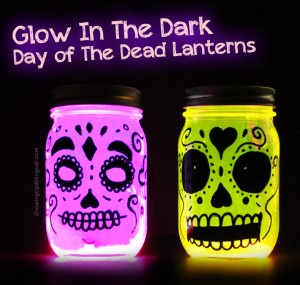
As many know, Dia de los Muertos (or the Day of the Dead) is celebrated on November 1st every year in Mexico. It’s been celebrated for over 4,000 years – long before Mexico existed! It is a celebration of life and it is a loved tradition with beautiful decorations and altars, parades and music.
If you want to teach your children about Dia de los Muertos (or learn about it yourself) this website is full of information on the history, traditions, and current celebrations. Then create these Day of the Dead lanterns to celebrate the lives of loved ones in your life that have passed on with this tutorial from Growing Up Bilingual.
What You’ll Need:
- glass mason jars
- black sharpie or other permanent black marker
- glow in the dark sticks
Directions:
- To make these lanterns, just paint a fun sugar skull or calavera design on the front of the mason jar. You can Google ideas for inspiration.
- Cut a glow in the dark stick and pour the glow in the dark liquid inside the mason jar. Close the jar tightly and shake it making sure that the liquid covers all the inside of the mason jars. Put them out in the dark and enjoy the glowing calaveras!
Note: Make sure that you use gloves when you cut the glow in the dark sticks and do not let children handle them or cut them as the chemicals inside the glow stick can irritate skin and eyes. Some glow sticks also have glass inside so be careful when handling as there might be glass shards inside the glow stick. Proper safety materials like safety glasses and gloves should be used when recommended to protect eyes and skin.
DIY Halloween “Preppy Pumpkin”
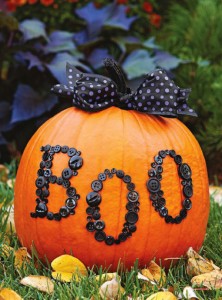
If you don’t want to carve your pumpkin or you have a fake pumpkin to decorate, here’s a great, simple, and very pretty idea that you can imitate and create your own version with different colors and words. Thanks to Pomp & Circumstance Events for the cute idea. All instructions below are for the pumpkin in the picture with all black decorations.
What You’ll Need:
- Pumpkin (real or fake in size of your choice)
- Ribbon (black or designed)
- Black paint (optional)
- Sharpie (black)
- Buttons (preferably black)
- Hot glue gun & extra sticks
- Scissors
Directions:
- Write a word/phrase across your pumpkin of your choice. Write in size and design you want the letters to look.
- Use hot glue gun to glue buttons on top of the word/phrase you wrote in marker. Try to get buttons as close together as possible.
- (Optional) – Paint the stem black, then wait for paint to dry fully.
- Cut ribbon the length of the pumpkin
- Tie ribbon in a bow around the stem and secure with hot glue.