
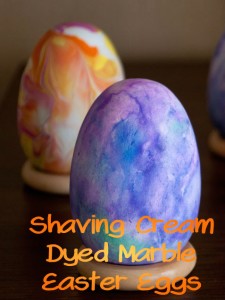
DIY Shaving Cream Dyed Marble Easter Eggs
I haven’t dyed eggs with my kids yet. It seems like Easter flew up on us this year. If we don’t make Kool-Eggs, then I think we are going to do Marbleized Dyed Easter Eggs. Inexpensive, fast, pretty, and very pretty!
NOTE: Dyeing your eggs with shaving cream is for decoration ONLY since egg shells are permeable and you shouldn’t eat shaving cream. If you like to eat your eggs after dyeing them, you can do marbleizing with whipped cream instead of shaving cream. Whipped cream is a lot more expensive than buying cheap shaving cream at a dollar store, so this is an optional switch.
What You’ll Need:
- Completely cooled hard boiled eggs
- Food coloring drops in different colors
- Medium to large baking sheet, baking pan, or other container with sides
- Cheap shaving cream (or whipped cream in an aerosol can)
- Spoon
- Toothpicks
- Paper towel
- Plastic gloves, sandwich baggies or plastic wrap
- Paper plate or cheap plastic storage container (that you don’t care will get dyed)
Instructions:
- Spray shaving (or whipped) cream and spread out evenly on a cookie sheet (or other container) with a spoon.
- Dribble food coloring across the surface. Neon food coloring makes cooler looking eggs.
- Use toothpicks to swirl the colors around in the shaving cream. Do it totally randomly and be sure to pick up and restart lines into the cream. This will make the best designs.
- Take a dried, cooled hard boiled egg, and roll it around in the cream. You can use plastic gloves, or use sandwich baggies or plastic wrap as gloves to help keep the dye consistent, keep finger prints off the eggs, and will protect your fingers from dye.
- Add more cream and/or dye as needed throughout the dyeing process.
- Sit colored eggs to the side on a paper plate or in a plastic storage container and allow them to dry for at least 2 hours, but best is overnight to 24 hours. DO NOT WIPE THEM OFF, leave them in the cream and dye. If you used whipped cream, be sure to put them in the refrigerator while they sit.
- After allowing the eggs to sit, wipe the cream and dye off with paper towel. You can store in the original egg carton in the fridge or set them out as decorations.
Thanks to TotSchool for the picture!
Kool-Eggs: Using Kool-Aid to Dye Easter Eggs
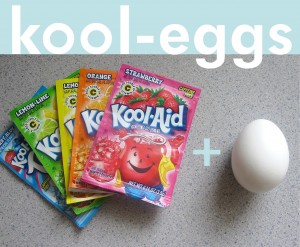
Skip the expensive and hard to use egg dying kits this year. The dye kits usually use vinegar or tablets and you have to wait to dissolve. Use just plain ol’ Kool-Aid! You can usually find Kool-Aid packets on a sale for 5 for $1 (usually less!), they smell sweet instead of chemically. All you need are hard boiled eggs, a spoon, tongs, or another way to get the eggs out of the dye, lots of paper towels, and a cup or bowl for each color. To make the dye: 2/3 cup of water for each packet of Kool-Aid and mix together.
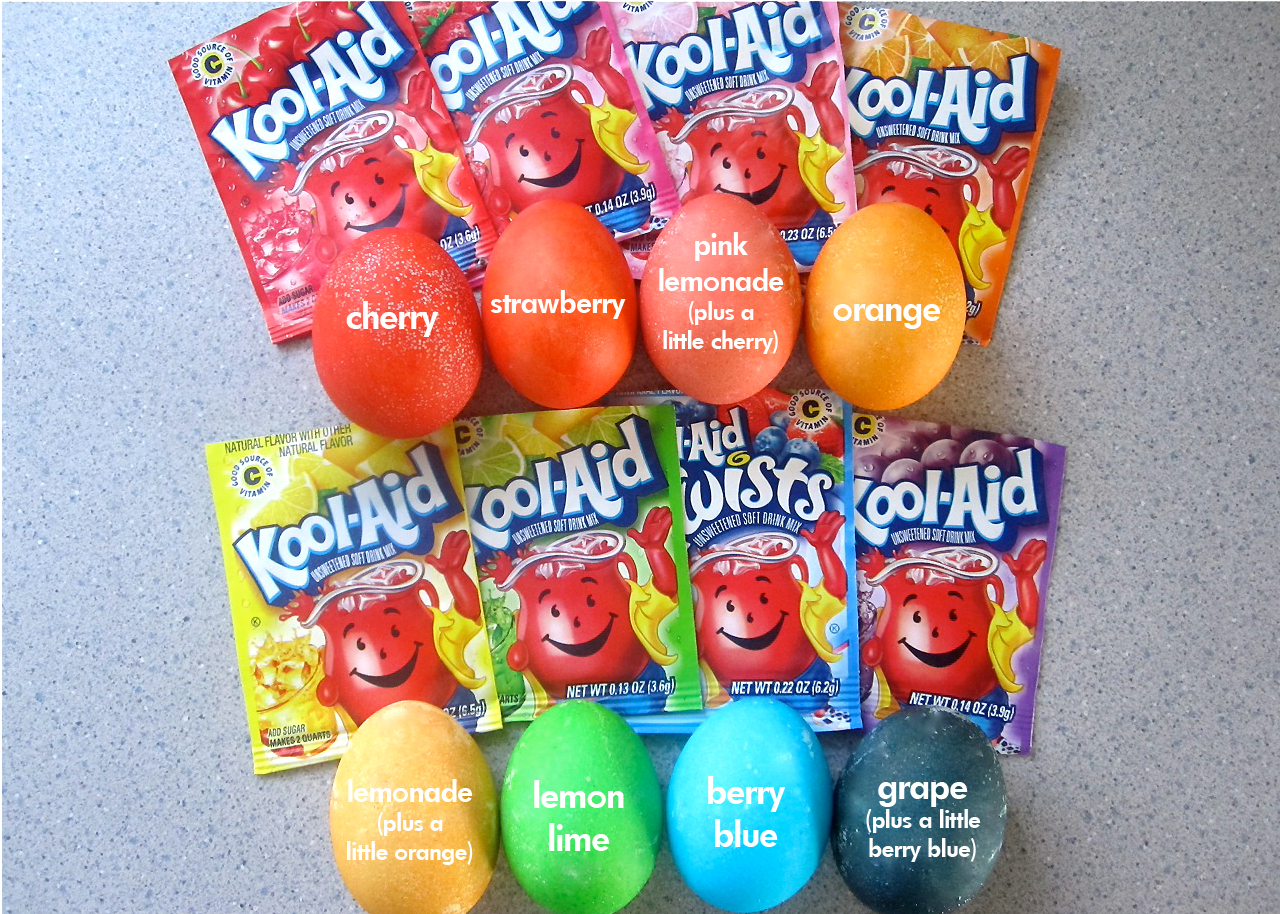
For some aid with colors, use the tutorial from Hey Jen Renee’s blog and her trial and error with the colors. Some will come out more colorful than others and some need to be mixed with other colors to get a color at all. See pic below and have fun!
DIY Four-Leaf Clover Door Hanging
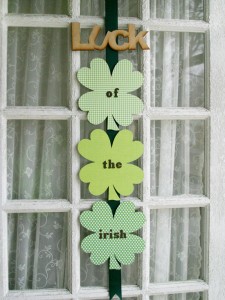
It doesn’t seem like it’s possible, but St. Patrick’s Day is only about a week away! Get your home a little bit more into the Irish spirit with this really cute and easy door (or wall if you’d rather) hanging from over at Good Housekeeping.
At your local craft store, buy either 3 or 4 wooden shamrock shapes (Note: If you can’t find a wooden “LUCK” cutout, just buy a 4th shamrock and follow the directions for how to make them). With a variety of different patterned green scrapbook paper, use spray adhesive to attach the front of the shamrock to the back of the scrapbook paper and allow to dry. Cut the shamrock out of the paper using a utility knife or scissors, then using a foam brush, apply Mod Podge over the front of the shamrocks to seal in the paper, then allow to dry. Using green scrapbook letters, spell out Luck (if needed), of, the, Irish. Last, attach the finished shamrocks onto the long piece of green ribbon using several glue dots to hold them on.
Except for waiting for the glue and Mod Podge to dry, this should only take a few minutes and can last for years!
Easy DIY Scrappy Wreath

Looking to make a spring wreath? Better yet, trying to think of a way to save some of your child’s favorite baby outfits and other stuff? This DIY scrappy wreath is the answer! Takes only a few minutes and a few bucks.
Go to the craft store and get a plain straw wreath or foam wreath. You can also save a couple of dollars and go to the hardware store and buy foam tubing, cut it into the size you want, the duct tape the two ends together.
Cut fabric out of your favorite old clothing, blankets, ribbon, or other items. Hot glue them around the wreath securely. Keep going until all of the foam or straw is covered.
Staple, tack, or glue on buttons, flowers, pacifiers, pins, earrings, necklaces, or any other decorative item you want to the wreath.
When the wreath is how you want it, you can either hang it as is, or use a long piece of ribbon or fabric, stick it through the center, and tie it in a a bow to use as the hanger.
Thanks to BluKatKraft for the picture!
DIY $3 Wall Projector
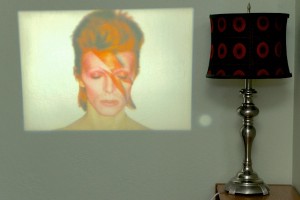
Watching a huge movie on the side of a garage or inside on a large wall is so much fun. It’s just like going to a drive-in, but not everyone has hundreds of dollars to buy one. Here’s a genius hack that only costs $3 and uses your smartphone. If you want visuals on this tutorial click that link above.
What You’ll Need:
- Shoebox or small box
- Small magnifying glass
- Paperclip
- Smartphone Stanley knife
- Duct tape
- Optional: Black paint
Directions:
- Figure out the center of your box. Place your magnifying glass in the middle of the “height side” of the box (where the heel or toes would be) and trace around the lens.
- Use the knife to cut out the circle.
- Stick the magnifying glass into the hole from the inside and duct tape it in securely. Tape all the way around the edges of the circle, too. This will prevent light from getting in.
- To prevent even more light from getting inside the box, paint the inside black until completely opaque and allow to dry.
- Poke a hole at the back of the box and stick your phone charger through it.
- Using a pair of pliers, bend the paperclip into a stand for your phone, or use one you already have.
- The picture of your phone will appear upside down on the wall since it’s reflected through the magnifying glass. To fix it: For an iPhone go to Settings > General > Accessibility and turn on Assistive Touch. Then touch the floating orb thing that’s on your screen and select Device > Rotate Screen. For Android, Screen Rotation Control app or the Ultimate Rotation Control app will flip it correctly.
- Dim the lights,place your phone on its stand in the box, then move the phone back and forth in the box to find your focus point.
- Close the box, turn out the lights, and watch the movie on the large, flat area of your choice! SIMPLE!