
Conversation Hearts Valentine’s Wreath Tutorial

Create this super simple Valentine’s Day themed wreath in just an hour or so and about $10-$20!
What You’ll Need:
- Circular foam form with four flat sides
- Pink tissue paper
- Hot glue
- 4 bags of Sweethearts Conversation Hearts candy (or two 1 pound bags)
- Big pink ribbon (or other ribbon to hang the wreath on)
Directions:
- Wrap the tissue paper around the foam and hot glue it on to secure it. This covers the boring white foam.
- Start hot gluing the conversation hearts in one row and go all the way around the wreath. It is easier and neater to do one row than to go three across.
- Do this as many times as it takes to cover the wreath completely, but leave the back that will be against the wall or door without candy on it.
- Tie a ribbon around and through the circle to hang, and that’s it!
Thanks to Crafts & Such for the picture and tutorial!
Scrabble Word Art Craft Tutorial

Run over to the dollar store, craft store, or thrift store to grab a picture frame, Scrabble tiles (you can find them in a used game or buy 100 Scrabble Tiles on Amazon for less than $6 and have them on hand for multiple projects!), hot glue, and scrapbook paper to make this super easy and SUPER CUTE craft. You can make them for any holiday, but this one is for Valentine’s Day in particular.
Directions:
- Put the scrapbook paper of your choice in the frame and put the glass over it.
- Hot glue the tiles of your word choices in lines on TOP of the glass. This makes it easy to change out the paper for different times of the year if you’d like.
- Hang and enjoy!
Thanks to Embellishing Life for the awesome craft idea!
DIY Peppermint Candy Platter
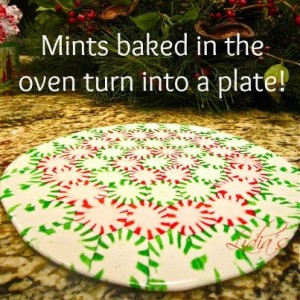
Did you know you can take cheap peppermint candy (or ANY hard candy of any type) and make a platter? It’s amazing and SO EASY! Here’s what you do:
- Line a pizza pan with parchment paper.
- Open peppermint candies and arrange them in whichever pattern you’d like on the parchment paper.
- Bake at 350 for 13-17 minutes.
- Pull it off the pizza pan after 2-3 minutes & put it flat on the counter to cool (still on the parchment paper).
- Allow to cool fully and pull off the paper. VOILA! Plate made from candy.
DIY Snowball Wreath
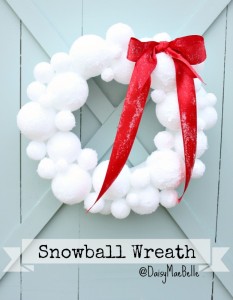
Do you have a ton of snow? Do have no snow and wish you did? Either way, this super easy snowball wreath will be the perfect decoration for the whole winter season!
What You’ll Need:
- styrofoam wreath form
- assorted styrofoam balls (the picture shows 8 large, 4 medium, 20 small, and 10 tiny)
- fake snow
- decoupage medium
- decoupage brush
- red satin ribbon
- low temp glue gun
Directions:
- Using the low temperature glue gun, glue the large snowballs to the wreath form, then fill in with the medium, then small.
- Add a thick layer of decoupage to the styrofoam. Make it really thick in some places.
- Add the fake snow over it.
- Add a bow and you can add a little decoupage and fake snow on it to make it look more realistic if you’d like!
“Melted Snowman” Ornament
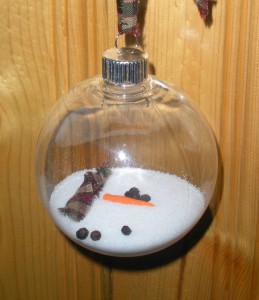
This very inexpensive gift and decorating idea is so funny! Make a “melted” snowman ornament for your kids’ teachers, neighbors, whoever else you can think of for just a couple of dollars and a few minutes of your time. Here’s how:
What You’ll Need:
- Table salt (for the “snow”)
- Peppercorns (for the “eyes” and “mouths”)
- Orange fimo molding clay (for the carrot nose – can be purchased at craft stores)
- Plastic or glass clear ornament bulbs
- Plaid fabric (optional – for a “scarf”)
- String, yarn, or anything you’d like to use to hang the ornament
- Funnel
- Drinking cup the same width as your ornaments
- Baking sheet
Directions:
- Roll out the fimo clay (you can also use playdoh or salt dough) and make carrot shapes. Cut the thicker end with a knife to make it look like a carrot (less rounded). Bake the fimo at 230 degrees for 30 minutes. Let cool.
- While waiting for the clay to harden, prop the ornaments into a drinking cup (so they can sit up on top without rolling). Poor in 1/4 cup of salt (approximately).
- Toss in 7 or so peppercorns on top of the salt.
- Cut a small piece of scarf-shaped fabric and throw into the ornament (optional).
- Once cooled, put a “carrot” into the ornament, then tie the ornament on a string.
That’s it! SO SIMPLE and so cute. The snowman parts should stay on top of the salt. Thanks to Eyeballs by Day, Crafts by Night for the tutorial!