
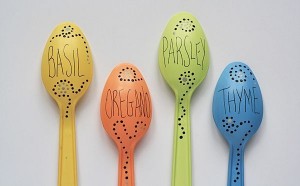
DIY Plastic Spoon Garden Markers
I love gifts that are handmade, useful, cute, and CHEAP! This Plastic Spoon Garden Markers tutorial is written to look just like their spoons, but it would also be very cute to use kids’ decorations and handwriting – for a gift for grandparents or parents, it would mean more that way. If you don’t have little ones handy, just follow the tutorial below. For visuals, click the link above.
What You’ll Need:
- 4 white plastic spoons
- Multi-Surface Satin paint in Gray, Brown, plus 4 others in your choice of colors (Note: You can use any type of paint if you choose to use clear top coat spray instead)
- Sandpaper
- Paintbrush
- Toothpick
- Fine point black art pen
- Clear enamel top coat spray (MUST for regular paint, or Optional: To seal in finished paint for the multi-surface)
Directions:
- Sand each spoon to knock off the shine. This will make the spoon easier to paint.
- Paint each spoon with a thin coat of paint, leaving the bottom 2″ of the handles unpainted. This is where the spoon will go into the ground.
- When dry, paint a second coat and allow to dry completely.
- Use art pen to write herb names on the spoons.
- Use a toothpick to dot on designs using the gray and brown paints.
- Spray with top coat sealing spray on both sides and all areas of the spoon, paying special attention to the deeper parts and painted areas. Allow to dry for an hour, then spray again.
- Let these dry for a full 48 hours before exposing to the outdoor elements.
Leave a Comment