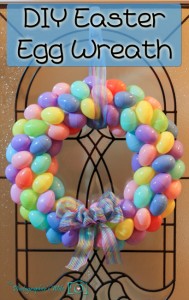
DIY Plastic Easter Egg Wreath

This wreath was featured on the Good Housekeeping website and for good reason. Isn’t it super cute? It’s incredibly simple and inexpensive, too. You can do so many things to this to make it more uniquely yours. You can use a premade bow, make the hanging ribbon the decorative bow and hanger in one, not use a ribbon at all, different kinds of decorative eggs, add washi tape or spray glitter to decorate the plastic eggs, glue in plastic Easter grass or flowers, add a bunny or a message to it – The possibilities are endless. Or you can leave it just like this and it’s perfect!
What You’ll Need:
- Styrofoam wreath form (or cut a wreath shape from a strong piece of cardboard)
- Long, and wide ribbon (for hanging and decorative bow, so buy a full roll of ribbon, preferably with wire)
- 4-5 bags of plastic eggs (your choice of colors & sizes: pastel, brightly colored, etc.)
- Hot glue gun with many hot glue sticks
- Craft glue (like Elmer’s)
- Optional: Ribbon or fabric to cover styrofoam wreath prior to applying eggs
Note: You will want to buy too many eggs at one time at the same store. This will assure that you do not run out mid-craft and have to buy more. If that happens, you run the risk of having use a different size and different shade of eggs to continue the wreath.
Directions:
- This first step is optional: The white of the styrofoam will show through between the plastic eggs, so if this will bother you, glue ribbon or fabric of your choice around the styrofoam fully.
- Open all the bags of eggs, open them, and glue them closed using craft glue so they stay closed.
- Decorating only the parts that will be visible (meaning so it can lie flat against the wall or door), draw a long line of hot glue down each egg then sticking to the styrofoam form. You’ll want to move fast so it doesn’t cool before you stick it to the wreath. If you can predict where you will place the next egg, place some hot glue onto the egg where it will touch other eggs before placement. This will help with the strength and stability of your wreath.
- Glue each consecutive egg like shown in the picture, without the same color touching (if you can help it) and as close together as possible so the least amount of the base shows under the eggs.
- Once finished, hold up and make sure that there aren’t any eggs that are loose and need more securing.
- To finish, create a bow of your choice (if you aren’t sure how, just Google a tutorial), and hot glue it on where you would like. Then cut a long piece of ribbon, tie into a knot, hide the knot behind the wreath, then hang by the ribbon.


Leave a Comment