
Recipe: Red, White & Blue-Berry Trifle
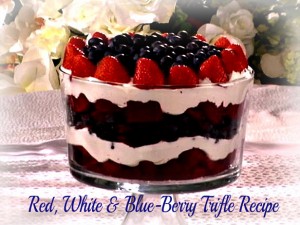
If you’re looking for a delicious dessert for Memorial Day or Independence Day that has simple ingredients and LOTS of fresh and juicy summer berries, you will love this Red, White & Blue-Berry Trifle. Make it any time of year!
Ingredients:
- 1 box red velvet cake mix (Note: Instead of red velvet cake, use 1 box chocolate cake & a bottle of red food coloring)
- 1 (16oz) tub whipped topping
- 2 pints blueberries, washed
- 1 pint strawberries, tops cut off, washed
Directions:
- Bake red velvet cake mix according to package directions. Allow to cool.
- With a serrated knife, cut the cake into 1-inch square pieces.
- Line the bottom of the trifle bowl with half of the cake squares.
- Using a spatula, spread about a 2-inch layer of whipped topping on top of the cake squares.
- Layer about 1 1/2 pints of the blueberries on top of whipped topping.
- Layer the remaining cake pieces on top of the blueberries to create a second layer of cake.
- Using a spatula, spread remaining whipped topping over the top layer of cake.
- Decorate the perimeter (along the bowl sides) with the strawberries by placing the strawberries cut side down.
- Sprinkle the remaining blueberries on top of the trifle inside the strawberry perimeter.
Recipe: Frozen Strawberry Crunch Cake
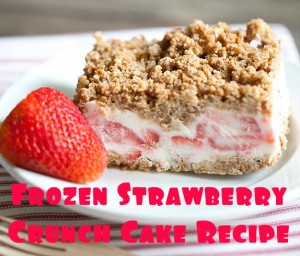
This simple take on an ice cream cake will be a big hit at your next family get together, or even just for dessert tonight! The Frozen Strawberry Crunch Cake from Spoonful calls for Nature Valley bars, but regular granola would work just fine as well.
Ingredients:
- 1 box Nature Valley Granola Bars
- 1/3 cup brown sugar
- 1/2 cup flour
- 6 tablespoons melted butter
- 2 egg whites
- 1/2 cup sugar
- 1 cup heavy whipping cream
- 1 lemon
- 4 ounces cream cheese
- 1 1/2 cups freshly chopped strawberries
Directions:
- Unwrap and put the Nature Valley granola bars (or regular granola) in a food processor until you it becomes a course crumb.
- In a large bowl, add crumbs, brown sugar, flour, and melted butter, then mix together. Spread into an 8×8″ pan covered with parchment paper.
- Bake at 350ºF for 20 minutes. Let cool completely, then divide in half and set aside.
- In a mixing bowl, combine eggs whites and sugar, then mix on high. Add the heavy cream and continue to mix for another 5 minutes.
- Add the lemon juice and softened cream cheese to mixture, then mix on low speed until completely combined.
- Fold the strawberries into the cream mixture until as evenly mixed as possible.
- In a glass cake pan that has been buttered fully, press half of the crumb crust mixture to the bottom, then top with strawberry mix, then add the rest of the granola crumbs to the top.
- Cover and freeze for at least three hours. ENJOY!
Layered Patriotic Non-Alcoholic Drink Recipe
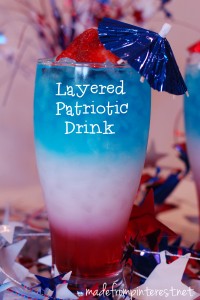
When it comes to the beautiful layered drinks, whether they are adult beverages or not, the way to get the drinks to have the layered look depends on the sugar content of each of the types (colors) of beverages. The higher the sugar content, the lower it needs to be in the glass. Thanks to Made From Pinterest for the easy (and pretty!) recipe!
- To make this beautiful Red, White, and Blue Patriotic and non-alcoholic drink, you just need Cran-Apple juice (of any brand), Sobe White Pina Colada, and Gatorade G2 Blueberry Pomegranate (the last two drinks do make a difference for sugar content and color).
- Grab your pretty glass and fill it almost to the top with crushed ice.
- Pour the Cran-Apple juice down the side of glass as close as you can to leave as little red on the upper parts of the glass as possible. Fill the red juice as high as you’d like it.
- Then pour the Sobe Pina Colada with as much as you’d like of white. You’ll see the Cran-Apple juice stays low since it’s higher in sugar content.
- Finish off the top of your drink with the Blueberry Pomegranate Gatorade.
- Add the straws and any fun patriotic decorations you’d like. Enjoy!!
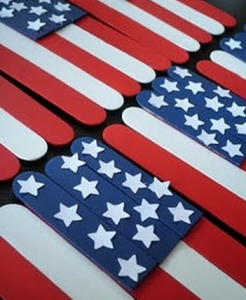
Patriotic Popsicle Sticks American Flag Kids Craft
I just love this craft because it is not only simple, but if you seal it, you can keep them for years to come!
You just need:
- Blue Paint
- White Paint
- Red Paint
- Popsicle Sticks
- Mod Podge (optional, for sealing)
- White Glue
- Cereal box or card board
- White star stickers
Once you have painted your popsicle sticks, you will need to have a small square of cardboard. I used an empty cardboard box for mine. Glue the dried, painted popsicle sticks directly to the cardboard so they have a nice foundation. Then layer on the second layer of painted popsicle sticks and secure with glue. Add the stars by painting them or using stickers.
Once dry, the flags can be glued onto another popsicle stick to “wave” or put into the ground as decorations. Another option is to tie them onto a string and make them into patriotic garland that you can use year after year!
This is a super cute holiday craft!
Check out this cute patriotic table cloth!
DIY Duct Tape Rose Pen Tutorial
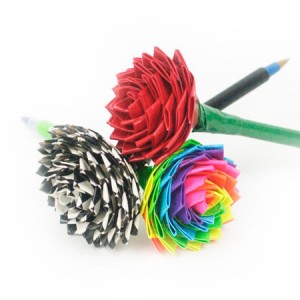
If you aren’t aware, there are dozens of designs in duct tape now. People are using it more than for just fixing pipes – they’re making projects like these really cute flower pens! This is like origami for duct tape. Make these for gifts, fun teacher presents, for decorations, and with tons of different combinations! Thanks to CraftFoxes for the tutorial. There is a visual tutorial if it will help with your craft! What You’ll Need:
- Green duct tape (for stems and leaves)
- Designed or colored duct tape (for petals)
- Plain pen
Directions:
- Take your pen and cover it in green tape lengthwise. This works best if you roll the pen across the tape, sticky-side up.
- To make petals, cut several strips of 2-inch long squares out of the colored or designed tape. Fold one edge over itself sticky side up, leaving some stickiness exposed on the side and bottom. It ends up looking like a sail on a boat because of the sticky edge left out instead of a perfect triangle.
- Take the other edge and fold it over, leaving only stickiness on the bottom of the strip.
- Wrap the petal tightly around the top of the pen stem.
- Repeat steps 2-5 with duct tape, wrapping the petals around the top. Continue until you’ve reached the size of rose you want.
- For the leaves under the base of the rose, repeat steps 2 – 4 with the green duct tape. Wrap these pieces around the stem at the base of the flower to cover up the tape edge.