
DIY $3 Dessert & Treat Stand
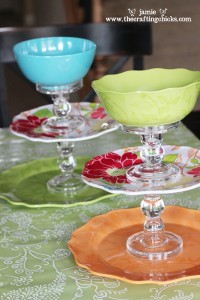
I showed you how to make one for Christmas, but why only have these simple and cheap stands for the holidays? You can make them and use them year round! Get everything either at the Dollar Store or Thrift Store, mix and match the colors, designs, and materials for your tastes and make them shabby chic! You can make them with a plate or a bowl on top, or you can make it with only 2 tiers instead of three. Thanks to Jamie at The Crafting Chicks for the cute and easy tutorial!
What You’ll Need:
- 2 candlestick holders
- A larger plate or platter
- A slightly smaller plate
- A bowl or another platter
- Permanent craft glue (like E6000 or Gorilla Glue)
Directions:
- Use a liberal amount of glue on the bottom of the first candlestick holder and stick it to the bottom plate in the middle (either measure to find exact middle or eyeball).
- Glue top of candlestick holder and place the littler plate on it.
- Repeat with the next candlestick holder and bowl.
- Allow to dry for an hour before use, then enjoy!
HAND WASH AND DRY ONLY!
Easy Natural DIY Lip Balm
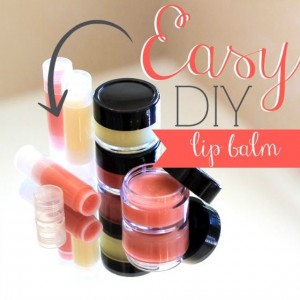
Why spend $3 or more per tube of lip balm? You can make it yourself in just minutes and for a fraction of the cost. Plus, every ingredient is all natural and safe to use over and over again! The directions below will make a couple of small lip gloss jars or tubes. You can double the recipe or stick to the ratio of 1 part beeswax to 2 parts oil to make as much as you want! Adding different oils will feel and taste different, so experiment and find what you love most.
What You’ll Need:
- 1 tsp. of grated packed down beeswax or beeswax pellets
- 2 tsp. of coconut oil
- 4-5 drops of Vitamin E oil
- 1/2 tsp. of honey
- To make colored lip balm, you’ll need some of your favorite blush or lipstick (optional)
Directions:
- Mix all the ingredients together and microwave for 10 seconds. Stir, then another 10 seconds. Do this over and over until it is fully melted and mixed together.
- Once everything is melted and mixed, IMMEDIATELY and carefully pour the mixture into the container of your choice.
- Allow to cool and fully harden (a few hours) before using or giving as a gift.
DIY Bath Paint for Kids
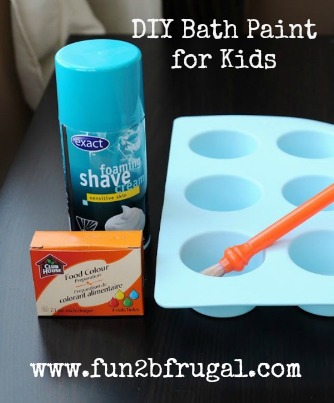
Have you spent tons of money on buying fun things to do for your kids or grandkids in the bath tub? With all the fancy toys, coloring crayons, paints etc they have on the market now. You could probably spend a pretty penny on just bath entertainment for kids alone. Here is a fun, quick, and of course frugal way to letting your kids have some bath time fun, and saving your money. Mommy is happy = Everyone is happy.
DIY Bath Paint for Kids
Needed:
1. Inexpensive Shaving Cream – buy whatever is on sale, or get some at your local Dollar Store.
2. Food Coloring
Directions:
1. Mix chosen food coloring into a small bowl of shaving cream. Or if you are going to make up more than one color a muffin tin works perfectly.
2. Give to child to have fun.
That’s it! How simple was that!!!!
Have fun!
DIY 5-Minute Fashion Pearl Statement Necklace
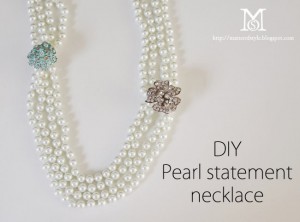
Statement necklaces are so popular right now, and the pearl ones are super expensive. They are obviously faux, but even then, they can be upwards of $30 or more. Make them into a statement necklace by yourself with just a few inexpensive pieces that you can find at craft stores, thrift stores, or even around the house in only 5 minutes! Thanks to A Matter of Style for the super cute tutorial!
What You’ll Need:
- Four pearl necklaces about 26″ long (or a long string of pearls cut into four 26″ long strands and a double string clasp, both from craft stores)
- Two fashion costume rings (at least one adjustable in size)
- 2 pieces of metallic wire
Directions:
- Put a strand of pearls through one of the rings (doubled up). Then put the other necklace through the same ring, so there are four lines of pearls through one ring.
- Do the same on the opposite side of the strands with the other ring.
- Fasten the rings to the strings with the metallic wire.
- If you are making the necklace yourself, attach the strings to the clasp, otherwise make sure that the necklace is long enough to fit over your head.
- Wear the necklace and keep the rings slightly asymmetrical, one lower than the other.
DIY Threaded Rhinestone Hoop Earrings

You can buy your own pair of fun threaded rhinestone earrings for $5-$15 each pair, but that gives you just ONE pair. If you want to get a pair for many different outfits or for different seasons, then you’ll go broke! Spend a few minutes and make them yourself with this tutorial from Just B.
What You’ll Need:
- Rhinestone chain (can be purchased at art supply or craft stores)
- Hoop earrings (in the same metal color as whatever the rhinestone chain comes on)
- Embroidery floss (whichever color you’d like!)
- Hot glue gun

Directions:
- Cut the rhinestone chain into 2 strips of the length of about half of the hoop earring.
- Lightly apply hot glue to the rhinestone chain and place onto the bottom half of the hoop (or if you’d like to show more rhinestone, then put it more toward the front of the hoop). Doesn’t need to be neat since the thread will be going over the glued part.
- Tie a knot around the earring on the BACK of the hoop with the floss. Put it between the first 2 rhinestones.
- Wrap the floss between each rhinestone (back and forth) making sure to wrap the side of the floss that sticks out from the knot back into the rhinestones. You don’t want to cut the end because the floss will unravel.
- When you reach the end, switch directions and go back toward the other side of the rhinestone chain. This should cover the whole chain.
- When you’re back to the other end, double knot the end of the floss and snip. Since this is the back of the earring, it will be barely noticeable.
- Put them on -TAH-DAH!!! Makes a great gift. So easy you could make DOZENS of them.