
DIY Elastic Hair Ties
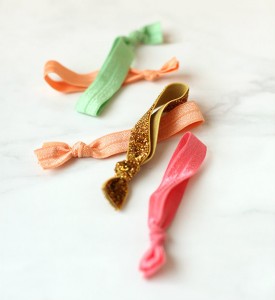
Elastic hair ties are such a popular hair accessory right now. They’re great because you can pull your hair back without leaving a huge dent, plus they’re really cute and you can wear them on your wrist. These little pieces of elastic can run you $5-$10 EACH depending on the brand and the color/decorations. You can make them yourself for a buck each or less!
What You’ll Need:
- 5/8″ foldover elastic (1 yard will make four hair ties)
- Scissors
- Measuring tape or ruler
Directions:
- Measure and cut a 9″ strip of elastic.
- Fold the strip of elastic in half.
- Tie the ends in a knot.
- Repeat.
Thanks to Minted for the tutorial! Be sure to check out their awesome website: http://www.minted.com/party-decorations
Candy Corn Home Decor
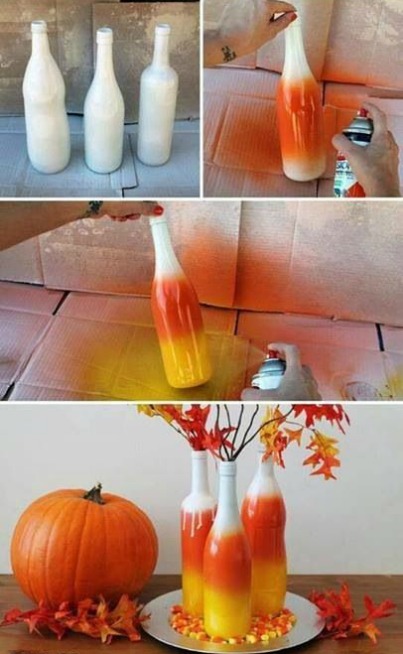
Have some empty wine bottles laying around and you are in need of some cute Halloween Home Decor? This is the perfect DIY Project for you. Super Simple, Easy & Cute all in one package.
Materials:
Empty Wine Bottles
Glossy Spray Paint – White, Orange & Yellow
Fall Foliage
Directions:
1. Make sure Wine Bottles are completely clean & dry.
2. Spray entire bottle with White Spray Paint.
3. Spray 3/4 way up with orange
4. Spray 1/2 way up with Yellow
5. Let dry completely.
6. Fill with Fall Foliage
7. Arrange on your mantle or as a centerpiece for your table!
Happy Fall!!!
Candy Corn Mousse Cups

Halloween is only a couple of days away! You can make some super fun desserts to give out to the kids’ friends or just as a dessert for the next few days. You can use them for Thanksgiving, too! Here’s how to make your own Candy Corn Mousse Cups:
INGREDIENTS
1 package (8 oz.) cream cheese, softened
½ cup powdered sugar
¼ cup milk or cream
1 teaspoon vanilla
1 small container (8 oz.) Cool Whip, thawed
orange and yellow food color
candy corn
DIRECTIONS
Beat cream cheese in the bowl of a stand mixer until fully smooth. Slowly add powdered sugar, add milk and then vanilla. Continue mixing about 1 minute on medium speed. Fold cool whip into cream cheese mixture; stir until fully combined. Scoop about 1/3 of the cheesecake mousse into a bowl; mix with orange food coloring. Color another third of the mixture yellow. Leave the remaining third white. Beginning with the yellow mousse, pipe or spoon the mixture into each glass. Repeat with the orange and white. Garnish with candy corn. Then ENJOY!
Yield: 8 mini servings. We halved the recipe and were able to fill 4 shot glasses.
DIY Window Cleaner Tutorial
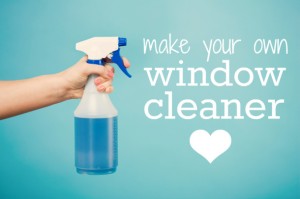
You don’t have to buy window cleaner from the store for $4 or more and have it filled with a bunch of chemicals you’ve never heard of. You can make your own, super effective window cleaner for just pennies!
What You’ll Need:
- 2 cups of water
- 3 tablespoons of vinegar
- 1/2 teaspoon of laundry detergent
- A spray bottle
Directions:
Simply combine all the ingredients into the spray bottle. Shake gently to mix so to not create too many bubbles. You’re ready to clean your glass and windows!
How to Make a Hair Bow Picture Frame Holder
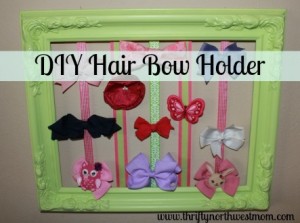
Picture via Thrifty NW Mom
Here is what you will need:
- Hot Glue
- Scissors
- Fabric (enough to cover the picture frame)
- Spools of ribbon (all sizes & textures)
- Spray paint (your choice of color)
- A sturdy picture frame
*Choose whatever size you want, I chose a big one because we have so many bows to put on it. I also have several smaller ones throughout the house. The basic wooden frames at the dollar store will work if you want to keep it simple. I found mine at a thrift store and it was falling apart when I bought it. See pic*
*You will also notice my fabric and ribbon aren’t matchy matchy :) You can choose a theme color, or you can be crazy. Ex. Hot pink and Zebra.


Here is a picture of my picture frame before I did any work to it. Yes, it was falling apart when I bought it! I still knew it would work for what I wanted.
The first thing you want to do is take your frame apart and sand it. After you sand it and wipe it down, spray paint it. I gave mine several coats and because it was an old frame with a lot of dings in it, I used a sand paper strip to give it a distressed looked after the paint dried.
The next step is to get your fabric and cut it to size. Place the fabric on the ground and place the inside of the frame (whether it’s the cardboard, glass, or wood) on top. You want to leave a few inches all the way around so it will fold over to the back where you will hot glue it into place.
After you have cut fabric, make sure the front of the fabric is facing the ground. Have the inside of the picture frame on top and start to hot glue. You will go through several hot glue sticks depending on the size of your frame. Put the glue on the edge and press the fabric to it.
Once the hot glue has dried and the fabric is secured, you can start putting the ribbon on. The purpose of the ribbon is for the hair bows to clip to it for show. You can place the ribbon horizontally, vertically, crisscrossed, or all of the above. Be creative. I did my ribbon crazy! Place a dab of hot glue on the back, put the end of the ribbon on it, then bring it across the front. Put another dab of glue on back and place the other end of the ribbon on it. Repeat this step until the frame is full of ribbon running across the front.
Place the center back into the frame and secure it. If you are using a small frame, place extra fabric or felt on the back to cover the ribbon ends. (It gives it a polished look!)
Now you are ready to add the bows! Check out my hair bow tutorials so you can constantly add to your collection!

