
Fun 2-Ingredient Cloud Dough
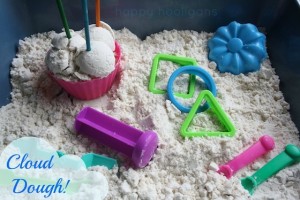
Sensory play is so much for for kids and they can find it in various ways. Some of the best ways are with flour, sand, playdoh, water, and this great idea that Happy Hooligans thought up called Cloud Dough (some call it Moon Dough). All you need is a bag of flour and baby oil! It has a great soft texture and has an added bonus of making skin nice and soft when playing with it!
In a large bowl, pour 1 cup of baby oil into 8 cups of flour. Stir well with a wisk or spoon. Have the kids help if you don’t mind getting a little flour on them. Put into a large container and give the kids all sorts of toys to manipulate the dough (Happy Hooligans has some great ideas). Store in a sealed container and it will last a long time! If it seems to harden a bit, just add a bit more baby oil. Have fun!
DIY Dollar Store Rose Petal Skirt
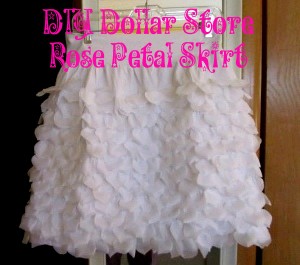
Spring and summer weddings, Mother’s Day, and fun family parties are all coming up soon. Why not make yourself or your daughter(s) this really cute rose petal skirt that was created by Fave Crafts? It would be adorable with different colored petals, made into dresses, or a tunic. Be sure to check out her website to see a step-by-step picture tutorial to help with creating your new skirt!
What You’ll Need:
- 1-2 XL white men’s undershirt (brand new is best if you’re doing a white skirt, used but very clean is okay for other colored petals)
- Bagged fabric rose petals (buy at dollar or craft stores)
- Scissors
- Ruler
- Pins
- Sewing machine
Directions:
- Lay your t-shirt flat and cut off the bottom for your skirt piece. Cut a piece that’s long enough to make a skirt. She suggests to measure it against a skirt you already own that’s a length you like. The skirt will already has a hem since it’s made from the bottom of the t-shirt, so you hardly have any work left.
- Next, sew the petals onto the skirt piece. Place one petal at a time, sewing them in a straight line, one right next to each other. Keep going until your skirt is covered completely by petals.
- For the top row, sew the petals upside down the iron them down so that the stitching doesn’t show.
- Now you need to make a waist band. To make this foldover waistband, first measure a pair of foldover pants you already own (if you have them) or measure another pair of pants.
- Now, cut more fabric from your t-shirt to use as your waistband. Cut double the width that you want your waistband to end up being (she cut 6 inches wide to make a 3 inch waistband). The length of your is what you measured from your pants.
- Sew this newly cut fabric into a tube, then fold the tube in half over itself so that the wrong sides are facing each other.
- Now put your skirt piece around yourself or whoever the skirt is going to be wearing it. If it’s way larger than your waistband, sew a basting stitch all the way around the top of your skirt piece and pull the threads to gather it until the circumference of your skirt’s waist is the same as your waistband.
- Put the skirt inside of the waistband so the raw sides of the waistband and gathered edge of the skirt are together, and the top of the waistband is facing down. Now, pin the waistband to the skirt.
- Sew around the top of your skirt to attach the waistband to the skirt piece. Then flip the waistband right side up, remove the basting stitch (if it’s showing), and enjoy!
How to Clean a Microfiber Couch
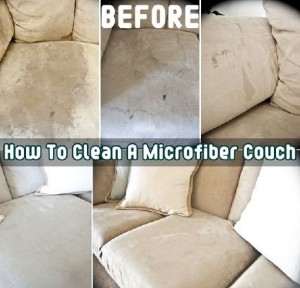
We have microfiber couches we bought right after our oldest daughter was born. She had severe GERD, then food issues, then twins were born right after that… anyway, our couches are beyond help. We need new ones, but maybe if we had seen this awesomeness, we could have saved our expensive microfiber couches, that we were assured were stain resistant. HAHA! Save yours after the stomach flu! Here’s how, for a couple of bucks with all items you can get at the dollar store!:
What You’ll Need:
- Empty spray bottle (you can get these at the dollar store)
- Several WHITE sponges (ONLY white – any other color will transfer onto your couch and make a worse stain)
- WHITE bristle brush scrubber (ONLY WHITE – see above)
- Plain rubbing alcohol (water stains microfiber, as we know, and alcohol evaporates faster so it won’t stain)
Directions:
- Pour alcohol into spray bottle, then spray the rubbing alcohol onto the microfiber, completely saturating the stained area.
- Using the white SPONGE (not brush), start scrubbing the stain right away. Scrub hard!! It will take muscle to get the stain out of microfiber. You will start to see the stain coming off onto the white of the sponge if you’re doing it well.
- If the sponge is dirty on both sides, move on to another, clean white sponge. If you continue to use a dirty one, you’ll just transfer the stain back into the microfiber.
- Once the stain is onto your sponge and off the fabric (using your best guess since it will be wet and hard to see if it’s stain or just wet), allow the fabric to dry fully. It will be hard to the touch, but that’s okay. Leave it for now.
- If the area that was stained is still dirty, repeat #1-4 until the stain is completely gone.
- Once the stain is gone and fabric is completely dry, using a swirling motion, fluff back up the microfiber fabric until it looks normal again.
EASY right? Almost too easy. I am so glad to have found this and happy to be able to share it with you! :)
Spoon Ring Tutorial
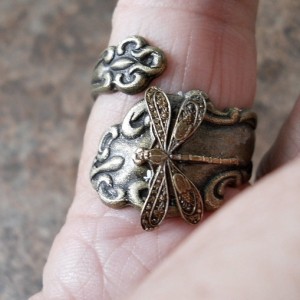
I’ve seen these made for a while now, but why I never thought to look for how to do it myself is beyond me. I have seen these being sold for $20 or more! No way! Just go to the thrift store and look for the coolest, most intricate design and do it yourself. It’d also be a fun way to remember Grandma’s place settings. This great tutorial has pictures along with the steps at Through The Front Door by Kirsten Danielle Design.
What You’ll Need:
- .925 or .900 sterling silver spoon or fork (must be sterling for it to work)
- Metal cutter, hacksaw, or jewelry saw
- File or sandpaper
- Dowel or ring mandrel
- Paper
- Pen
- Hammer or mallet (optional)
- Butane torch (optional)
Directions:
- The first thing you are going to want to do is to decide what type of ring you want to make. You can either make one that coils up your finger or you can make the one that folds over itself. The one you choose determines the length of the handle (longer for the one that wraps up your finger).
- If you are making the type that overlaps itself (not coil up your finger) use a strip of paper and wrap it loosely around the finger you want to wear the ring. Mark the overlap by .25″ so it will go over itself.
- Using metal cutter or saw, cut the length you measured in the last step or cut it right under the utensil part of the silverware if you are doing the coil ring.
- File the cut end with either a metal file or a coarse grit sandpaper. Work your way down to a fine grit sand paper to get a super-smooth finish.
- Now you must bend it into a ring shape. You can bend it around the dowel using shear force, you can hammer it around the dowel, or you can use a butane torch to heat it up before you bend it. If the metal is pliable enough, you can just bend it by hand.
- Adjust to your finger to make sure it’s shaped correctly.
- Use sterling cleaner or buff the silver to shine. That’s it!
DIY Sea Salt Beachy Hair Spray & How-To Style Tutorial

I love the look of beach waves, but to buy a bottle of sea salt beach hair spray can cost upwards of $12. This tutorial will cost you only a couple of dollars, works just as well, and will smell even better!
What You’ll Need:
- Plastic spray bottle (you can grab these at the dollar store)
- 1 tsp sea salt (NOT table salt!)
- 8 oz water
- 1/2 tsp coconut oil, olive oil or light conditioner (coconut oil is the best and smells most beachy!)
- 3 drops essential oil of your choice
- Lemon juice (optional)
Directions:
- Remove the top from the spray bottle. Pour water into the plastic spray bottle.
- Add sea salt to the bottle. The more salt you add, the more “crunchy,” textured and beachy your hair will feel, but dryer as well.
- Add moisturizer to combat the drying factor of the salt. Use coconut oil, olive oil or light conditioner. Avoid adding more than a teaspoon because it can weigh down your hair instead of adding wavy volume.
- Add essential oil for fragrance and additional benefits of your choice. For example, rose essential oil aids hydration and peppermint helps with headaches. Choose your favorite oil based on scent and healing properties.
- Close the top of the bottle tightly and shake the bottle’s ingredients vigorously for ingredients to mix. If you don’t shake the bottle VERY HARD, the oil will remain on the surface and the salt on the bottom.
- Spray all over hair until it becomes very damp. Scrunch your damp locks with your fingers to accentuate its natural wave. Let your hair air dry. Note: If your hair is naturally straight, twist your locks to achieve better results. Twist locks of your hair into buns. Pin them on your head with hair pins. When your hair is almost dry, unwrap your locks and let them out of the buns gently. Let air dry fully.
- Style as you’d like or leave as is. Spray with a layer of hairspray for extra support.
- Store the spray bottle and mixture in the fridge when not in use. Shake very hard before each use.