
DIY Plastic Spoon Garden Markers
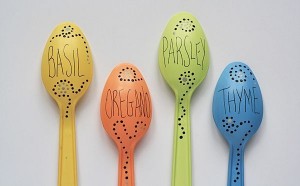
I love gifts that are handmade, useful, cute, and CHEAP! This Plastic Spoon Garden Markers tutorial is written to look just like their spoons, but it would also be very cute to use kids’ decorations and handwriting – for a gift for grandparents or parents, it would mean more that way. If you don’t have little ones handy, just follow the tutorial below. For visuals, click the link above.
What You’ll Need:
- 4 white plastic spoons
- Multi-Surface Satin paint in Gray, Brown, plus 4 others in your choice of colors (Note: You can use any type of paint if you choose to use clear top coat spray instead)
- Sandpaper
- Paintbrush
- Toothpick
- Fine point black art pen
- Clear enamel top coat spray (MUST for regular paint, or Optional: To seal in finished paint for the multi-surface)
Directions:
- Sand each spoon to knock off the shine. This will make the spoon easier to paint.
- Paint each spoon with a thin coat of paint, leaving the bottom 2″ of the handles unpainted. This is where the spoon will go into the ground.
- When dry, paint a second coat and allow to dry completely.
- Use art pen to write herb names on the spoons.
- Use a toothpick to dot on designs using the gray and brown paints.
- Spray with top coat sealing spray on both sides and all areas of the spoon, paying special attention to the deeper parts and painted areas. Allow to dry for an hour, then spray again.
- Let these dry for a full 48 hours before exposing to the outdoor elements.
DIY Embellished Flip-Flops Tutorial
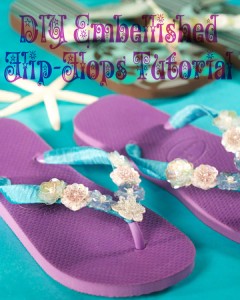
Take your plain, cheap rubber flip-flops and embellish them yourself with this tutorial from Martha Stewart. It’s super inexpensive and only takes a few minutes.
What You’ll Need:
- Plain rubber flip-flops
- Seam binding or regular ribbon in color of your choice (seam binding works best)
- Scissors
- Fabri-tac fabric permanent glue (or other brand, but this one is the best)
- Trim and embellishments
Directions:
- Cut about a yard of seam binding, and wrap around one side of the Y-shaped flip-flop strap, starting from the back and working up to the toe. Secure seam binding at beginning and end with glue. Repeat on the other side of the Y.
- Glue desired embellishments onto wrapped strap.
- Repeat these steps on the second flip-flop.
- Allow to fully dry before wearing and show off your new fancy flippies!
DIY Chevron Striped Flip Flops
![]()
I love flip flops! I have at least six pairs. The prices for plain colored ones can be only $1 in a lot of stores at various times of the spring and summer (Old Navy is especially known for this sale). If you want ones that have the footbed decorated, they’re going to be at the very least $5 each pair, but likely more. For only a few minutes of your time and some paint markers, you can can decorate your own flip flops to go with any outfit! If you need a visual tutorial, visit Teen Vogue.
What You’ll Need:
- One pair of foam flip flops (your choice of color)
- Blue painters or regular artist tape with a 3/4-inch width
- Scissors
- Oil-based paint markers in your choice of colors (Sharpie makes a large variety of colors and are easy to use)
Directions:
- Cut the painters or artist tape into 15 pieces about 1.5 inches in length. Make the cut at a right angle to the tape edge so that the pieces look like rectangles.
- Starting at the toe of the shoe, place a piece of tape at an angle. Press down firmly around all the edges to be sure it’s secure.
- Place the next piece of tape overlapping the first piece. The long side of the second piece should lay flat over the short side of the first piece. Press firmly around the edges again.
- Continue this tape placement across the shoe creating a chevron stripe.
- Leaving a small gap from the first stripe, start the next row the same way as the first. Continue adding rows and even spacing between each until you’ve covered the footbed.
- Once the footbed is covered, starting in the enter of the toe area of the side of the flip flop, line the edge of the tape with the edge of the footbed, and press tape firmly onto the “wall” or “lift” of the shoe. If the tape is wider than the height of the shoe, then make sure to fold it under the sole of your flip flop, not onto the footbed. Also wrap tape around the part of the strap that connects to the footbed.
- Color in the first stripe with one of the paint markers – you don’t have to be extraordinarily neat. Repeat on the rest of the stripes, alternating your colors or do them all one color. Make it your own!
- Allow the paint to dry, and go over any dull or missed areas with a second marker coat. Some lighter colors may need two coats, and you may want to do a second coat just to have it last a little longer under your feet. Allow to dry fully once the paint is how you like.
- Carefully pull the tape off your flip flop. Allow to dry for a couple of hours to make sure the edges that were touching the tape are fully dry, then enjoy! Try many different designs and color combinations! These would make great gifts, too.
Teacher Appreciation Crayon Wreath
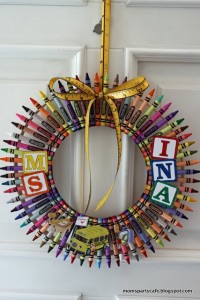
Next week is Teacher Appreciation Week, and I read that teachers love receiving gift cards for school supplies and things with their names on them. This Crayon Wreath would be an inexpensive way to say thank you to your child’s teacher. Thanks to Moms’ Party Cafe for the super cute and imaginative idea!
What You’ll Need:
- 12″ embroidery hoop, or basketry hoop (or a styrofoam wreath cut in half thickness or cardboard cut into a wreath shape, both covered with fabric or painted to cover their colors)
- 8″ embroidery hoop or basketry hoop (or same choices as above)
- box of 64 crayons
- printouts of what you need from this template
- hot glue
- ribbon
Directions:
- Place the 8″ hoop in side the 12″ hoop with equal distance between all edges.
- Arrange the crayons along the 2 hoops. Hot glue the crayons to the hoops. TIP: Keep the unglued crayons arranged on the hoops to keep the spacing accurate.
- Tie the bow around the 2 crayons that you want at the top.
- Create a separate loop and glue the edges together to create the hanging loop.
- Personalize with the teacher’s name and hot glue them on.
- If very careful with the wreath, it should last for years to come!
DIY Eggshell Votive Candles

Happy Easter!!! I hope everyone had a wonderful day with their families! Use those leftover Easter eggs on this cute craft. Save those hard boiled eggs for tomorrow by putting them back in the refrigerator. I’ll be sharing the highest rated egg salad recipe on the whole internet!
What you need:
- eggshells
- paper towel
- soy candle wax
- candle wick with metal tab
- hot glue gun
- double boil sauce pan
- wooden skewers
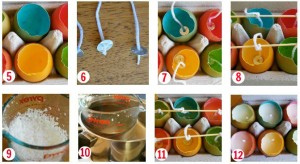
Directions:
- Crack open dyed hard boiled egg at the pointed end and break the shell down 1/3 (leaving about 2/3 of the shell behind) and take the egg out, placing in a container to be stored in refrigerator.
- Carefully rinse the inside of the egg to be used as a votive. Allow to air dry on a paper towel.
- Cut a piece of wick to about 10 cm in length and thread it through your metal tab.
- Secure the metal tab & wick to the bottom of the eggshell using a hot glue gun.
- Tie the pieces of wick to a wooden skewer to keep the wick out of the wax.
- Place your soy candle wax into a Pyrex jug (or a double boiler saucepan).
- Place jug in boiling water on the stove and wait until it melts. It will become clear when it’s ready. Take it off the heat as soon as it has melted.
- Pour the melted wax into the eggshells as carefully as possible.
- Leave your eggshell candles to dry for a few hours. Once the wax is hard you can remove the wooden skewers and trim the wick.
- You can place the eggshell votive candle holders or any other decorative holder. These would also be great to save for gifts for next spring/Easter!