DIY Patriotic Beaded Earrings

Get an extra little splash of red, white, and blue with these simple earrings from She Knows. The jewelry only takes a few minutes to make, can be worn for years, and given as gifts or a party favor. For a visual step-by-step tutorial, visit the She Knows link above.
What You’ll Need:
- Round-nosed pliers
- Jewelry pliers
- 2 Silver earring hoops
- 6 Red beads
- 6 Blue beads
- 6 White beads
- 2 Star charms
- 6 Jump rings
- 2 Earring wires
Directions:
- String the beads onto the earring hoop. Make a pattern of red-white-blue. Repeat the pattern three times.
- Using the round-nosed pliers, make a curve on the straight side of the earring wire so that it points up.
- Hook the curve onto the loop on the other end of the earring hoop. Using round-nosed pliers, twist curve into a vertical loop.
- Use two jump rings to suspend the star charm by attaching one jump ring to the top of the charm, then use a second jump ring to connect the first jump ring to the vertical loop you created in the last step.
- Use a third jump ring to connect the earring wire to the vertical loop.
- Repeat the steps above to make a second earring.
- Wear and ENJOY!
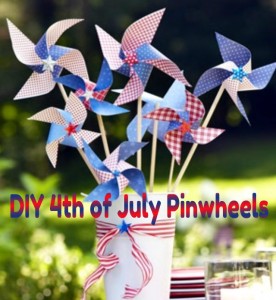
DIY 4th of July Pinwheels

Sparklers can cause some pretty nasty burns on little hands, so instead of sparklers this year, make them these pretty 4th of July pinwheels – or just make them for fun and decorations!
What You’ll Need:
- Double-sided patriotic patterned scrapbook paper
- Wooden dowels
- Straight pins
- Beads
- Hot glue gun and hot glue
- Double-sided tape
- Scissors
- Star stickers
- Spray adhesive (if needed)
- (Optional: Plain white scrapbook paper to decorate yourself or by kids)
Directions:
- To create dual-sided pinwheels, gather your double-sided scrapbook papers in patriotic colors, or create your own (better yet, have the kids decorate them and have them involved in the celebration!). Use the spray adhesive to adhere them together.
- Cut paper into square shapes – 8-in and 6-in squares – to create different sized pinwheels.
- Fold squares in half diagonally to create a triangle, then press to crease.
- Open the triangle and fold diagonally the opposite way, then press to crease.
- Open up the triangle and flatten out the square.
- Cut along each diagonal fold three-quarters of the way to the center.
- Pull the tip of every other corner toward the center. Use double-sided tape or white craft glue to adhere the first tip to the center, then each folded-in tip on top of each other. When you finish, you’ll have the pinwheel shape.
- If you want your pinwheel to spin, skip to step 10. If not and will be used for decorations only, hot glue the pinwheel to your wooden dowel. Skip cutting down wooden dowels from the hardware or craft store and use inexpensive flag dowels (removing the flags, of course).
- Finish your pinwheel with a decorative star sticker in the center.
- If you want your pinwheel to spin, you’ll need to push a pin through the center (a straight pin works), then a bead beneath the pinwheel. You’ll drive the pin into your dowel with a hammer.
- If needed, fold over (or cut and then fold over) any part of the pin that sticks through to the back to prevent injuries.
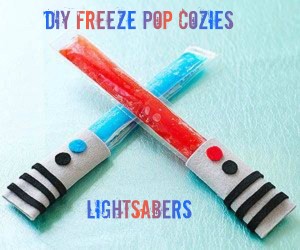
DIY Freeze Pop Cozies Lightsabers

Feel the force with these adorable felt cozies to keep your little ones’ hands warm and clean(ish) while they are enjoying their freeze pops this summer with this quick tutorial from Family Fun. Instructions are for 1 cozy, and they’re very simple, so just repeat with as many as you’d like to make!
- Cut a 3″x4″ rectangle from gray felt.
- Fold it over a freeze pop and use fabric glue to seal the side and bottom edges.
- Clamp the fabric closed with binder clips or clothes pins (optional, but gives a stronger hold to the glue).
- Slip the felt off the pop.
- Glue on stripes and dots of black and colored felt (or use fabric paint if you want it even simpler!).
- Allow to dry fully, then you’re able to battle the dark side! Enjoy!
DIY Decorative Rose Mirror
Next time you use up all the eggs, hang on to those egg cartons and make this awesome decorative mirror. So simple.
Materials
- 12-cup egg cartons (you’ll need 5 cartons to make a small mirror or 12 to make a large mirror)
- Hot-glue gun and hot-glue sticks
- Mirror tile or small mirror (frame removed)
- 3mm MDF
Directions
- Step 1: Make a mirror with a flower design that is made out of none other than egg cartons.
- Step 2: Cut 1 slit into each corner of 1 cup (to make 4 slits). Cut each piece into a petal shape. Repeat with another cup, to create second layer of rose. Repeat with a third cup, but cut petals a little smaller, then roll so petals curve and make a bud shape.
- Step 3: Hot glue the 3 layers together, offsetting middle layer so petals sit in spaces between petals of bottom layer. Finish with layer of smaller petals. Repeat process until you’ve made enough roses to completely surround mirror. Spray roses with white paint, if desired. Leave to dry.
- Step 4: Measure and mark 3cm in across top and down side from 1 corner of MDF. Rule a line to join marks and saw off triangle. Repeat for all corners. Position mirror in centre of MDF, trace around, then remove.
- Step 5: Drill 2 pairs of holes in frame above mirror position. Thread through picture hanging wire and secure. Paint MDF border with black paint and allow to dry. Glue mirror in position.
- Step 6: Starting at 1 corner, hot glue roses to frame, bending petals to fill in gaps if needed. Continue until frame is covered.
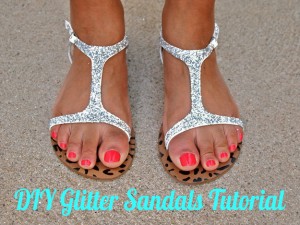
DIY Glitter Sandals Tutorial

Have a pair of boring sandals that aren’t getting worn enough? This tutorial will teach you how to easily and very inexpensively glam your sandals up and make sure you’ve got sparkly feet this summer!
What You’ll Need:
- A pair of basic flat sandals
- Glitter (a large container of glitter in the color of your choice)
- Tacky glue (from the craft store)
- Foam brush
- Clear sealant
Directions:
- Use a brush to apply a layer of glue over the areas of the sandal you are going to apply glitter. Do 1 sandal at a time.
- Sprinkle glitter generously over the glued area while the glue is still wet. Be sure to put pour the glitter on the sandal over newspaper, paper, or other way to collect the leftover glitter.
- Gently shake off extra glitter. To keep the remaining glitter in place, spray on a light coat of clear sealant. Or if you’re out of sealant, use a light coat of clear fingernail polish.
- Repeat steps 1-3 on the other sandal.
- Allow your sandals to dry fully overnight, then admire your new glitzy footwear!


