
Spoon Ring Tutorial
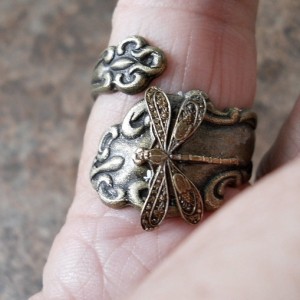
I’ve seen these made for a while now, but why I never thought to look for how to do it myself is beyond me. I have seen these being sold for $20 or more! No way! Just go to the thrift store and look for the coolest, most intricate design and do it yourself. It’d also be a fun way to remember Grandma’s place settings. This great tutorial has pictures along with the steps at Through The Front Door by Kirsten Danielle Design.
What You’ll Need:
- .925 or .900 sterling silver spoon or fork (must be sterling for it to work)
- Metal cutter, hacksaw, or jewelry saw
- File or sandpaper
- Dowel or ring mandrel
- Paper
- Pen
- Hammer or mallet (optional)
- Butane torch (optional)
Directions:
- The first thing you are going to want to do is to decide what type of ring you want to make. You can either make one that coils up your finger or you can make the one that folds over itself. The one you choose determines the length of the handle (longer for the one that wraps up your finger).
- If you are making the type that overlaps itself (not coil up your finger) use a strip of paper and wrap it loosely around the finger you want to wear the ring. Mark the overlap by .25″ so it will go over itself.
- Using metal cutter or saw, cut the length you measured in the last step or cut it right under the utensil part of the silverware if you are doing the coil ring.
- File the cut end with either a metal file or a coarse grit sandpaper. Work your way down to a fine grit sand paper to get a super-smooth finish.
- Now you must bend it into a ring shape. You can bend it around the dowel using shear force, you can hammer it around the dowel, or you can use a butane torch to heat it up before you bend it. If the metal is pliable enough, you can just bend it by hand.
- Adjust to your finger to make sure it’s shaped correctly.
- Use sterling cleaner or buff the silver to shine. That’s it!
Simple Upcycled T-Shirt Produce Bag Tutorial
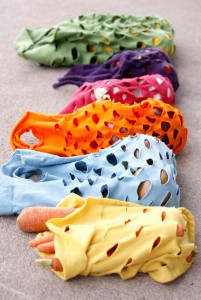
Going to the local farmer’s market is a great way to get fresh produce and support local growers, but you definitely need produce bags to keep your food safe. Instead of pay $5 or more per bag, create your own using old t-shirts and very little sewing. All you need is a t-shirt, scissors, a sewing machine, and a pen.
This amazing and simple tutorial comes from Delias Creates. She has a visual, step-by-step tutorial for extra help if you need it.
- Turn an old, clean t-shirt inside out, then draw a shape for the bad you like – square or round – and as large as you want it. You can make 2 out of one t-shirt if you make them small, or a large one out of a whole t-shirt.
- Sew the 2 sides together using either a straight stitch or narrow zig-zag going around the edges, leaving 1 side open.
- Flip it right side out, then finish the seams by straight stitching around the edges again.
- Now, draw lines sporadically across the bag in lines about 2-3″ long, spaced at least an inch between each line both sideways and on top and bottom apart.
- Draw the shape of a hole for your handle at the top of the fabric.
- Now, cut the lines and handle through the 2 layers. Be careful to not cut too far and combine 2 cuts together.
- Now, stretch the fabric out and it’s ready to use! So simple!
Homemade Air Freshener Gel

This homemade air freshener gel is so easy to make and would make a great gift!
What You’ll Need:
- 3-4 jars, capable of holding 1/2-cup of fluid each (this site used 4 baby food jars which hold 1/2 cup of mixture)
- Food Coloring
- Essential Oil or Room Fragrance drops
- 2 cups of water, divided into two 1 cup amounts
- 4 envelopes of unflavored gelatin
- 1 tablespoon of salt
- Kitchen equipment: whisk, a pan to boil water, funnel, and spoons
Directions:
- Pour a few drops of food coloring into each jar.
- Pour 1 teaspoon (minimum) of essential oil into each jar. The more you pour, the stronger the scent.
- Bring 1 cup of water to a rapid boil.
- Add all 4 of the gelatin to the water and whisk until fully dissolved (about 1 minute).
- Add the other cup of water to the pan and the salt. Stir to dissolve the salt.
- Remove the pan from the heat. Pour the mixture into the jars within a couple of minutes of removing from the heat.
- Use a funnel to pour an equal amount into each jar.
- Stir the mixture quickly before it solidifies.
- Let cool and solidify for at least 24 hours. The gel air freshener should last between 4-6 weeks and you can do it again!
Thanks to Instructables for the awesome idea and instructions!
DIY Head Scarf
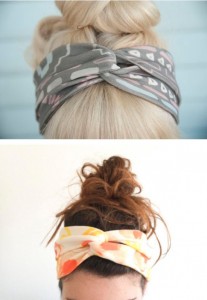
Head scarfs are super stylish right now, but to buy them already made into a headband or head scarf is pretty expensive (I’ve seen them for $20 or more just for ONE), and it limits the designs to what the creators choose. Make them yourself in literally seconds and you can make them out of your grandmother’s hand-me-downs, the cute one you saw at the thrift store, or the expensive ones. Up to you which scarf you wear, but here’s how to wear it as told by Lucky Pony.
Wrap the scarf around your head with the middle of the scarf at the nape of your neck. Twist the two ends around each other once 3. Wrap the scarf back down to the bottom of your head and knot with a bow. You can choose if you want to reverse it and have the bow at the top of your head instead – versatile head scarf instructions! Enjoy!
DIY Bouncing Bubbles
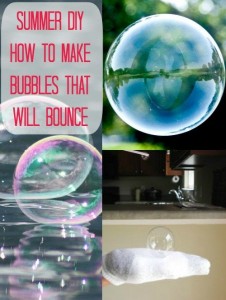
Kids love bubbles, and they are a huge part of summer play. Try something new with the kids and make them amazing bouncing bubbles! Skip the “Deluxe Bouncing Bubbles Kit” that costs $35 or more. You can make it at home with just a few ingredients with the tutorial from Play at Home Mom.
- 1 C distilled drinking water
- 1 Tablespoon dish soap
- 1 Teaspoon of glycerin (you can buy at craft stores or in the first aid aisle)
- something to blow bubbles with (straw, yarn, bubble blower wands, etc.)
- 1 clean glove (or sock to keep the bubbles from popping)
Mix ingredients together and let stand for at least 24 hours. Have fun!