
DIY Plastic Easter Egg Wreath
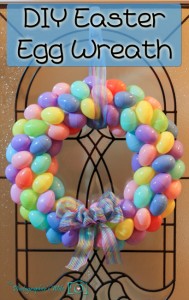
This wreath was featured on the Good Housekeeping website and for good reason. Isn’t it super cute? It’s incredibly simple and inexpensive, too. You can do so many things to this to make it more uniquely yours. You can use a premade bow, make the hanging ribbon the decorative bow and hanger in one, not use a ribbon at all, different kinds of decorative eggs, add washi tape or spray glitter to decorate the plastic eggs, glue in plastic Easter grass or flowers, add a bunny or a message to it – The possibilities are endless. Or you can leave it just like this and it’s perfect!
What You’ll Need:
- Styrofoam wreath form (or cut a wreath shape from a strong piece of cardboard)
- Long, and wide ribbon (for hanging and decorative bow, so buy a full roll of ribbon, preferably with wire)
- 4-5 bags of plastic eggs (your choice of colors & sizes: pastel, brightly colored, etc.)
- Hot glue gun with many hot glue sticks
- Craft glue (like Elmer’s)
- Optional: Ribbon or fabric to cover styrofoam wreath prior to applying eggs
Note: You will want to buy too many eggs at one time at the same store. This will assure that you do not run out mid-craft and have to buy more. If that happens, you run the risk of having use a different size and different shade of eggs to continue the wreath.
Directions:
- This first step is optional: The white of the styrofoam will show through between the plastic eggs, so if this will bother you, glue ribbon or fabric of your choice around the styrofoam fully.
- Open all the bags of eggs, open them, and glue them closed using craft glue so they stay closed.
- Decorating only the parts that will be visible (meaning so it can lie flat against the wall or door), draw a long line of hot glue down each egg then sticking to the styrofoam form. You’ll want to move fast so it doesn’t cool before you stick it to the wreath. If you can predict where you will place the next egg, place some hot glue onto the egg where it will touch other eggs before placement. This will help with the strength and stability of your wreath.
- Glue each consecutive egg like shown in the picture, without the same color touching (if you can help it) and as close together as possible so the least amount of the base shows under the eggs.
- Once finished, hold up and make sure that there aren’t any eggs that are loose and need more securing.
- To finish, create a bow of your choice (if you aren’t sure how, just Google a tutorial), and hot glue it on where you would like. Then cut a long piece of ribbon, tie into a knot, hide the knot behind the wreath, then hang by the ribbon.
Recipe: Edible Hollow Easter Eggs
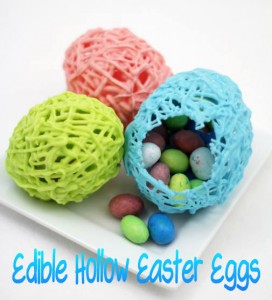
Last year I did the craft that looks just like these that uses yarn and glue on balloons. They came out really cute, but after Easter, they were pretty mangled, so we tossed them. Instead, I think we may make this edible version from She Knows – and they are SUPER CUTE!
Ingredients:
- Chocolate candy melts in pastel colors (1 cup solid candy melts = about 3 hollow eggs)
- Piping bags, frosting, or zip-closed sandwich bags
- Small latex balloons (DO NOT USE WATER BALLOONS!)
- Non-stick cooking spray
- Straws or wooden skewers
- Clothespins
- Plastic cups or glasses (larger than the inflated balloons)
- Optional: Small Easter candies like jelly beans
Directions:
- Inflate balloons to about the size of a real egg or slightly larger. (Do not use water balloons. The latex is too thin and will burst when you pour hot melted chocolate on it.)
- Put one cup of chocolate candy melts in a bowl and microwave for 30 seconds at a time, stirring after each heating until completely melted. Pour the melted chocolate into a piping bag or zip-closed bag. Cut off the tip or corner or the bag.
- Work over the sink or a newspaper and hold the inflated balloons by the tied end. Grab each balloon by the end, and lightly spray your balloons with non-stick cooking spray, then drizzle melted chocolate across the bottom of the balloon in all directions. Turn balloon over and continue drizzling chocolate over the top and sides.
- With a clothespin, clip the balloon to a straw or wooden skewer and balance inside of a cup or glass to dry.
- Once the chocolate is completely dry and cooled, deflate your balloon by clipping the tied end with scissors to release the air. Let it release the air on its own, don’t rush it.
- Very carefully and slowly pull the balloon out of the hole that is left where the tie of the balloon was.
- You can either leave the eggs as they are, or you can break some of the candy and use it as a basket. Fill with little candies for extra fun!
DIY Rainbow Jello Egg Jigglers
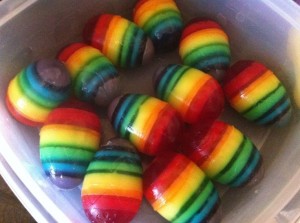
Seriously, are these not the CUTEST things you’ve ever seen? They are extremely pretty and a bit tedious to make. You can always just make 1 or 2 colors of Jello instead and work yourself up to these full spectrum rainbows. Here’s what you do:
Using Jell-O Jigglers Egg Molds, coat the mold with a generous amount of cooking spray. Use a syringe to add each layer of color at a time, then chill for 10-15 minutes between each layer before moving to the next. Store them in the fridge in an egg-carton, making “hard boiled eggs” that were filled with Jell-O instead. :)
DIY Eggshell Planters & Gardens

From Better Homes & Gardens
Eggshells contain an abundance of natural vitamins and minerals that help plants of all kinds grow stronger and live longer. One way to use the shells is to just throw them in a food processor and throw them in your garden’s soil, but also a great way to start a garden is inside of eggshells! Many people start this little project right after Easter – perfect timing with spring and to reuse the eggshells from Easter eggs!
Empty the shell completely by cracking the pointed end and breaking the shell down to where 2/3 to 3/4 of the shell is still there. Rinse the insides of spare egg residue, crack the bottom of the shell (for the roots to grow through and for oxygen), and stick it back in the carton. Fill the shell with planting soil, poke a hole with your finger for the seed or plant, and continue with more eggshells. Make sure to set your new garden near sunlight water as needed.
Martha Stewart Living Magazine says this is how to know when to move them from the shell to the real garden, “The first leaves to sprout will be the cotyledons or seed leaves, which supply nutrients to the young plant until the first true leaves (resembling those of the parent plant) appear. When plants have grown to about 3 inches and have at least two sets of true leaves, they are ready to be transplanted to the garden. (Remove them from the eggshells first.)”
DIY Shaving Cream Dyed Marble Easter Eggs

I haven’t dyed eggs with my kids yet. It seems like Easter flew up on us this year. If we don’t make Kool-Eggs, then I think we are going to do Marbleized Dyed Easter Eggs. Inexpensive, fast, pretty, and very pretty!
NOTE: Dyeing your eggs with shaving cream is for decoration ONLY since egg shells are permeable and you shouldn’t eat shaving cream. If you like to eat your eggs after dyeing them, you can do marbleizing with whipped cream instead of shaving cream. Whipped cream is a lot more expensive than buying cheap shaving cream at a dollar store, so this is an optional switch.
What You’ll Need:
- Completely cooled hard boiled eggs
- Food coloring drops in different colors
- Medium to large baking sheet, baking pan, or other container with sides
- Cheap shaving cream (or whipped cream in an aerosol can)
- Spoon
- Toothpicks
- Paper towel
- Plastic gloves, sandwich baggies or plastic wrap
- Paper plate or cheap plastic storage container (that you don’t care will get dyed)
Instructions:
- Spray shaving (or whipped) cream and spread out evenly on a cookie sheet (or other container) with a spoon.
- Dribble food coloring across the surface. Neon food coloring makes cooler looking eggs.
- Use toothpicks to swirl the colors around in the shaving cream. Do it totally randomly and be sure to pick up and restart lines into the cream. This will make the best designs.
- Take a dried, cooled hard boiled egg, and roll it around in the cream. You can use plastic gloves, or use sandwich baggies or plastic wrap as gloves to help keep the dye consistent, keep finger prints off the eggs, and will protect your fingers from dye.
- Add more cream and/or dye as needed throughout the dyeing process.
- Sit colored eggs to the side on a paper plate or in a plastic storage container and allow them to dry for at least 2 hours, but best is overnight to 24 hours. DO NOT WIPE THEM OFF, leave them in the cream and dye. If you used whipped cream, be sure to put them in the refrigerator while they sit.
- After allowing the eggs to sit, wipe the cream and dye off with paper towel. You can store in the original egg carton in the fridge or set them out as decorations.
Thanks to TotSchool for the picture!