
Recipe: Valentine’s Day Marshmallow Pops
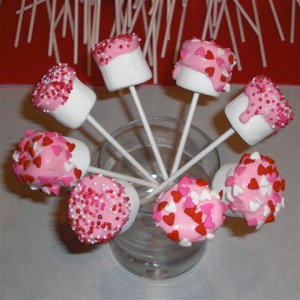
Change up the regular Valentine’s hearts lollipops or cake pops, and make these super simple Valentine’s Day Marshmallow Pops in just a few minutes. Would be great for a child’s school party, too!
Just stick a lollipop stick through a marshmallow, then dip it into melted chocolate (add food coloring to white chocolate for different colors). Before it hardens, dip the marshmallow with the chocolate into different sprinkles, then put it into a glass, stick down. Do this over and over again, and when you put it into a glass, be sure they don’t touch each other (like in the picture). That’s it, it’s that simple! Kids would love to decorate their own marshmallow pops. Do this for birthdays, Easter, Christmas, any holiday!
Scrabble Word Art Craft Tutorial
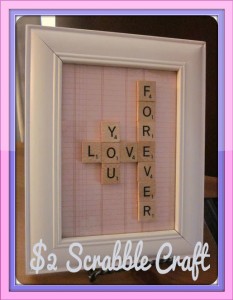
Run over to the dollar store, craft store, or thrift store to grab a picture frame, Scrabble tiles (you can find them in a used game or buy 100 Scrabble Tiles on Amazon for less than $6 and have them on hand for multiple projects!), hot glue, and scrapbook paper to make this super easy and SUPER CUTE craft. You can make them for any holiday, but this one is for Valentine’s Day in particular.
Directions:
- Put the scrapbook paper of your choice in the frame and put the glass over it.
- Hot glue the tiles of your word choices in lines on TOP of the glass. This makes it easy to change out the paper for different times of the year if you’d like.
- Hang and enjoy!
Thanks to Embellishing Life for the awesome craft idea!
Recipe: Nutella CrockPot Hot Cocoa
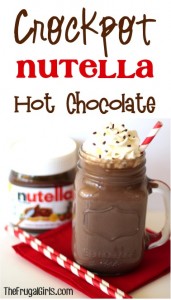
Gather around on Christmas Eve or morning and make this DELICIOUS Nutella hot cocoa using your slow cooker.
Ingredients:
- 5 cups Milk
- 1/2 cup Hershey’s Cocoa
- 1/2 cup Nutella
- 1/2 cup White Sugar
- 1 cup Hot Water
- Crockpot
Directions:
- Combine the cocoa, sugar, Nutella, and hot water in large pan. Stir, bringing to a gentle boil.
- Transfer this mixture to your crockpot, then add milk and stir.
- Cook on high for about 2 – 2.5 hours (or on low for approx. 4 – 4.5 hours), or until hot.
- Pour into mugs or Mason Jar Mugs, and top with whipped cream and sprinkles!
Thanks to The Frugal Girls for the recipe!
Recipe: Easy & Pretty Sparkling Cranberry Brie Bites
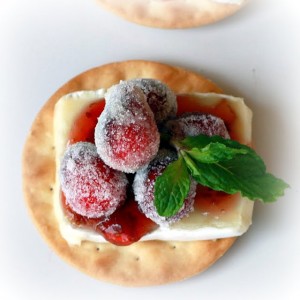
Want a festive-looking and delicious appetizer that is easy and will impress all your guests? Try this recipe for Sparkling Cranberry Brie Bites!
Ingredients & Directions for 16 Sugared Cranberries:
- 2 cups of fresh cranberries, washed thoroughly
- 1 cup of good maple syrup
- 1 cup of granulated sugar
- Place washed cranberries in a medium bowl.
- Heat syrup in a small sauce pan just until warm.
- Pour warm syrup over cranberries. Make sure it is NOT hot, or the cranberries may pop.
- Cool, cover, and let soak in the refrigerator overnight.
- The next day, drain cranberries in a colander.
- Place sugar in a large bowl or baking dish. Add cranberries in 2 batches and roll around until lightly coated in sugar. Place on a baking sheet until dry (about 1 hour).
Rest of the Ingredients & Directions:
- 16 crackers (of your choice)
- 8 oz Brie cheese
- Cranberry chutney or cranberry relish
- Fresh mint for garnish.
Assemble crackers with one slice of brie, a light layer of cranberry chutney, and 4 or 5 sugared cranberries. Garnish with fresh mint sprigs. Now they’re ready to be served!
Thanks to Yummy Mummy Kitchen for the recipe!
Recycled Magazine Bows Tutorial
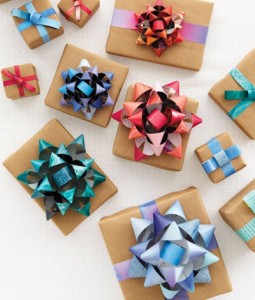
Instead of recycling your magazines, reuse them! Here is an easy tutorial for bows that you can use year round.
What You Need:
- 1 page of magazine per bow you plan on making
- Double-sided tape
Directions:
- Cut the page lengthwise into nine 3/4-inch wide strips of these heights: 3 at 11 inches long, 3 at 10 inches long, 2 at 9 inches long, and 1 at 3 1/2 inches long.
- Twist each strip to form loops at both ends and make a circle out of the smallest.
- Secure the ends with double-sided tape.
- Layer and stick, starting with the longest strips. End with the circle in the center.
Thanks to Whole Living for the tutorial. For pictures of each step, go here.