
Recipe: Ultimate Grasshopper Cookies

Ingredients:
- Cookies:
- 1 Box Devil’s Food Cake mix
- 2 eggs
- 1/2 C. butter, melted
- 1 tsp. vanilla extract
- 3 Tbsp. brown sugar
- Mint Frosting:
- 2-3 C. powdered sugar
- 3/4 C. butter, softened
- 1 1/2 tsp. peppermint extract
- milk, if needed
- green food dye (for a more dark green if desired)
- Chocolate Glaze:
- 1 1/2 C. chocolate chips (I like to use chocolate “melts”)
- 4 Tbsp. butter
- Andes Mint Candies, roughly chopped
Directions:
1. Preheat oven to 350 degrees and line cookie sheets with parchment paper.
2. Combine cake mix, eggs, butter (let it cool a little, so it doesn’t cook the eggs), vanilla and sugar. That batter will be still.
3. Make dough balls a little large than a Tablespoon and place on cookie sheets to bake. (You make one to pat each dough ball down a little bit because cake mix cookies tend to bake up tall.)
4. Bake for 7-9 minutes and let cool on cooling racks.
5. Mint Frosting: Beat butter for 2 minutes. Add peppermint extract and slowly add it powdered sugar until you reach your desired consistency. Add 1-2 Tablespoons milk if it gets too thick. Add green dye for color if desired.
6. Chocolate Glaze: Melt chocolate chips and butter together in a microwave proof bowl. Zap for about 30 seconds, then stir, then microwave in 10 second increments and stir until smooth.
7. To assemble: Pipe on frosting, smooth over with a knife, spoon on your glaze and top with peppermint candies.
Thanks to Your Cup of Cake for the recipe!
Recipe: Vanilla Ice Cream Made With Real Snow!

Many of us in the United States are dealing with insane winter weather, including blizzards and more snow than we’ve seen in years. Take advantage of the piles of white stuff by making it into ice cream! Big hit with kids and adults and only takes 20 minutes. A big bonus – It’s Gluten-Free! Here’s how to do it:
Ingredients:
- 1 gallon CLEAN snow
- 2 cups of whole milk or half and half
- 1 cup sugar
- 2 tsp vanilla
Directions:
- Combine milk or half and half with the sugar and vanilla.
- Stir until the sugar is dissolved and add it to the fresh snow, then eat!
OR
- One 14 oz. can sweetened condensed milk
- 1 tsp vanilla
- 2 quarts fresh snow
- Combine together and eat!
Thanks to Polka Dot Poplars for the recipes and picture!
Recipe: Almond Chantilly Strawberry Dip
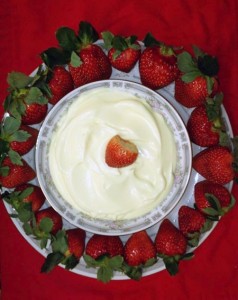
Simple and delicious, Almond Chantilly Strawberry Dip is perfect for parties or just for a snack!
Ingredients:
- 3 oz box Instant vanilla pudding
- 1 cup heavy cream
- 1 teaspoon almond extract
- fresh strawberries
Directions:
- Make the vanilla pudding as directed on its package.
- While waiting for the pudding to firm, whip the heavy cream and almond extract together in a separate bowl until thick and looks like whipped cream.
- Add the whipped cream into the vanilla pudding. Stir them together until smooth and have an even color.
- Stick in the refrigerator to cool, then serve with fresh strawberries!
Recipe: Valentine’s Day Trail Mix

Easy to make and can easily be modified for food allergies, Valentine’s Day trail mix is a healthier alternative to bagged candy for handing out to friends or to have at a party.
All you need is Valentine’s M&Ms, Sweethearts Conversation Hearts, pretzels, raisins, caramel corn, and peanuts (if allowed). Other options include marshmallows, Chex Mix, and Cheerios.You can substitute for Gluten-Free or Dairy-Free versions of these foods instead and this snack will still be a hit. Mix all together, fill in bags of your choice, and VOILA! Done! :)
Conversation Hearts Valentine’s Wreath Tutorial

Create this super simple Valentine’s Day themed wreath in just an hour or so and about $10-$20!
What You’ll Need:
- Circular foam form with four flat sides
- Pink tissue paper
- Hot glue
- 4 bags of Sweethearts Conversation Hearts candy (or two 1 pound bags)
- Big pink ribbon (or other ribbon to hang the wreath on)
Directions:
- Wrap the tissue paper around the foam and hot glue it on to secure it. This covers the boring white foam.
- Start hot gluing the conversation hearts in one row and go all the way around the wreath. It is easier and neater to do one row than to go three across.
- Do this as many times as it takes to cover the wreath completely, but leave the back that will be against the wall or door without candy on it.
- Tie a ribbon around and through the circle to hang, and that’s it!
Thanks to Crafts & Such for the picture and tutorial!