
Recipe: Rainbow Sugar Cookie Bark

St. Patrick’s Day is coming up, and we think of all things green and gold and rain and rainbows and… Well, here’s a super pretty and delicious recipe that will help you celebrate! I don’t know who I’m kidding. This will be made in my house all year round because my 5.5 year old daughter’s favorite color is “Rainbows”! :)
Ingredients:
- 1 roll refrigerated sugar cookie dough
- 16 oz of vanilla flavored candy coating
- 2 cups rainbow-colored candies (like Skittles)
Find the instructions on how to make the Rainbow Sugar Cookie Bark at Mom On Time Out.
Recipe: Lucky Rainbow Chex Mix

I saw this picture floating around my Pinterest page and I said literally aloud in front of my kids, “Oh no!” What I mean by that is, “Oh, no. That looks so amazing and if I make it, then it won’t make it beyond a day in this house.” So, instead, here’s the recipe from Tablespoon for YOU ALL. Lucky you, and just in time for St. Patrick’s Day!
Ingredients:
- 1 box (11.5 oz) Lucky Charms® cereal
- 6 cups Rice Chex® or Corn Chex® cereal
- 2 bags (12 oz each) white vanilla baking chips (4 cups)
- 1/4 cup multicolored candy sprinkles
Directions:
- Pour box of Lucky Charms and pick out all the marshmallows (about 2 cups). DO NOT EAT THEM. Okay, you can eat a couple. But set aside the rest to add to the mix later. Measure 2 cups of the remaining Lucky Charms cereal (without the marshmallows) into large bowl, add Chex cereal.
- Line cookie sheet with foil or waxed paper. In medium microwavable bowl, microwave white vanilla baking chips uncovered on High about 2 minutes, stirring every 30 seconds, until chips can be stirred smooth. Pour over cereal mixture in large bowl; toss to evenly coat.
- Spread mixture in single layer on cookie sheet. Immediately sprinkle with candy sprinkles. Let stand until set, about 20 minutes. Gently break up mixture; toss in reserved marshmallows. Store in airtight container and should last about a month (yeah right!).
Recipe: Light Louisiana Shrimp & Sausage Gumbo

It’s Mardi Gras in Louisiana! Gumbo is a Louisiana staple, and it comes in many varieties, shrimp, sausage, ground beef, and more. It’s high in calories and delicious. Save yourselves the calories for a Hurricane (a delicious adult beverage!) or a piece of King Cake by making this lightened up version of Shrimp Gumbo. You’ll love it so much, you’ll make it all year. This recipe from Self serves 4.
Ingredients:
- 1 boneless, skinless chicken breast, cut into 1-inch chunks
- 1 teaspoon Cajun seasoning
- 1 tablespoon canola oil
- 2 chicken sausages, cut into 1/2-inch-thick slices
- 3 cups chopped celery
- 1 cup chopped onion
- 1 cup cored, seeded and chopped green bell pepper
- 4 cloves garlic, chopped
- 1/4 cup packed chopped fresh thyme
- 2 tablespoons whole-wheat flour
- 15 oz diced tomatoes with juice
- 1 cup low-sodium chicken broth
- 1/2 lb medium shrimp, shelled and deveined (about 20 shrimp)
- 16 oz frozen sliced okra
- 1/4 cup chopped fresh Italian parsley
Directions:
- Sprinkle chicken with Cajun seasoning. Heat oil in large pot over high heat. Brown chicken and sausage, turning once, 2 to 3 minutes.
- Add celery, onion, bell pepper, garlic and thyme. Cook until vegetables start to soften, 2 to 3 minutes. Add 1 tbsp water if vegetables stick.
- Reduce heat to medium. Sprinkle flour over meat-vegetable mixture. Cook, stirring, 1 minute.
- Add tomatoes, juice and broth. Simmer, covered, until chicken is cooked through, about 10 minutes.
- Add shrimp and okra; simmer, covered, until shrimp is cooked through and okra is tender, 2 to 3 minutes. Garnish with parsley.
Easy DIY Scrappy Wreath

Looking to make a spring wreath? Better yet, trying to think of a way to save some of your child’s favorite baby outfits and other stuff? This DIY scrappy wreath is the answer! Takes only a few minutes and a few bucks.
Go to the craft store and get a plain straw wreath or foam wreath. You can also save a couple of dollars and go to the hardware store and buy foam tubing, cut it into the size you want, the duct tape the two ends together.
Cut fabric out of your favorite old clothing, blankets, ribbon, or other items. Hot glue them around the wreath securely. Keep going until all of the foam or straw is covered.
Staple, tack, or glue on buttons, flowers, pacifiers, pins, earrings, necklaces, or any other decorative item you want to the wreath.
When the wreath is how you want it, you can either hang it as is, or use a long piece of ribbon or fabric, stick it through the center, and tie it in a a bow to use as the hanger.
Thanks to BluKatKraft for the picture!
Recipe: Quick Classic Mardi Gras King Cake
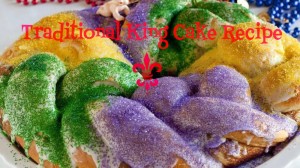
My whole family is in Michigan, but my sister and brother-in-law took jobs down in Louisiana a few years ago. One of the things they HAD to share with us is how Mardi Gras is a state holiday in Louisiana, and she sent us a traditional King Cake. We’d never heard of it, but once we had our first bite, we were hooked! You will too with this recipe from Betty Crocker.
- Ingredients:
- Cake
- 3 1/2 cups Gold Medal® all-purpose flour
- 1 package (2 1/4 teaspoons) Rapid Rise yeast
- 1 cup milk
- 1/4 cup sugar
- 1 teaspoon salt
- 2 eggs
- 6 tablespoons unsalted butter, softened, cut into 12 pieces
Cinnamon Filling
- 2/3 cup packed light brown sugar
- 1 1/2 teaspoons ground cinnamon
- 4 tablespoons unsalted butter, softened
Icing
- 1 cup powdered sugar
- 1 tablespoon milk
- 1/2 teaspoon vanilla
Decoration
- Dark green, purple, and yellow or gold sugars, if desired
- Miniature plastic baby, if desired
Directions:
- Mix 2 1/2 cups flour and yeast in mixing bowl of stand mixer, using the paddle attachment, on low for about 30 seconds.
- Heat milk, sugar, and salt in a small saucepan over medium heat until sugar is dissolved and milk is between 120°F to 130°F.
- With mixer on low, pour in liquids and mix until incorporated. Add eggs one at a time. Continue mixing until a shaggy dough forms. Clean off paddle and switch to dough hook. Mix in the remaining 1 cup flour a little at a time, adding more or less flour as needed to make a soft dough. Add the softened butter, a piece at a time, kneading until each piece of butter is absorbed.
- Knead for eight minutes on low. The dough should completely clear the sides of the bowl. If it is too sticky, add additional flour 1 tablespoon at a time, mixing in thoroughly before determining if more flour is needed. If the dough seems too dry, spritz with water from a spray bottle a couple of times, mixing in thoroughly before determining if more water is needed. Every 2 minutes, stop the machine, scrape the dough off the hook, and then continue kneading.
- Turn the dough out onto a lightly floured surface and knead a few times by hand to be sure it’s smooth and elastic. Form the dough into a ball. Place dough into a greased bowl. Turn once so greased surface is on top. Cover bowl with plastic wrap and refrigerate for 1 hour.
- While the dough is chilling, make cinnamon filling. In small bowl, combine the brown sugar and ground cinnamon. Combine butter with cinnamon mixture and mix well.
- Roll the chilled dough into a 10 x 20 inch rectangle. Spread the filling on half of the long side of the dough. Fold the dough in half covering the filling. Pat dough down firmly so the dough will stick together. Cut dough into three long strips. Press the tops of the strips together and braid the strips. Press the ends together at the bottom. Gently stretch the braid so that it measures 20 inches again. Shape it into a circle/oval and press the edges together.
- Transfer the ring to a parchment lined or greased baking sheet. Cover the dough with plastic wrap and let it rise until doubled, about 1 hour. While the dough is rising, preheat the oven to 350º. Bake the cake until it is golden brown, 20 – 35 minutes. Remove from oven and let cool 10 minutes on baking sheet and then place it on a cooling rack to cool completely before icing. To hide the baby in the cake, if desired, make a small slit in the bottom of the cake and put the miniature plastic baby in after the cake has cooled.
- Icing: In a small bowl, mix powdered sugar, milk and vanilla until smooth (add additional milk if mixture is too thick or powdered sugar if too thin).
- Spoon icing over top of the cake. Immediately sprinkle on colored sugar, alternating between the three colors.