
DIY Snowball Wreath
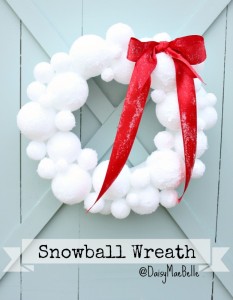
Do you have a ton of snow? Do have no snow and wish you did? Either way, this super easy snowball wreath will be the perfect decoration for the whole winter season!
What You’ll Need:
- styrofoam wreath form
- assorted styrofoam balls (the picture shows 8 large, 4 medium, 20 small, and 10 tiny)
- fake snow
- decoupage medium
- decoupage brush
- red satin ribbon
- low temp glue gun
Directions:
- Using the low temperature glue gun, glue the large snowballs to the wreath form, then fill in with the medium, then small.
- Add a thick layer of decoupage to the styrofoam. Make it really thick in some places.
- Add the fake snow over it.
- Add a bow and you can add a little decoupage and fake snow on it to make it look more realistic if you’d like!
“Melted Snowman” Ornament
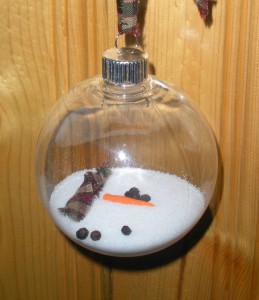
This very inexpensive gift and decorating idea is so funny! Make a “melted” snowman ornament for your kids’ teachers, neighbors, whoever else you can think of for just a couple of dollars and a few minutes of your time. Here’s how:
What You’ll Need:
- Table salt (for the “snow”)
- Peppercorns (for the “eyes” and “mouths”)
- Orange fimo molding clay (for the carrot nose – can be purchased at craft stores)
- Plastic or glass clear ornament bulbs
- Plaid fabric (optional – for a “scarf”)
- String, yarn, or anything you’d like to use to hang the ornament
- Funnel
- Drinking cup the same width as your ornaments
- Baking sheet
Directions:
- Roll out the fimo clay (you can also use playdoh or salt dough) and make carrot shapes. Cut the thicker end with a knife to make it look like a carrot (less rounded). Bake the fimo at 230 degrees for 30 minutes. Let cool.
- While waiting for the clay to harden, prop the ornaments into a drinking cup (so they can sit up on top without rolling). Poor in 1/4 cup of salt (approximately).
- Toss in 7 or so peppercorns on top of the salt.
- Cut a small piece of scarf-shaped fabric and throw into the ornament (optional).
- Once cooled, put a “carrot” into the ornament, then tie the ornament on a string.
That’s it! SO SIMPLE and so cute. The snowman parts should stay on top of the salt. Thanks to Eyeballs by Day, Crafts by Night for the tutorial!
DIY Snowflake Necklace

This adorable snowflake necklace can be made for a few dollars and a few minutes of your time. This would make a great stocking stuffer!
What You’ll Need:
- 18″ necklace (any kind, but the blog shows a ball chain like this one)
- White shrink plastic film (like this one by Graphix)
- Necklace jump ring
- Hole punch
Directions:
- Print this template and trace it on to the shrink film. Cut it out.
- Punch a hole into wherever you want to put the jump ring through.
- Put into oven and bake according to directions.
- Allow to cool, put the jump ring through the hole, and put the necklace through the ring. ALL DONE!
Thanks to Lana Red Studio for the amazing template and necklace directions!
DIY Holiday Serving Tray
Don’t spend $20 on serving trays for the holidays! You can make your own standing serving trays for less than $2 each (seriously!), and you can decorate them the way you want! You can also give them away with your cookies to friends and neighbors. It’ll blow their mind that you “spent so much” even though you know you didn’t! :)
Just got to Dollar Tree or your local dollar store and look for a matching bowl and plate (or mix and match!). Turn the bowl upside down so the bowl is open to the table and hot glue the bottom of the bowl to the bottom of the plate. Let it sit for a minute, and that’s it!
Thanks to The Tip Garden for the idea!
DIY Kiss-mas Tree Craft
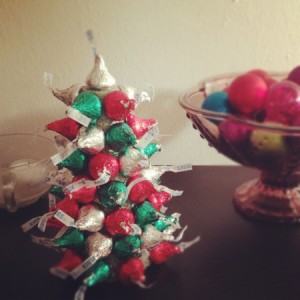
This craft is so insanely simple and adorable that you’ll want to do them every year and for different holidays (Easter trees, anyone?)! Here’s what do:
What You’ll Need:
- Styrofoam tree form from a craft store
- Hot glue gun
- Hershey Kisses
Directions:
- The styrofoam trees come in many sizes, so choose whichever you like best! Try them all for fun.
- Starting at the very top, put a dab of the hot glue on the styrofoam where you are putting the kiss.
- Work your way down from the top in circles, swirling the way down the to the bottom.
- Experiment with different decorations (ribbon, glitter, etc.) and different candies for the “star at the top” of the tree.
Let us know how yours looks and what you find works best! Thanks to Sweet Nothings NYC for the tutorial!