
Handmade Icicle Ornaments
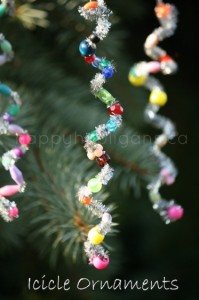
Looking for a simple, fun, and festive art project for the kids? These Icicle Ornaments are exactly that, plus it is a cute and sparkly sensory experience for the kids while decorating the tree!
What You’ll Need:
- metallic pipe cleaners
- pony beads
- thread (for hanging on the tree)
- pencil
Directions:
- To help keep the beads from falling off the end, bend the tip of each of the pipe cleaners around a few times.
- Put fun colored beads along the pipe cleaner. Leave space between them so you can see the sparkly metallic.
- Loop the pipe cleaner around the pencil to give it the spiral look.
- Loop a thread through the top bead and tie in a knot. Hang on the tree. It’s that simple!
Thanks to Happy Hooligans for the adorable idea!
DIY Glitter Branches

Such a cute and CHEAP idea for decorating for the holidays. Add a few decorative vases to put them in, and you’ve got a super sparkly room!
What You’ll Need:
- Tree branches (Make sure they’re thoroughly dry!)
- White glue
- Spray glue
- Paint brush
- Cookie sheet
- Silver spray paint
- Silver glitter
- Clear Colorfill accents (You can get them at Michael’s or other craft stores) OR Epsom Salt
Directions:
- Find a branch outside that you want in the size and shape that you like. Choose a few if you want to do more than one. Cut down to shape using lopping shears.
- Spray with silver spray paint and allow it to dry.
- Spray the spray glue over the whole branch making sure to get all the nooks and crannies.
- Sprinkle the silver glitter over the branch. Hold branch over a cookie sheet to help catch the glitter when it falls. If you do it outside, then it will be cleaner (choose a non-windy day).
- Glue in random places to make it look icy, then sprinkle with clear Colorfull accents over the glue (or Epsom salt). This creates an “icy build up”.
Thanks to Momtastic for the tutorial!
Recipe: Christmas Crunch

Christmas Crunch is a different type of sweet treat for Christmas. Definitely something not expected, and VERY delicious!
Ingredients:
- 1/2 cup popping popcorn kernels, or 2 bags tender white popcorn
- 1 (12 oz) bag Vanilla Candy Melts (such as Wilton Candy Melts)
- 1 1/3 cups broken pretzel pieces
- 1 (12 oz) bag green and red Milk Chocolate or Mint M&Ms
- Red, green and white Sprinkles
Directions:
- Pop popcorn in a popcorn popper into a large bowl (or alternately in the microwave if using microwave bags of popcorn) according to manufactures directions. Remove any unpopped popcorn kernels. Toss in broken pretzel pieces and M&Ms.
- Melt Vanilla Candy Melts in a microwave safe bowl on 50% power in 30 second intervals, stirring after each interval until melted and smooth. Drizzle half of melted chips over popcorn mixture, then stir, tossing gently a few times with a rubber spatula. Then drizzle remaining half of melted chips over popcorn, and gently stir mixture until evenly coated (don’t over stir though or your sprinkles wont stick if the white chips begin to set and harden).
- Pour mixture into a single layer onto wax paper. Sprinkle entire mixture evenly with sprinkles (as many as you’d like) before vanilla chips set.
- Allow to cool and harden, then gently break into pieces and store in an airtight container.
Thanks to Cooking Classy for the recipe!
Starbucks Caramel Apple Cider Recipe
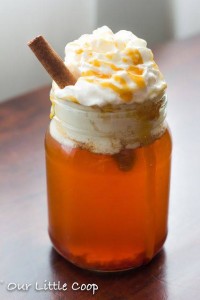
Today would be a great day to enjoy a caramel apple cider just like from Starbucks! Here’s the simple recipe:
Ingredients:
- 3 Tablespoons of Starbucks Cinnamon Dolce Syrup $9.95 for a 1-liter bottle (that’s A LOT of syrup) or you can make your own by creating a simple syrup of 1/2 cup of light brown sugar, 1/2 cup water and 1 tablespoon of cinnamon. Simmer in a small saucepan until brown sugar has dissolved. Use 3 tablespoons of this as well.
- 12oz of Treetop Premium apple juice (or any premium apple juice)
- Caramel syrup
- Whipped cream
Directions:
- Add 3 tablespoons of cinnamon syrup into your mug
- Add 12oz of apple juice, mix and warm
- Top with whipped cream
- Drizzle with caramel syrup
- Enjoy!
Thanks to Our Little Coop for the recipe!
Handmade Puzzle Wreath Picture Frame
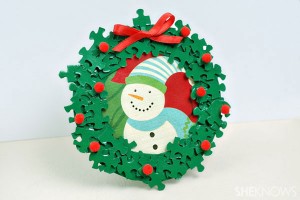
If you’re like us, we have tons of random puzzle pieces all over. If you’re not, then go to your thrift shop and get a 100 piece puzzle for $1 or so. Either way, this is a fun and thrifty gift that the kids can make, and when you fill with a picture, the grandparents will love for years to come!
What You’ll Need:
- paint brush
- glue
- red pom poms
- red ribbon
- a small round picture frame (craft store or dollar store)
- puzzle pieces
- green craft paint
- newspaper or something else to protect your work surface
Directions:
- Lay your puzzle pieces on the protected surface, and paint one side of each of your puzzle pieces green. Allow the puzzle pieces to dry. Double check that they are painted well enough to be opaque. If not, then put on another layer and let dry.
- Start gluing the puzzle pieces around the frame. Glue a single layer and allow that layer to dry completely before adding more layers. Add more puzzle pieces until the frame is completely covered and green.
- Once the puzzle pieces are dry, glue red pom poms around the frame, then tie a bow with red ribbon and glue it to the top of the frame to make it look like a wreath. Put chosen picture inside and gift. That’s it!