
DIY Patriotic Beaded Earrings

Get an extra little splash of red, white, and blue with these simple earrings from She Knows. The jewelry only takes a few minutes to make, can be worn for years, and given as gifts or a party favor. For a visual step-by-step tutorial, visit the She Knows link above.
What You’ll Need:
- Round-nosed pliers
- Jewelry pliers
- 2 Silver earring hoops
- 6 Red beads
- 6 Blue beads
- 6 White beads
- 2 Star charms
- 6 Jump rings
- 2 Earring wires
Directions:
- String the beads onto the earring hoop. Make a pattern of red-white-blue. Repeat the pattern three times.
- Using the round-nosed pliers, make a curve on the straight side of the earring wire so that it points up.
- Hook the curve onto the loop on the other end of the earring hoop. Using round-nosed pliers, twist curve into a vertical loop.
- Use two jump rings to suspend the star charm by attaching one jump ring to the top of the charm, then use a second jump ring to connect the first jump ring to the vertical loop you created in the last step.
- Use a third jump ring to connect the earring wire to the vertical loop.
- Repeat the steps above to make a second earring.
- Wear and ENJOY!
DIY 4th of July Pinwheels
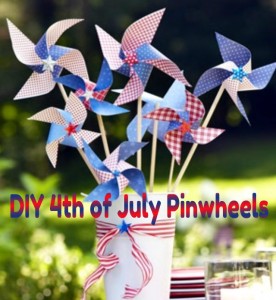
Sparklers can cause some pretty nasty burns on little hands, so instead of sparklers this year, make them these pretty 4th of July pinwheels – or just make them for fun and decorations!
What You’ll Need:
- Double-sided patriotic patterned scrapbook paper
- Wooden dowels
- Straight pins
- Beads
- Hot glue gun and hot glue
- Double-sided tape
- Scissors
- Star stickers
- Spray adhesive (if needed)
- (Optional: Plain white scrapbook paper to decorate yourself or by kids)
Directions:
- To create dual-sided pinwheels, gather your double-sided scrapbook papers in patriotic colors, or create your own (better yet, have the kids decorate them and have them involved in the celebration!). Use the spray adhesive to adhere them together.
- Cut paper into square shapes – 8-in and 6-in squares – to create different sized pinwheels.
- Fold squares in half diagonally to create a triangle, then press to crease.
- Open the triangle and fold diagonally the opposite way, then press to crease.
- Open up the triangle and flatten out the square.
- Cut along each diagonal fold three-quarters of the way to the center.
- Pull the tip of every other corner toward the center. Use double-sided tape or white craft glue to adhere the first tip to the center, then each folded-in tip on top of each other. When you finish, you’ll have the pinwheel shape.
- If you want your pinwheel to spin, skip to step 10. If not and will be used for decorations only, hot glue the pinwheel to your wooden dowel. Skip cutting down wooden dowels from the hardware or craft store and use inexpensive flag dowels (removing the flags, of course).
- Finish your pinwheel with a decorative star sticker in the center.
- If you want your pinwheel to spin, you’ll need to push a pin through the center (a straight pin works), then a bead beneath the pinwheel. You’ll drive the pin into your dowel with a hammer.
- If needed, fold over (or cut and then fold over) any part of the pin that sticks through to the back to prevent injuries.
Recipe: Grand Old Flag Cake
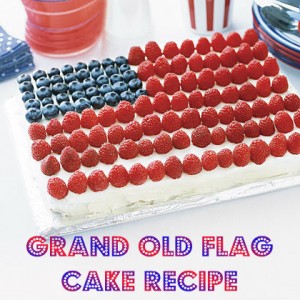
I love seeing this cake every year in all the magazines for their patriotic issues (Memorial & Independence Day). This recipe comes from an old issue of All You and you can check for the nutrition on the website. You can also use change the ingredients and flavors around, or boxed/premade/gluten-free/etc. cake and frosting – totally up to you!
Ingredients:
Chocolate cake:
- Cooking spray
- 1 3/4 cups flour
- 1 1/2 cups granulated sugar
- 2/3 cup unsweetened cocoa powder
- 1 teaspoon baking soda
- 1/2 teaspoon baking powder
- 1/4 teaspoon salt
- 1 1/2 sticks (6 oz.) unsalted butter, softened
- 1 1/2 cups buttermilk
- 2 eggs
- 1 teaspoon vanilla extract
Cream-cheese frosting:
- 2 (8 oz.) packages cream cheese, softened
- 8 tablespoons (1 stick) unsalted butter, softened
- 2 1/2 cups confectioners’ sugar, sifted
- 2 teaspoons fresh lemon juice
- 1/2 pint blueberries
- 1 1/2 pints raspberries
Directions:
- Preheat oven to 350°F. Line length of 13×9-inch cake pan with parchment paper, and leave a 4-inch overhang. Lay another sheet across width of pan and up sides (without the overhang). Spray paper evenly with the cooking spray.
- To make cake: Whisk together flour, granulated sugar, cocoa powder, baking soda, baking powder and salt in a large bowl. Using an electric mixer, beat in butter on low speed until mixture is crumbly. Add buttermilk, eggs and vanilla. Increase speed to medium and beat, scraping down inside of bowl, until smooth, 2 to 3 minutes. Transfer to baking pan.
- Bake cake until a cake tester inserted in center comes out clean, about 30 minutes. Cool in pan on a rack for 10 minutes. Holding overhanging pieces of paper, pull cake from pan and let cool completely on rack. Invert platter on cake and flip over to invert cake. Carefully peel off paper and discard.
- Make frosting: Using an electric mixer, beat cream cheese and butter on medium speed until light. Gradually beat in confectioners’ sugar until fluffy. Beat in the lemon juice. Refrigerate frosting for about 10 minutes if it’s too soft to spread.
- Frost sides and top of cake. Arrange blueberries in a rectangle in upper left-hand corner of cake. Arrange raspberries in 7 rows for stripes. Refrigerate cake until serving. (Cake can be made up to 3 hours ahead.)
DIY Freeze Pop Cozies Lightsabers

Feel the force with these adorable felt cozies to keep your little ones’ hands warm and clean(ish) while they are enjoying their freeze pops this summer with this quick tutorial from Family Fun. Instructions are for 1 cozy, and they’re very simple, so just repeat with as many as you’d like to make!
- Cut a 3″x4″ rectangle from gray felt.
- Fold it over a freeze pop and use fabric glue to seal the side and bottom edges.
- Clamp the fabric closed with binder clips or clothes pins (optional, but gives a stronger hold to the glue).
- Slip the felt off the pop.
- Glue on stripes and dots of black and colored felt (or use fabric paint if you want it even simpler!).
- Allow to dry fully, then you’re able to battle the dark side! Enjoy!
Recipe: No Bake Oreo Ice Cream Cake
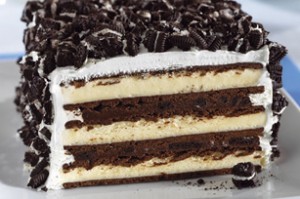
Summer is here and that means it’s ICE CREAM SEASON! (In my house, that’s year round, honestly, haha!) Skip buying a $30 ice cream cake for family gatherings and parties and make this super simple and inexpensive No Bake Oreo Ice Cream Cake instead!
Ingredients:
- 1 pkg of Jello Chocolate Instant Pudding (dry powder mix)
- 1/2 cup hot fudge ice cream topping (warmed up)
- 1 tub or 8 oz Cool Whip Whipped Topping, thawed
- 16 Oreo Cookies, chopped (about 2 cups)
- 12 ice cream sandwiches (chocolate, vanilla, mint, etc.)
- Also: Foil, whisk, baking spatula
Note: Brand name is irrelevant for the recipe. You can use any equivalent brand or store brand and will have the same delicious result.
Directions:
- In a medium bow, whisk the warmed fudge topping with 1 cup of whipped cream until well blended.
- Add the dry pudding mix, stir for a full 2 minutes. Add 1 cup of chopped cookies and stir until the cookies are fully mixed throughout the “frosting”.
- On a 24″ piece of foil, place 4 ice cream sandwiches side by side. Cover with half of the mixture. Add 4 more sandwiches, then add the rest of mixture.
- Add the last 4 ice cream sandwiches, frost with the rest of the plain whipped cream. With the remainder of cookie pieces, cover top and side of the cake, and press into the whipped cream. If you’d like to decorate, stick full Oreos into the top of the square cake shape..
- Wrap the cake very loosely with foil and freeze for 4 hours before serving.
Instead of Oreos, you could use other goodies such as Andes mints, raspberries, bananas, strawberries, chocolate chips, crushed butterfingers or M&Ms, and you can use real whipped cream.