Easy Homemade 3-Ingredient Vanilla Coconut Body Scrub
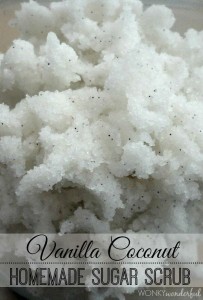
This time of the year, our skin is so dry and flaky. Why spend $30 or more on a body scrub from The Body Shop or other retailer when you can make it at home with only 3 ingredients for pennies and in only a couple of minutes. Oh, and it smells like summer. BLISS!
What You’ll Need:
- 1/2 cup solid coconut oil
- 1 cup white sugar
- Seeds from 1 vanilla pod
Directions:
- Use your whisk attachment on your mixer and whip 1/2 cup solid coconut oil for about 10 minutes. Be sure to stop to scrape down the sides after 5 minutes.
- Add 1 cup white sugar and the seeds from 1 vanilla pod. Mix for another 1-2 minutes.
- Transfer to an air tight container until ready for use.
Smells so good! You’ll love it. Thanks to Wonky Wonderful for the recipe!
Recipe: South of the Border Guacamole

So, Cinco de Mayo is almost over, but guacamole with tortilla chips is something you can eat year round! My family eats it at least biweekly – and avocados are so high potassium and good fats that it makes it seem like we are eating a healthy food, too! Here’s one of the highest rated guacamole recipes on the internet and it’s a copycat of South of the Border Restaurant’s version.
Ingredients:
- 2 large ripe Avocados
- 1 medium Tomato, chopped
- 1 Green Onion, chopped
- 2 Green Chile Peppers, seeded and chopped
- 1/8 tsp. Black Pepper
- 3 Tbsp. Lemon Juice
Instructions:
- Chop avocados coarsely and mash until smooth.
- Add tomato, onion and chiles and mix gently. Add pepper and lemon juice. Stir.
- Cover tightly with plastic wrap until ready to serve. Serve with your favorite tortilla chips.
Recipe: Skinny Taco Dip
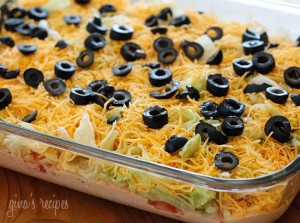
One of the most popular recipes on Skinny Taste, this taco dip can be easily modified: take stuff out that you don’t like and add ingredients in that you do. Served with tortilla chips, this will be a hit at your next get together or just for fun!
Ingredients:
- 8 oz 1/3 less fat Philadelphia cream cheese
- 8 oz reduced fat sour cream
- 16 oz jar mild salsa
- 1/2 packet taco seasoning
- 2 cups iceberg lettuce, shredded fine
- 2 large tomatoes, seeds removed and diced
- 1 cup reduced fat shredded cheddar cheese
- 2.25 oz sliced black olives
Directions:
- In a large bowl, combine cream cheese, sour cream, salsa and taco seasoning and mix well with an electric mixer.
- Spread mix onto the bottom of a large shallow glass dish.
- Top with shredded lettuce, tomatoes, shredded cheese and black olives. Serve with baked tortilla chips.
DIY Chevron Striped Flip Flops

I love flip flops! I have at least six pairs. The prices for plain colored ones can be only $1 in a lot of stores at various times of the spring and summer (Old Navy is especially known for this sale). If you want ones that have the footbed decorated, they’re going to be at the very least $5 each pair, but likely more. For only a few minutes of your time and some paint markers, you can can decorate your own flip flops to go with any outfit! If you need a visual tutorial, visit Teen Vogue.
What You’ll Need:
- One pair of foam flip flops (your choice of color)
- Blue painters or regular artist tape with a 3/4-inch width
- Scissors
- Oil-based paint markers in your choice of colors (Sharpie makes a large variety of colors and are easy to use)
Directions:
- Cut the painters or artist tape into 15 pieces about 1.5 inches in length. Make the cut at a right angle to the tape edge so that the pieces look like rectangles.
- Starting at the toe of the shoe, place a piece of tape at an angle. Press down firmly around all the edges to be sure it’s secure.
- Place the next piece of tape overlapping the first piece. The long side of the second piece should lay flat over the short side of the first piece. Press firmly around the edges again.
- Continue this tape placement across the shoe creating a chevron stripe.
- Leaving a small gap from the first stripe, start the next row the same way as the first. Continue adding rows and even spacing between each until you’ve covered the footbed.
- Once the footbed is covered, starting in the enter of the toe area of the side of the flip flop, line the edge of the tape with the edge of the footbed, and press tape firmly onto the “wall” or “lift” of the shoe. If the tape is wider than the height of the shoe, then make sure to fold it under the sole of your flip flop, not onto the footbed. Also wrap tape around the part of the strap that connects to the footbed.
- Color in the first stripe with one of the paint markers – you don’t have to be extraordinarily neat. Repeat on the rest of the stripes, alternating your colors or do them all one color. Make it your own!
- Allow the paint to dry, and go over any dull or missed areas with a second marker coat. Some lighter colors may need two coats, and you may want to do a second coat just to have it last a little longer under your feet. Allow to dry fully once the paint is how you like.
- Carefully pull the tape off your flip flop. Allow to dry for a couple of hours to make sure the edges that were touching the tape are fully dry, then enjoy! Try many different designs and color combinations! These would make great gifts, too.
Teacher Appreciation Crayon Wreath
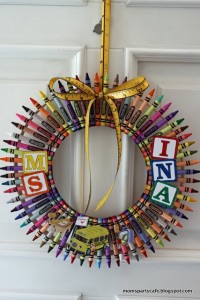
Next week is Teacher Appreciation Week, and I read that teachers love receiving gift cards for school supplies and things with their names on them. This Crayon Wreath would be an inexpensive way to say thank you to your child’s teacher. Thanks to Moms’ Party Cafe for the super cute and imaginative idea!
What You’ll Need:
- 12″ embroidery hoop, or basketry hoop (or a styrofoam wreath cut in half thickness or cardboard cut into a wreath shape, both covered with fabric or painted to cover their colors)
- 8″ embroidery hoop or basketry hoop (or same choices as above)
- box of 64 crayons
- printouts of what you need from this template
- hot glue
- ribbon
Directions:
- Place the 8″ hoop in side the 12″ hoop with equal distance between all edges.
- Arrange the crayons along the 2 hoops. Hot glue the crayons to the hoops. TIP: Keep the unglued crayons arranged on the hoops to keep the spacing accurate.
- Tie the bow around the 2 crayons that you want at the top.
- Create a separate loop and glue the edges together to create the hanging loop.
- Personalize with the teacher’s name and hot glue them on.
- If very careful with the wreath, it should last for years to come!
Leftover Easter Candy Bark

If you’re anything like me, you have Easter candy coming out your ears right now and are finding yourself eating it all the time. Yes, I know you’re sneaking it just like I am! Instead of sneaking handfuls of candy, make this fun candy bark! Bring it to work or to someone else’s house and really get rid of the candy! :)
Ingredients:
- 26 ounces white chocolate (or white chocolate melts)
- 8 Peeps, chopped or cut into 1/8ths
- 1 cup Easter candies (M&Ms, Reese’s Pieces, etc.), crushed
Directions:
- Line a baking sheet with foil, shiny-side up; smooth out the creases.
- Crush the candies by placing them in a resealable bag and gently rolling a mug or rolling pin over the bag. It’s fine if some of the candies are left whole.
- Create a double boiler by putting a glass or metal bowl over a saucepan of barely simmering water, making sure the bowl doesn’t touch the water. Add the chocolate and stir until melted and smooth. Do not overheat the chocolate or it will seize. NOTE: You can also microwave in 30 second increments, stirring between. This will be the way you do it with the white chocolate melts.
- Remove the bowl from the pan and wipe the condensation from the bottom. Pour the white chocolate onto the prepared baking sheet; use the rubber spatula to spread it into a 10-to-12-inch circle, about 1/4 inch thick.
- Press the chopped Peeps and crushed candies into the chocolate, arranging them so each bite has a mix of flavors, colors and textures. Refrigerate the chocolate for 1 hour to completely set before breaking it into large pieces.
- Break into pieces and store in an airtight container at room temperature for 1 to 2 weeks.
5-Star Simple Homemade Egg Salad
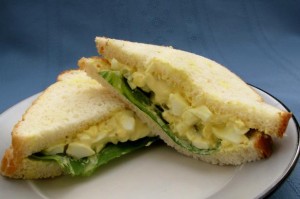
Here’s a great recipe for all those hard boiled Easter eggs if yours are still good. Instead of just tossing them out, make this highly rated Egg Salad recipe from Food.com. It was the highest rated egg salad recipe I could find on the internet – Enjoy!
Ingredients:
(This makes 2 servings)
- 4 hard-boiled eggs
- 2 tablespoons mayonnaise (Light mayo is good, too! Use more mayo if needed)
- 2/3 tablespoon mustard (Regular yellow mustard)
- 2/3 tablespoon relish
- 4 slices whole wheat bread (any type will do)
- Optional: 2/3 to taste pepper & 2/3 to taste Lettuce
Directions:
- Finely chop boiled eggs.
- Mix in mayo 1 tablespoon at a time, so not to add too much.
- Mix in mustard, relish and pepper.
- Put egg salad mixture on bread (toasted bread or on rolls are great as other options).
- Top sandwich with lettuce.
DIY Eggshell Votive Candles

Happy Easter!!! I hope everyone had a wonderful day with their families! Use those leftover Easter eggs on this cute craft. Save those hard boiled eggs for tomorrow by putting them back in the refrigerator. I’ll be sharing the highest rated egg salad recipe on the whole internet!
What you need:
- eggshells
- paper towel
- soy candle wax
- candle wick with metal tab
- hot glue gun
- double boil sauce pan
- wooden skewers
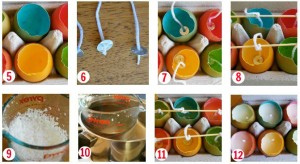
Directions:
- Crack open dyed hard boiled egg at the pointed end and break the shell down 1/3 (leaving about 2/3 of the shell behind) and take the egg out, placing in a container to be stored in refrigerator.
- Carefully rinse the inside of the egg to be used as a votive. Allow to air dry on a paper towel.
- Cut a piece of wick to about 10 cm in length and thread it through your metal tab.
- Secure the metal tab & wick to the bottom of the eggshell using a hot glue gun.
- Tie the pieces of wick to a wooden skewer to keep the wick out of the wax.
- Place your soy candle wax into a Pyrex jug (or a double boiler saucepan).
- Place jug in boiling water on the stove and wait until it melts. It will become clear when it’s ready. Take it off the heat as soon as it has melted.
- Pour the melted wax into the eggshells as carefully as possible.
- Leave your eggshell candles to dry for a few hours. Once the wax is hard you can remove the wooden skewers and trim the wick.
- You can place the eggshell votive candle holders or any other decorative holder. These would also be great to save for gifts for next spring/Easter!
Recipe: Easy Easter Marshmallow Bark
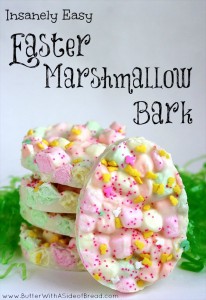
Isn’t this the cutest thing you’ve ever seen? You won’t believe how easy it is to make either. Butter, with a side of Bread is an awesome blog with a ton of easy to make and delicious recipes. You NEED to check her out over there. It also has the visual tutorial of how she made this marshmallow bark.
DIY Plastic Easter Egg Wreath
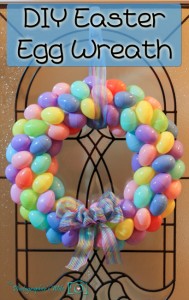
This wreath was featured on the Good Housekeeping website and for good reason. Isn’t it super cute? It’s incredibly simple and inexpensive, too. You can do so many things to this to make it more uniquely yours. You can use a premade bow, make the hanging ribbon the decorative bow and hanger in one, not use a ribbon at all, different kinds of decorative eggs, add washi tape or spray glitter to decorate the plastic eggs, glue in plastic Easter grass or flowers, add a bunny or a message to it – The possibilities are endless. Or you can leave it just like this and it’s perfect!
What You’ll Need:
- Styrofoam wreath form (or cut a wreath shape from a strong piece of cardboard)
- Long, and wide ribbon (for hanging and decorative bow, so buy a full roll of ribbon, preferably with wire)
- 4-5 bags of plastic eggs (your choice of colors & sizes: pastel, brightly colored, etc.)
- Hot glue gun with many hot glue sticks
- Craft glue (like Elmer’s)
- Optional: Ribbon or fabric to cover styrofoam wreath prior to applying eggs
Note: You will want to buy too many eggs at one time at the same store. This will assure that you do not run out mid-craft and have to buy more. If that happens, you run the risk of having use a different size and different shade of eggs to continue the wreath.
Directions:
- This first step is optional: The white of the styrofoam will show through between the plastic eggs, so if this will bother you, glue ribbon or fabric of your choice around the styrofoam fully.
- Open all the bags of eggs, open them, and glue them closed using craft glue so they stay closed.
- Decorating only the parts that will be visible (meaning so it can lie flat against the wall or door), draw a long line of hot glue down each egg then sticking to the styrofoam form. You’ll want to move fast so it doesn’t cool before you stick it to the wreath. If you can predict where you will place the next egg, place some hot glue onto the egg where it will touch other eggs before placement. This will help with the strength and stability of your wreath.
- Glue each consecutive egg like shown in the picture, without the same color touching (if you can help it) and as close together as possible so the least amount of the base shows under the eggs.
- Once finished, hold up and make sure that there aren’t any eggs that are loose and need more securing.
- To finish, create a bow of your choice (if you aren’t sure how, just Google a tutorial), and hot glue it on where you would like. Then cut a long piece of ribbon, tie into a knot, hide the knot behind the wreath, then hang by the ribbon.


