
Recipe: French Toast Roll Ups

Change up your weekend breakfast and surprise the family with these yummy French Toast Roll Ups! The Girl Who Ate Everything has step-by-step picture directions of the recipe if you want to check it out.
Ingredients:
- slices of white sandwich bread;
- rolling pin
- some softened cream cheese
- cut up strawberries
- Nutella
- eggs (for making the french toast, so number will vary)
- 3 Tbls milk
- 1/3 cup granulated sugar
- 1 heaping teaspoon of ground cinnamon
- butter (to grease the pan)
Directions:
- Cut the crust from each slice of bread and flatten it out with a rolling pin.
- Place about 1-2 teaspoons of your chosen filling 1 inch from one end of the bread in a strip. Roll the bread up tightly and repeat with the remaining pieces of bread. I really like cream cheese with diced strawberries as one combination and Nutella with diced strawberries as another combination.
- In a shallow bowl whisk the eggs and milk until well combined.
- In a separate shallow bowl mix the sugar with the cinnamon.
- Heat a skillet set over medium heat and melt a tablespoon of butter.
- Dip each bread roll in the egg mixture coating well and then place them in the pan seam side down. Cook in batches until golden brown, turning them to cook and brown on all sides, about 2 minutes per side. Add butter to the pan as needed.
- Add cooked rolls immediately from the pan to the cinnamon sugar and roll until completely covered in sugar. You can serve with syrup for dipping but I think they’re perfectly good all by themselves.
DIY Sidewalk Chalk Paint

We all love using sidewalk chalk, but have you heard of using sidewalk paint? It’s easy to make, and just like its chalk counterpart, you can jut rinse it off with water once you’re finished. Here’s the recipe from About.com. Thanks to One Perfect Day Blog for the cute pic!
What You’ll Need:
- 1/2 Cup Water
- 1/2 Cup Cornstarch
- Approximately 12 Drops of Food Coloring (Adjusted until you get your desired color)
- Jar With Lid
- Paint brushes, Foam Brushes, and/or sponges
Instructions:
- Measure the water, cornstarch, and food coloring and pour into a jar. Place the lid on the jar tightly, then shake jar until the paint is completely mixed.
- Repeat #1 for every color you want to use and paint with.
- The paint is now ready to use!
- Use paint brushes and foam brushes to make roads, games, and even huge murals on your sidewalk. You can also make fun shapes using sponges.
- If the paint gets a little too dry, simply add a little bit of water.
- When you’re done playing, rinse off with water or wait until it rains again. It will wash off skin and clothes, too!
Recipe: Copycat Cheesecake Factory Chicken Lettuce Wrap Tacos

This recipe is an almost exact copycat of the Cheesecake Factory Skinnylicious Mediterranean Chicken Lettuce Wrap Tacos – Only 250 calories in 3 “tacos” and so delicious! You can add or take out ingredients you don’t care for to make it your own!
Ingredients:
- 2 ounces boneless skinless chicken breasts, cut into 4-in long, 1-in thick strips
- 2 teaspoons Mediterranean Spice
- 1/4 cup Balsamic Vinaigrette
- 4 romaine lettuce leaves, shredded
- 1 tablespoon thinly sliced red onion
- 1/4 cup Red-Wine Vinaigrette
- 1/4 cup Tzatziki
- 12 butter lettuce leaves
- 4 Roma tomatoes, chopped
- 1 1/2 ounces crumbled feta cheese
- 12 kalamata olives, pitted and chopped
- 1 teaspoon chopped parsley
- 1/2 teaspoon dried basil
- 1/2 teaspoon dried oregano
Directions:
- Preheat a grill pan over high heat. Season chicken with 1 teaspoon Mediterranean spice and place on grill. Cook, basting with balsamic vinaigrette and turning once, until cooked through, about 2 minutes per side.
- Season chicken with remaining teaspoon Mediterranean spice and remove from grill; set aside.
- Place shredded romaine lettuce and red onions in a medium bowl; drizzle with red-wine vinaigrette and toss to combine.
- Divide mixture evenly among butter lettuce leaves and drizzle each with 1 teaspoon tzatziki.
- Top each taco with 1 piece of chicken and garnish with chopped tomatoes, feta cheese, and olives. Season with parsley, basil, and oregano; serve.
DIY Wire Bow Ring
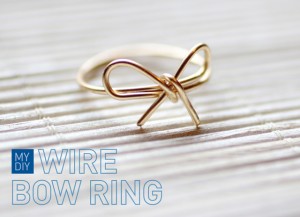
Wire rings are HUGE right now. You can buy them on etsy for $10 or more, OR spend a few bucks and a few minutes and make as many as you want in any size! Make them for your kids, midi rings, toe ring… Endless ideas. Thanks to My DIY for the tutorial. If you are more of a visual person, she has a step-by-step picture tutorial in addition to other wire ring designs.
What You’ll Need:
- Round Jewelry Pliers
- Wire (you can get any kind you want, but sterling or gold will last longer)
- Chapstick tube or other small, rounded item
Directions:
- Cut 6″ of wire to start your ring.
- Right in the center of your wire, wrap it around your finger that you want to wear it on. Then use a Chapstick tube to make it evenly rounded.
- With your round pliers, grab the top and bend over the top of the pliers to create the right loop of the bow.
- Next grab the bottom wire and bend over the top of the pliers to create the second loop.
- Adjust the wire so your loops are even.
- Take the end of the left loop, and wrap around the center, through the ring.
- Trim the ends of the wire evenly to a shorter length and file the edges if they are sharp.
Recipe: Slow Cooker French Toast Casserole

Doesn’t this Slow Cooker French Toast Casserole by Rachel Ray look AMAZING? It’s simple, too. Be sure to PIN IT and/or share it to your Facebook page so you don’t lose it!
Ingredients:
- 1 loaf white bread, cut into 1-inch cubes
- 8 eggs
- 1 1/2 cups milk
- 1/2 cup cream
- 1/4 cup maple syrup
- Zest of 1 orange
- 1/2 cup toasted walnuts
- 3 tablespoons butter, cut into cubes
- Nonstick cooking spray
- Maple syrup and bananas, for serving (Optional: butter or margarine for taste)
Directions:
- Preheat oven to 400ºF.
- Place bread cubes on a baking sheet and toast in the oven for 8-10 minutes or until golden brown. Remove from oven and allow to cool.
- In a large bowl, whisk together eggs, milk, cream, maple syrup and orange zest. Add the toasted bread cubes into the egg mixture. Add in walnuts and combine.
- Line the crock of a slow cooker with aluminum foil then spray with a nonstick cooking spray. Pour the bread and egg mixture into the slow cooker and dot the top with the cubed butter.
- Set the slow cooker to cook on high for 3 hours or set to low for 5 hours.
- Serve French Toast topped with maple syrup, sliced bananas, and more walnuts and butter if desired.
Recipe: Homemade Nutella (Even Better Than Packaged!)

If you love Nutella and want to try to make it yourself? The recipe below by Brown Eyed Baker is amazingly somehow better than the Nutella you buy at the store!
Recipe makes: 1½ cups Prep time: 15 minutes Cook time: 15 minutes
Ingredients:
- 2 cups (or 8 ounces) hazelnuts
- 1 cup powdered sugar
- ⅓ cup Dutch-processed cocoa powder
- 2 tablespoons hazelnut oil
- 1 teaspoon vanilla extract
- ⅛ teaspoon salt
Directions:
1. Preheat oven to 375* F. Spread the hazelnuts out on a single layer on a rimmed baking sheet and roast until dark brown and fragrant, 12 to 15 minutes, rotating the baking sheet halfway through baking. Keep a close eye on them, as they can go from perfect roasted to burnt in a short amount of time. Transfer the hazelnuts to a medium-sized bowl.
2. Once the hazelnuts are cool enough to handle, place a second bowl upside-down on top of the bowl with the hazelnuts. Shake vigorously for about 30 seconds to remove the skins of the hazelnuts. It may take a few times to get all of the skins off; each time, remove the hazelnuts that have lost their skin to the bowl of a food processor, then continue shaking.
3. Process the hazelnuts in a food processor until their oil is released and they form a smooth, loose paste, 2 to 5 minutes, scraping down the bowl often.
4. Add the powdered sugar, cocoa powder, hazelnut oil, vanilla extract and salt and process until fully incorporated, scraping the bowl as needed, about 2 minutes. The mixture will loosen and become glossy. Transfer the spread to a jar with a tight-fitting lid or an airtight container. You can store it in the refrigerator or at room temperature for up to 1 month.
Fun 2-Ingredient Cloud Dough

Sensory play is so much for for kids and they can find it in various ways. Some of the best ways are with flour, sand, playdoh, water, and this great idea that Happy Hooligans thought up called Cloud Dough (some call it Moon Dough). All you need is a bag of flour and baby oil! It has a great soft texture and has an added bonus of making skin nice and soft when playing with it!
In a large bowl, pour 1 cup of baby oil into 8 cups of flour. Stir well with a wisk or spoon. Have the kids help if you don’t mind getting a little flour on them. Put into a large container and give the kids all sorts of toys to manipulate the dough (Happy Hooligans has some great ideas). Store in a sealed container and it will last a long time! If it seems to harden a bit, just add a bit more baby oil. Have fun!
DIY Dollar Store Rose Petal Skirt

Spring and summer weddings, Mother’s Day, and fun family parties are all coming up soon. Why not make yourself or your daughter(s) this really cute rose petal skirt that was created by Fave Crafts? It would be adorable with different colored petals, made into dresses, or a tunic. Be sure to check out her website to see a step-by-step picture tutorial to help with creating your new skirt!
What You’ll Need:
- 1-2 XL white men’s undershirt (brand new is best if you’re doing a white skirt, used but very clean is okay for other colored petals)
- Bagged fabric rose petals (buy at dollar or craft stores)
- Scissors
- Ruler
- Pins
- Sewing machine
Directions:
- Lay your t-shirt flat and cut off the bottom for your skirt piece. Cut a piece that’s long enough to make a skirt. She suggests to measure it against a skirt you already own that’s a length you like. The skirt will already has a hem since it’s made from the bottom of the t-shirt, so you hardly have any work left.
- Next, sew the petals onto the skirt piece. Place one petal at a time, sewing them in a straight line, one right next to each other. Keep going until your skirt is covered completely by petals.
- For the top row, sew the petals upside down the iron them down so that the stitching doesn’t show.
- Now you need to make a waist band. To make this foldover waistband, first measure a pair of foldover pants you already own (if you have them) or measure another pair of pants.
- Now, cut more fabric from your t-shirt to use as your waistband. Cut double the width that you want your waistband to end up being (she cut 6 inches wide to make a 3 inch waistband). The length of your is what you measured from your pants.
- Sew this newly cut fabric into a tube, then fold the tube in half over itself so that the wrong sides are facing each other.
- Now put your skirt piece around yourself or whoever the skirt is going to be wearing it. If it’s way larger than your waistband, sew a basting stitch all the way around the top of your skirt piece and pull the threads to gather it until the circumference of your skirt’s waist is the same as your waistband.
- Put the skirt inside of the waistband so the raw sides of the waistband and gathered edge of the skirt are together, and the top of the waistband is facing down. Now, pin the waistband to the skirt.
- Sew around the top of your skirt to attach the waistband to the skirt piece. Then flip the waistband right side up, remove the basting stitch (if it’s showing), and enjoy!
How to Clean a Microfiber Couch
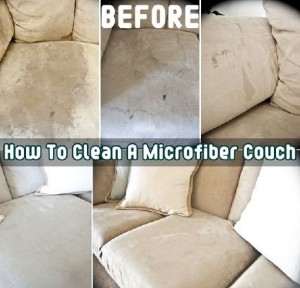
We have microfiber couches we bought right after our oldest daughter was born. She had severe GERD, then food issues, then twins were born right after that… anyway, our couches are beyond help. We need new ones, but maybe if we had seen this awesomeness, we could have saved our expensive microfiber couches, that we were assured were stain resistant. HAHA! Save yours after the stomach flu! Here’s how, for a couple of bucks with all items you can get at the dollar store!:
What You’ll Need:
- Empty spray bottle (you can get these at the dollar store)
- Several WHITE sponges (ONLY white – any other color will transfer onto your couch and make a worse stain)
- WHITE bristle brush scrubber (ONLY WHITE – see above)
- Plain rubbing alcohol (water stains microfiber, as we know, and alcohol evaporates faster so it won’t stain)
Directions:
- Pour alcohol into spray bottle, then spray the rubbing alcohol onto the microfiber, completely saturating the stained area.
- Using the white SPONGE (not brush), start scrubbing the stain right away. Scrub hard!! It will take muscle to get the stain out of microfiber. You will start to see the stain coming off onto the white of the sponge if you’re doing it well.
- If the sponge is dirty on both sides, move on to another, clean white sponge. If you continue to use a dirty one, you’ll just transfer the stain back into the microfiber.
- Once the stain is onto your sponge and off the fabric (using your best guess since it will be wet and hard to see if it’s stain or just wet), allow the fabric to dry fully. It will be hard to the touch, but that’s okay. Leave it for now.
- If the area that was stained is still dirty, repeat #1-4 until the stain is completely gone.
- Once the stain is gone and fabric is completely dry, using a swirling motion, fluff back up the microfiber fabric until it looks normal again.
EASY right? Almost too easy. I am so glad to have found this and happy to be able to share it with you! :)
Spoon Ring Tutorial
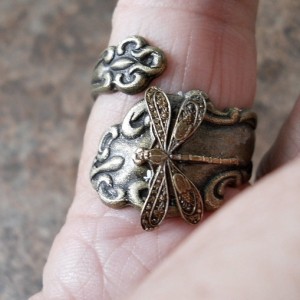
I’ve seen these made for a while now, but why I never thought to look for how to do it myself is beyond me. I have seen these being sold for $20 or more! No way! Just go to the thrift store and look for the coolest, most intricate design and do it yourself. It’d also be a fun way to remember Grandma’s place settings. This great tutorial has pictures along with the steps at Through The Front Door by Kirsten Danielle Design.
What You’ll Need:
- .925 or .900 sterling silver spoon or fork (must be sterling for it to work)
- Metal cutter, hacksaw, or jewelry saw
- File or sandpaper
- Dowel or ring mandrel
- Paper
- Pen
- Hammer or mallet (optional)
- Butane torch (optional)
Directions:
- The first thing you are going to want to do is to decide what type of ring you want to make. You can either make one that coils up your finger or you can make the one that folds over itself. The one you choose determines the length of the handle (longer for the one that wraps up your finger).
- If you are making the type that overlaps itself (not coil up your finger) use a strip of paper and wrap it loosely around the finger you want to wear the ring. Mark the overlap by .25″ so it will go over itself.
- Using metal cutter or saw, cut the length you measured in the last step or cut it right under the utensil part of the silverware if you are doing the coil ring.
- File the cut end with either a metal file or a coarse grit sandpaper. Work your way down to a fine grit sand paper to get a super-smooth finish.
- Now you must bend it into a ring shape. You can bend it around the dowel using shear force, you can hammer it around the dowel, or you can use a butane torch to heat it up before you bend it. If the metal is pliable enough, you can just bend it by hand.
- Adjust to your finger to make sure it’s shaped correctly.
- Use sterling cleaner or buff the silver to shine. That’s it!