
Homemade No-Sew Fall Leaves Headband
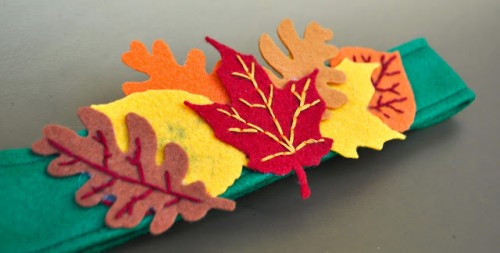
Want to get a little festive before Thanksgiving? Make these adorable and SIMPLE Fall Headbands — No sewing is required! Kids will love making these to wear for Thanksgiving.
What You’ll Need:
- Pre-cut felt leaves from art supply stores (or you can use different colors of felt and cut yourself)
- Embroidery floss and a needle (optional, or draw the veins on with a sharpie)
- Felt (for the headband)
- Glue gun
- Velcro
- Sewing machine (optional: helps it stay together better, but not necessary)
Directions:
- Stitch veins on 3-5 leaves (or draw them on with sharpie markers).
- Measure your child’s head and cut the headband out of felt. Make sure it’s about 4″ tall and leave about 2″ of overlap for the velcro. Fold over in half and hot glue or sew the headband together.
- Hot glue or sew the velcro to the ends of the headband.
- Hot glue the leaves however you’d like to the front of the headband. Use many different colors and leaf designs to make it super unique. Stitch on if you’d like for extra support.
Thanks to Make Life Lovely for the great idea!
Recipe: Disneyland’s Apple Pie Caramel Apples
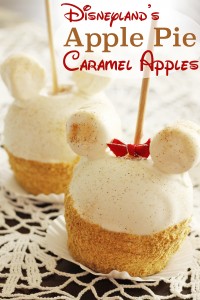
These Apple Pie Caramel Apples are a huge hit! I was able to find a recipe to make them at home, and it’s not as hard as it looks.
Ingredients:
- 4 large Granny Smith apples
- 5 to 6 cups caramels (or appx. 1 bag Kraft Caramel bits)
- 7 to 8 cinnamon graham crackers (or 1 prepared pie crust)
- 1 .5 lbs. melting chocolates (or chocolate chips)
- cinnamon & sugar to taste (appx 2 Tbsp sugar + 1/8 tsp. cinnamon)
- 8 large marshmallows (optional: to make “ears”)
Directions:
- To get the wax coating off from the apples, scrub apples and dry with a dishcloth or paper towel. To get the wax completely off, drop them in boiling water for a few seconds then scrub off.
- Refrigerate apples for a few hours until they are fully cold.
- Melt caramel in the microwave (in a microwave-safe dish) for 30 seconds at a time until caramel is nice and melted (or follow directions on package if using Bits). If you are using unwrapped caramels, you can also put caramels in a small crockpot on high heat until melted.
- Place caramel apple sticks or popsicle sticks into the top of each apple and dip each apple into the caramel until fully coated, rotating the apple as needed. Let excess caramel drip off and them place the apples on wax paper. Refrigerate for at least 3 hours until caramel is completely cooled onto the apples.
- In a food processor, process graham crackers (or pie crust) until well blended. If using a pie crust, add a little cinnamon and sugar to the mixture. Place in a bowl and set aside.
- Melt chocolate in a microwave-safe dish in the microwave until chocolate is just melted and there are no lumps. Dip each apple in the chocolate and allow chocolate to set for a few seconds. When chocolate has slightly set, roll the bottom half in processed pie or cracker crumbs. Sprinkle each entire apple with cinnamon and sugar and set aside.
- Optional: Once the chocolate on the apples have set, roll each marshmallow in the chocolate and place onto the apples to make Mickey’s “ears”. Sprinkle with cinnamon and sugar and hold in place until the ears set.
A HUGE thanks to Favorite Family Recipes for the awesome recipe and picture!
Recipe: Apple Pie “French Fries”
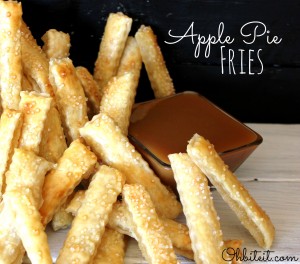
Okay, so maybe these Apple Pie “French Fries” aren’t the healthiest snack, but how cute are they? They look like real French fries with salt and shape. These would be really fun to have at a birthday party. The recipe below from Oh Bite It! serves 25-30 “fries”, so you may need more than that for parties.
Ingredients:
- 1 pkg of Pillsbury refrigerated pie crusts (2 ct., but brand doesn’t matter)
- 1.5 cups of Apple Pie Filling
- 1 Egg
- Sparkle sugar for sprinkling “salt” onto the fries
- Caramel sauce and/or ice cream for dipping
- Optional: Food processor, Decorative edge roll-cutter
Directions:
- Chop up apple pie filling as best as you can, or use food processor and save tons of time.
- Unroll the 2 pie crusts. On 1 of the crusts, spread the apple filling around leaving 1/8″ at edge, then lightly press the other crust onto the top of it to secure it.
- Make egg wash by combining an egg with a splash of water.
- Brush egg wash across the entire top of the crust and sprinkle with the sparkle sugar.
- Cut the crust into 1/2″ strips then again into “fries” shape and size. Place very carefully onto parchment paper lined baking sheet.
- Bake at 350-degrees for 12 minutes or until slightly golden and firm.
- Serve with caramel and/or ice cream for dipping.
Make Your Own Make Up Remover
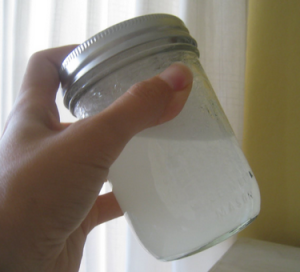
Removing your makeup can be be a pain and some of those products just seem to dry your skin out. This gentle recipe is great for removing your makeup with out being irritating. Use cotton balls or a washcloth with the makeup remover and rub very gently to remove all the makeup off your face.
What You’ll Need:
- 2 cups warm water
- 1-2 Tbsp of liquid coconut oil (not the same measurement as in its solid form)
- Face wash soap or baby body wash
- Container for storage
Directions:
- Start by pouring warm water into the storage container.
- Add a tbsp. (or two) of coconut oil that has been melted in it’s liquid state.
- Next, add a squirt of face wash and stir everything together.
- You may need to shake the container before each use, but it will keep for several months.
Recipe: “Stained Glass” Sugar Cookies

This is the coolest and most creative use of hard candies I’ve seen since the DIY Christmas platters using peppermint candies I posted back in December. They’re beautiful, fun to look at, easy to make, and completely, 100% edible! Make them for your next potluck, for holidays, or just for fun. I can’t wait to hear how you like them!
Ingredients & Tools:
- Jolly Ranchers Hard Candies (Any hard candy will work, but cannot be sugar-free candy)
- Your favorite sugar cookie recipe (either premade or made from scratch, both work)
- 2 sizes of cookie cutters (these were hearts, but you can use your choice of 2 of the same shape, but different sizes)
- Baking sheet
- Wire racks
- Waxed paper
Directions:
- Roll out sugar cookie dough and cut out the cookies with a large cookie cutter. Use a spatula to move them to the baking sheet.
- Using the small cookie cutter, remove the centers of the large cookies that are on the baking sheet.
- Place 2 Jolly Ranchers (or other hard candy) of different colors inside the new empty center of the cookies. Choosing 2 different colors gives the stained glass look.
- Bake cookies with candy centers according to your cookie recipe’s instructions.
- Let the cookies cool on the baking sheet for 5 minutes to allow the candy center to harden before you then transfer them to wire racks to cool completely.
- Once fully cooled, you can move them onto a plate or into a storage container, but to prevent the hard candies from sticking together place waxed paper between layers of cookies. Enjoy!