
Candy Corn Mousse Cups

Halloween is only a couple of days away! You can make some super fun desserts to give out to the kids’ friends or just as a dessert for the next few days. You can use them for Thanksgiving, too! Here’s how to make your own Candy Corn Mousse Cups:
INGREDIENTS
1 package (8 oz.) cream cheese, softened
½ cup powdered sugar
¼ cup milk or cream
1 teaspoon vanilla
1 small container (8 oz.) Cool Whip, thawed
orange and yellow food color
candy corn
DIRECTIONS
Beat cream cheese in the bowl of a stand mixer until fully smooth. Slowly add powdered sugar, add milk and then vanilla. Continue mixing about 1 minute on medium speed. Fold cool whip into cream cheese mixture; stir until fully combined. Scoop about 1/3 of the cheesecake mousse into a bowl; mix with orange food coloring. Color another third of the mixture yellow. Leave the remaining third white. Beginning with the yellow mousse, pipe or spoon the mixture into each glass. Repeat with the orange and white. Garnish with candy corn. Then ENJOY!
Yield: 8 mini servings. We halved the recipe and were able to fill 4 shot glasses.
Recipe: Nutella Banana Bread
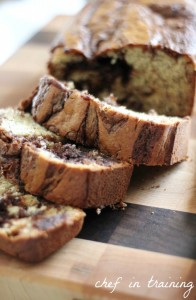
Nutella added INTO banana bread? Yes! It’s a simple recipe to make such delicious bread that you’ll never go back to “regular” banana bread again. Thanks to Chef In Training for the yummy recipe!
Ingredients:
- 1 cup sugar
- 2 large eggs
- 1 1/4 cup mashed ripe bananas
- 1 tsp. vanilla
- 1/3 cup milk
- 3/4 heaping cup Nutella
- 2 cups flour
- 3/4 tsp. baking soda
- 1/2 tsp. salt
- 1/4 cup softened butter
Directions:
- Preheat oven to 350 degrees and spray an 8×4-inch loaf pan with nonstick spray.
- Whisk together flour, baking soda and salt in a medium sized bowl.
- Beat sugar and butter in another large bowl with an electric mixer at medium speed until fully blended. Add the eggs, one at a time, beating well after each one. Add banana, milk and vanilla, then beat until blended. Add the flour mixture from the other bowl and beat at low speed just until flour is mixed in, but not too blended.
- Put the Nutella into a small dish and warm in the microwave for 15 seconds. Add 1 cup of the banana bread batter to the Nutella in the bowl and stir them together until well blended.
- Add this newly made Nutella batter, then the plain banana bread batter in alternating layers into the bread pan. Lightly swirl the two types of batter with a knife.
- Bake at 350 degrees for 50 to 60 minutes. The bread will seem a little underbaked, but that’s what makes it so good and moist! Let the bread cool for at least 15 minutes in the pan before taking it out of the pan to cool completely.
DIY Tiara of Queen Elsa from Frozen
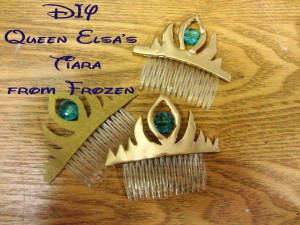
Unless you live under a rock, you know of the amazing Disney movie, Frozen. It’s the hottest animated movie of all time and literally every Frozen-themed item is either completely sold out or being sold for 4 to 10x the original price. People are even upset they can’t buy beach towels! I’m here to help with that, at least a little bit. You can make a Queen Elsa of Arendelle tiara yourself in about half an hour and for about $10 (yay!).
What You’ll Need:
- Wax paper
- Hot glue gun (and LOTS of glue sticks)
- Metallic gold spray paint
- Blue, faceted aqua colored beads
- Wire cutters
- Floral wire
- Plastic hair piece comb
- Print the template
- Scissors
- Xacto Knife
- Optional: For easier versions, use felt or cardboard cut out instead of glue
Directions:
- Print out the PDF of the template from Instructables, then tape it to the back of some waxed paper. (For the easier felt versions, tape the template to some felt and trace it onto the felt by holding it up to a light source, or trace and cut out cardboard).
- Hot glue all over the stencil showing through the wax paper and put the comb into the bottom so it will be nice and strong. Try to complete a whole section at once so the glue will be even and not show layers.
- Once glue is cooled. cut it out using some sharp scissors to get really clean edges. Refine the shape with an Xacto knife to get sharp tips on the tiara,
- Once the crown is as you like, spray with gold spray paint.
- For the jewel, cut a length of wire that will reach from one side of the middle of the teardrop center to the other. Put the jewel on the wire and hot glue the wire to the tiara.
- Do your hair up like Queen Elsa on Coronation Day, and you’ve got yourself some happy kids!
Easy Natural DIY Lip Balm
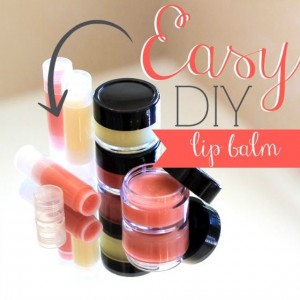
Why spend $3 or more per tube of lip balm? You can make it yourself in just minutes and for a fraction of the cost. Plus, every ingredient is all natural and safe to use over and over again! The directions below will make a couple of small lip gloss jars or tubes. You can double the recipe or stick to the ratio of 1 part beeswax to 2 parts oil to make as much as you want! Adding different oils will feel and taste different, so experiment and find what you love most.
What You’ll Need:
- 1 tsp. of grated packed down beeswax or beeswax pellets
- 2 tsp. of coconut oil
- 4-5 drops of Vitamin E oil
- 1/2 tsp. of honey
- To make colored lip balm, you’ll need some of your favorite blush or lipstick (optional)
Directions:
- Mix all the ingredients together and microwave for 10 seconds. Stir, then another 10 seconds. Do this over and over until it is fully melted and mixed together.
- Once everything is melted and mixed, IMMEDIATELY and carefully pour the mixture into the container of your choice.
- Allow to cool and fully harden (a few hours) before using or giving as a gift.
Recipe: Oreo and Peanut Butter Brownie Cakes
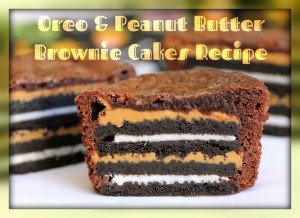
These VERY yummy little brownie cupcakes are so easy to make, you may never go back to regular brownies or cupcakes again. Make them for your next party or potluck! Big thanks to FoodSnots on Instructables for the recipe! Ingredients:
- 1 box brownie mix, 8×8 inch size
- 24 Oreo Cookies
- 1/2 cup creamy peanut butter
Directions:
- Preheat oven to 350 degrees and line a 12 muffin cup baker with paper liners and spray generously with cooking spray.
- Prepare brownie mix according to package directions, then spoon just enough brownie batter to cover the bottom of the liners completely.
- Spread a teaspoon of peanut butter over 2 Oreo cookies, stack them, then place them in the lined cups. Repeat.
- Spoon 2 tablespoons of brownie batter over each of the stacked Oreos and let it run down the sides of the cookies.
- Bake cookies and brownies for about 14 minutes or until brownies are cooked through (don’t be fooled by the “shiny” top, they may already be baked fully).
- Let cool completely then serve or store in an airtight container with a slice of bread to keep them moist for up to a week.