
DIY Eggshell Votive Candles

Happy Easter!!! I hope everyone had a wonderful day with their families! Use those leftover Easter eggs on this cute craft. Save those hard boiled eggs for tomorrow by putting them back in the refrigerator. I’ll be sharing the highest rated egg salad recipe on the whole internet!
What you need:
- eggshells
- paper towel
- soy candle wax
- candle wick with metal tab
- hot glue gun
- double boil sauce pan
- wooden skewers
Directions:
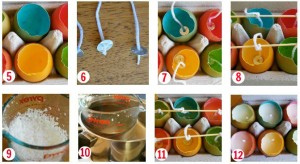
- Crack open dyed hard boiled egg at the pointed end and break the shell down 1/3 (leaving about 2/3 of the shell behind) and take the egg out, placing in a container to be stored in refrigerator.
- Carefully rinse the inside of the egg to be used as a votive. Allow to air dry on a paper towel.
- Cut a piece of wick to about 10 cm in length and thread it through your metal tab.
- Secure the metal tab & wick to the bottom of the eggshell using a hot glue gun.
- Tie the pieces of wick to a wooden skewer to keep the wick out of the wax.
- Place your soy candle wax into a Pyrex jug (or a double boiler saucepan).
- Place jug in boiling water on the stove and wait until it melts. It will become clear when it’s ready. Take it off the heat as soon as it has melted.
- Pour the melted wax into the eggshells as carefully as possible.
- Leave your eggshell candles to dry for a few hours. Once the wax is hard you can remove the wooden skewers and trim the wick.
- You can place the eggshell votive candle holders or any other decorative holder. These would also be great to save for gifts for next spring/Easter!
Recipe: Easy Easter Marshmallow Bark
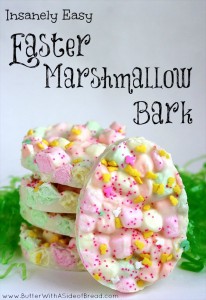
Isn’t this the cutest thing you’ve ever seen? You won’t believe how easy it is to make either. Butter, with a side of Bread is an awesome blog with a ton of easy to make and delicious recipes. You NEED to check her out over there. It also has the visual tutorial of how she made this marshmallow bark.
Recipe: Fluffy Bunny Butt Cookies

Spring is here and Easter has some of the cutest and brightest holiday treats. These adorable Fluffy Bunny Butt Cookies recipe from the Pillsbury website are easy and will be a big hit at any parties or family parties this weekend. Have your kids help decorate these lil cuties!
Ingredients:
- 1 roll (16.5 oz) Pillsbury™ refrigerated sugar cookies
- 1/3 cup all-purpose flour
- 1 container (12 oz) fluffy white whipped ready-to-spread frosting
- 22 miniature marshmallows
- Spring colored candy sprinkles
- Optional: Pink gel food color
Directions:
- Heat oven to 350°F. In a large bowl, knead cookie dough and flour with hands until well mixed.
- Reshape dough into 9 x 1 1/2-inch log. Wrap dough in plastic wrap and refrigerate for 30 minutes.
- Remove plastic wrap. Cut cookie dough into 33 slices. Cut 11 of these slices into 4 equal wedges. Shape each of the wedges into ovals for bunny feet. Place cookie dough slices and bunny feet on ungreased cookie sheet.
- Bake cookies for 8 to 12 minutes or until edges are light golden brown. Let cool for 1 minute, then remove from cookie sheets and place on cooling racks. Cool completely (10-15 minutes).
- While cooling, using a medium microwavable bowl, stir frosting and 1 to 3 drops pink food color until well blended and you find the color pink you like best. Microwave frosting uncovered on High for 10 to 15 seconds or until soft, but not translucent.
- To make bunny butt, frost 1 whole cookie slice and 2 bunny feet with frosting. Place bunny feet on bottom of cookie as shown in photo. Place 1 marshmallow in center of each cookie for tail.
- Decorate bunny paws with candy sprinkles. Repeat with remaining cookie slices and bunny feet. These can be baked and frozen for up to 2 months before thawed and eaten.
FUN EXTRA: If you want to decorate more, you can add ears to your bunny by placing candy-coated almonds or jelly beans at top of each cookie.
DIY Four-Leaf Clover Door Hanging
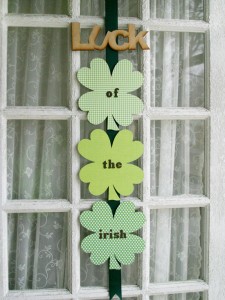
It doesn’t seem like it’s possible, but St. Patrick’s Day is only about a week away! Get your home a little bit more into the Irish spirit with this really cute and easy door (or wall if you’d rather) hanging from over at Good Housekeeping.
At your local craft store, buy either 3 or 4 wooden shamrock shapes (Note: If you can’t find a wooden “LUCK” cutout, just buy a 4th shamrock and follow the directions for how to make them). With a variety of different patterned green scrapbook paper, use spray adhesive to attach the front of the shamrock to the back of the scrapbook paper and allow to dry. Cut the shamrock out of the paper using a utility knife or scissors, then using a foam brush, apply Mod Podge over the front of the shamrocks to seal in the paper, then allow to dry. Using green scrapbook letters, spell out Luck (if needed), of, the, Irish. Last, attach the finished shamrocks onto the long piece of green ribbon using several glue dots to hold them on.
Except for waiting for the glue and Mod Podge to dry, this should only take a few minutes and can last for years!
Recipe: Quick Classic Mardi Gras King Cake

My whole family is in Michigan, but my sister and brother-in-law took jobs down in Louisiana a few years ago. One of the things they HAD to share with us is how Mardi Gras is a state holiday in Louisiana, and she sent us a traditional King Cake. We’d never heard of it, but once we had our first bite, we were hooked! You will too with this recipe from Betty Crocker.
- Ingredients:
- Cake
- 3 1/2 cups Gold Medal® all-purpose flour
- 1 package (2 1/4 teaspoons) Rapid Rise yeast
- 1 cup milk
- 1/4 cup sugar
- 1 teaspoon salt
- 2 eggs
- 6 tablespoons unsalted butter, softened, cut into 12 pieces
Cinnamon Filling
- 2/3 cup packed light brown sugar
- 1 1/2 teaspoons ground cinnamon
- 4 tablespoons unsalted butter, softened
Icing
- 1 cup powdered sugar
- 1 tablespoon milk
- 1/2 teaspoon vanilla
Decoration
- Dark green, purple, and yellow or gold sugars, if desired
- Miniature plastic baby, if desired
Directions:
- Mix 2 1/2 cups flour and yeast in mixing bowl of stand mixer, using the paddle attachment, on low for about 30 seconds.
- Heat milk, sugar, and salt in a small saucepan over medium heat until sugar is dissolved and milk is between 120°F to 130°F.
- With mixer on low, pour in liquids and mix until incorporated. Add eggs one at a time. Continue mixing until a shaggy dough forms. Clean off paddle and switch to dough hook. Mix in the remaining 1 cup flour a little at a time, adding more or less flour as needed to make a soft dough. Add the softened butter, a piece at a time, kneading until each piece of butter is absorbed.
- Knead for eight minutes on low. The dough should completely clear the sides of the bowl. If it is too sticky, add additional flour 1 tablespoon at a time, mixing in thoroughly before determining if more flour is needed. If the dough seems too dry, spritz with water from a spray bottle a couple of times, mixing in thoroughly before determining if more water is needed. Every 2 minutes, stop the machine, scrape the dough off the hook, and then continue kneading.
- Turn the dough out onto a lightly floured surface and knead a few times by hand to be sure it’s smooth and elastic. Form the dough into a ball. Place dough into a greased bowl. Turn once so greased surface is on top. Cover bowl with plastic wrap and refrigerate for 1 hour.
- While the dough is chilling, make cinnamon filling. In small bowl, combine the brown sugar and ground cinnamon. Combine butter with cinnamon mixture and mix well.
- Roll the chilled dough into a 10 x 20 inch rectangle. Spread the filling on half of the long side of the dough. Fold the dough in half covering the filling. Pat dough down firmly so the dough will stick together. Cut dough into three long strips. Press the tops of the strips together and braid the strips. Press the ends together at the bottom. Gently stretch the braid so that it measures 20 inches again. Shape it into a circle/oval and press the edges together.
- Transfer the ring to a parchment lined or greased baking sheet. Cover the dough with plastic wrap and let it rise until doubled, about 1 hour. While the dough is rising, preheat the oven to 350º. Bake the cake until it is golden brown, 20 – 35 minutes. Remove from oven and let cool 10 minutes on baking sheet and then place it on a cooling rack to cool completely before icing. To hide the baby in the cake, if desired, make a small slit in the bottom of the cake and put the miniature plastic baby in after the cake has cooled.
- Icing: In a small bowl, mix powdered sugar, milk and vanilla until smooth (add additional milk if mixture is too thick or powdered sugar if too thin).
- Spoon icing over top of the cake. Immediately sprinkle on colored sugar, alternating between the three colors.