
DIY Decorative Rose Mirror
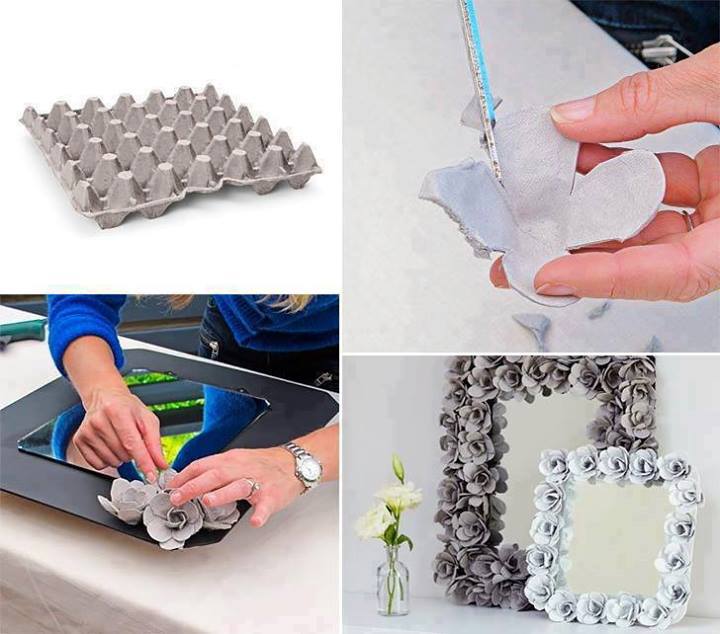
Next time you use up all the eggs, hang on to those egg cartons and make this awesome decorative mirror. So simple.
Materials
- 12-cup egg cartons (you’ll need 5 cartons to make a small mirror or 12 to make a large mirror)
- Hot-glue gun and hot-glue sticks
- Mirror tile or small mirror (frame removed)
- 3mm MDF
Directions
- Step 1: Make a mirror with a flower design that is made out of none other than egg cartons.
- Step 2: Cut 1 slit into each corner of 1 cup (to make 4 slits). Cut each piece into a petal shape. Repeat with another cup, to create second layer of rose. Repeat with a third cup, but cut petals a little smaller, then roll so petals curve and make a bud shape.
- Step 3: Hot glue the 3 layers together, offsetting middle layer so petals sit in spaces between petals of bottom layer. Finish with layer of smaller petals. Repeat process until you’ve made enough roses to completely surround mirror. Spray roses with white paint, if desired. Leave to dry.
- Step 4: Measure and mark 3cm in across top and down side from 1 corner of MDF. Rule a line to join marks and saw off triangle. Repeat for all corners. Position mirror in centre of MDF, trace around, then remove.
- Step 5: Drill 2 pairs of holes in frame above mirror position. Thread through picture hanging wire and secure. Paint MDF border with black paint and allow to dry. Glue mirror in position.
- Step 6: Starting at 1 corner, hot glue roses to frame, bending petals to fill in gaps if needed. Continue until frame is covered.
DIY Glitter Sandals Tutorial

Have a pair of boring sandals that aren’t getting worn enough? This tutorial will teach you how to easily and very inexpensively glam your sandals up and make sure you’ve got sparkly feet this summer!
What You’ll Need:
- A pair of basic flat sandals
- Glitter (a large container of glitter in the color of your choice)
- Tacky glue (from the craft store)
- Foam brush
- Clear sealant
Directions:
- Use a brush to apply a layer of glue over the areas of the sandal you are going to apply glitter. Do 1 sandal at a time.
- Sprinkle glitter generously over the glued area while the glue is still wet. Be sure to put pour the glitter on the sandal over newspaper, paper, or other way to collect the leftover glitter.
- Gently shake off extra glitter. To keep the remaining glitter in place, spray on a light coat of clear sealant. Or if you’re out of sealant, use a light coat of clear fingernail polish.
- Repeat steps 1-3 on the other sandal.
- Allow your sandals to dry fully overnight, then admire your new glitzy footwear!
DIY Plastic Spoon Garden Markers
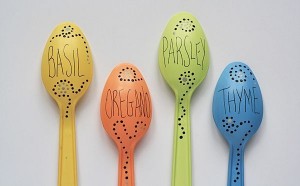
I love gifts that are handmade, useful, cute, and CHEAP! This Plastic Spoon Garden Markers tutorial is written to look just like their spoons, but it would also be very cute to use kids’ decorations and handwriting – for a gift for grandparents or parents, it would mean more that way. If you don’t have little ones handy, just follow the tutorial below. For visuals, click the link above.
What You’ll Need:
- 4 white plastic spoons
- Multi-Surface Satin paint in Gray, Brown, plus 4 others in your choice of colors (Note: You can use any type of paint if you choose to use clear top coat spray instead)
- Sandpaper
- Paintbrush
- Toothpick
- Fine point black art pen
- Clear enamel top coat spray (MUST for regular paint, or Optional: To seal in finished paint for the multi-surface)
Directions:
- Sand each spoon to knock off the shine. This will make the spoon easier to paint.
- Paint each spoon with a thin coat of paint, leaving the bottom 2″ of the handles unpainted. This is where the spoon will go into the ground.
- When dry, paint a second coat and allow to dry completely.
- Use art pen to write herb names on the spoons.
- Use a toothpick to dot on designs using the gray and brown paints.
- Spray with top coat sealing spray on both sides and all areas of the spoon, paying special attention to the deeper parts and painted areas. Allow to dry for an hour, then spray again.
- Let these dry for a full 48 hours before exposing to the outdoor elements.
DIY Embellished Flip-Flops Tutorial
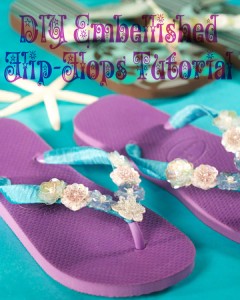
Take your plain, cheap rubber flip-flops and embellish them yourself with this tutorial from Martha Stewart. It’s super inexpensive and only takes a few minutes.
What You’ll Need:
- Plain rubber flip-flops
- Seam binding or regular ribbon in color of your choice (seam binding works best)
- Scissors
- Fabri-tac fabric permanent glue (or other brand, but this one is the best)
- Trim and embellishments
Directions:
- Cut about a yard of seam binding, and wrap around one side of the Y-shaped flip-flop strap, starting from the back and working up to the toe. Secure seam binding at beginning and end with glue. Repeat on the other side of the Y.
- Glue desired embellishments onto wrapped strap.
- Repeat these steps on the second flip-flop.
- Allow to fully dry before wearing and show off your new fancy flippies!
Preserve your Herbs
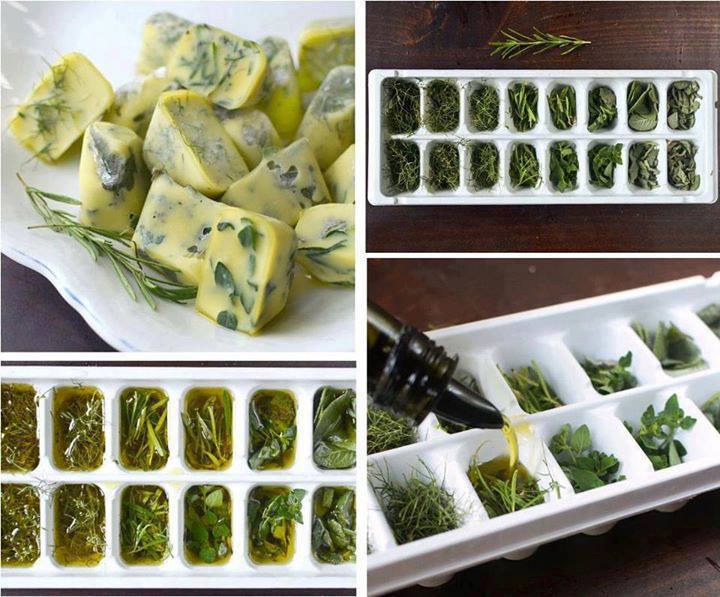
Often times you buy a big bundle of dill or rosemary, but only use up a little bit of it for the one recipe you were making. Now, here is a great way to preserve all those extra herbs you have and make your money go a little bit further!
8 Steps for Freezing Herbs in Oil
- Choose firm, fresh herbs, ideally directly from the market or your own garden.
- If you wish, you can chop them fine. Or leave them in larger sprigs and leaves.
- Pack the ice cube trays about 2/3 full of herbs.
- You can mix up the herbs, too; think about freezing a bouquet of sage, thyme, and rosemary to add to winter roast chickens and potatoes!
- Pour extra-virgin olive oil or melted, unsalted butter over the herbs.
- Cover lightly with plastic wrap and freeze overnight.
- Remove the frozen cubes and store in freezer containers or small bags.
- Don’t forget to label each container or bag with the type of herb (and oil) inside!
Enjoy!