
Recipe: Kool-Aid Playdough
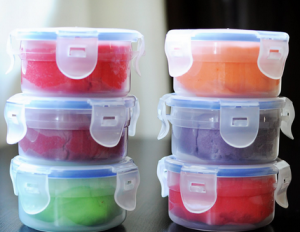

I love using my freebies and awesome deals to make fun low cost activities for the kids. This is a super fun thing that the kids can even help make! It is really easy and you can finish the whole process and be ready to play in about 7 minutes (okay 10 if you have the kids helping). Someone asked if you can make this with Country Time Lemonade and I can say, the last time I tried it, it did not produce as good of results as the Kool-Aide. Plus the KoolAide scent lasted a lot longer.
Ingredients
- 1 cup flour
- ¼ cup salt
- 1 packet Kool-Aid
- 1/2 cup Water
- 1 tbsp oil
Instructions
- Mix the flour, the salt, and the Kool-Aid together.
- Boil the water.
- Add the oil to the water.
- Pour some of the water into the dry ingredients and mix with a spoon. Keep adding water and work the dough until the color is uniform and feels like playdough.
- Be sure to keep stored in a resealable container in the refrigerator – it will last a very long time if you do, and can be used over and over again.
DIY Plastic Spoon Garden Markers
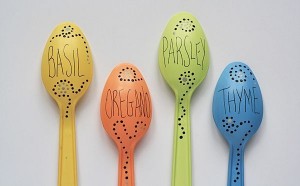
I love gifts that are handmade, useful, cute, and CHEAP! This Plastic Spoon Garden Markers tutorial is written to look just like their spoons, but it would also be very cute to use kids’ decorations and handwriting – for a gift for grandparents or parents, it would mean more that way. If you don’t have little ones handy, just follow the tutorial below. For visuals, click the link above.
What You’ll Need:
- 4 white plastic spoons
- Multi-Surface Satin paint in Gray, Brown, plus 4 others in your choice of colors (Note: You can use any type of paint if you choose to use clear top coat spray instead)
- Sandpaper
- Paintbrush
- Toothpick
- Fine point black art pen
- Clear enamel top coat spray (MUST for regular paint, or Optional: To seal in finished paint for the multi-surface)
Directions:
- Sand each spoon to knock off the shine. This will make the spoon easier to paint.
- Paint each spoon with a thin coat of paint, leaving the bottom 2″ of the handles unpainted. This is where the spoon will go into the ground.
- When dry, paint a second coat and allow to dry completely.
- Use art pen to write herb names on the spoons.
- Use a toothpick to dot on designs using the gray and brown paints.
- Spray with top coat sealing spray on both sides and all areas of the spoon, paying special attention to the deeper parts and painted areas. Allow to dry for an hour, then spray again.
- Let these dry for a full 48 hours before exposing to the outdoor elements.
DIY Chevron Striped Flip Flops
![]()
I love flip flops! I have at least six pairs. The prices for plain colored ones can be only $1 in a lot of stores at various times of the spring and summer (Old Navy is especially known for this sale). If you want ones that have the footbed decorated, they’re going to be at the very least $5 each pair, but likely more. For only a few minutes of your time and some paint markers, you can can decorate your own flip flops to go with any outfit! If you need a visual tutorial, visit Teen Vogue.
What You’ll Need:
- One pair of foam flip flops (your choice of color)
- Blue painters or regular artist tape with a 3/4-inch width
- Scissors
- Oil-based paint markers in your choice of colors (Sharpie makes a large variety of colors and are easy to use)
Directions:
- Cut the painters or artist tape into 15 pieces about 1.5 inches in length. Make the cut at a right angle to the tape edge so that the pieces look like rectangles.
- Starting at the toe of the shoe, place a piece of tape at an angle. Press down firmly around all the edges to be sure it’s secure.
- Place the next piece of tape overlapping the first piece. The long side of the second piece should lay flat over the short side of the first piece. Press firmly around the edges again.
- Continue this tape placement across the shoe creating a chevron stripe.
- Leaving a small gap from the first stripe, start the next row the same way as the first. Continue adding rows and even spacing between each until you’ve covered the footbed.
- Once the footbed is covered, starting in the enter of the toe area of the side of the flip flop, line the edge of the tape with the edge of the footbed, and press tape firmly onto the “wall” or “lift” of the shoe. If the tape is wider than the height of the shoe, then make sure to fold it under the sole of your flip flop, not onto the footbed. Also wrap tape around the part of the strap that connects to the footbed.
- Color in the first stripe with one of the paint markers – you don’t have to be extraordinarily neat. Repeat on the rest of the stripes, alternating your colors or do them all one color. Make it your own!
- Allow the paint to dry, and go over any dull or missed areas with a second marker coat. Some lighter colors may need two coats, and you may want to do a second coat just to have it last a little longer under your feet. Allow to dry fully once the paint is how you like.
- Carefully pull the tape off your flip flop. Allow to dry for a couple of hours to make sure the edges that were touching the tape are fully dry, then enjoy! Try many different designs and color combinations! These would make great gifts, too.
Teacher Appreciation Crayon Wreath
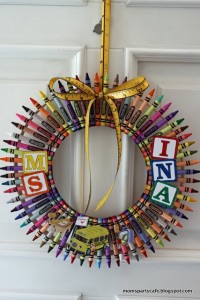
Next week is Teacher Appreciation Week, and I read that teachers love receiving gift cards for school supplies and things with their names on them. This Crayon Wreath would be an inexpensive way to say thank you to your child’s teacher. Thanks to Moms’ Party Cafe for the super cute and imaginative idea!
What You’ll Need:
- 12″ embroidery hoop, or basketry hoop (or a styrofoam wreath cut in half thickness or cardboard cut into a wreath shape, both covered with fabric or painted to cover their colors)
- 8″ embroidery hoop or basketry hoop (or same choices as above)
- box of 64 crayons
- printouts of what you need from this template
- hot glue
- ribbon
Directions:
- Place the 8″ hoop in side the 12″ hoop with equal distance between all edges.
- Arrange the crayons along the 2 hoops. Hot glue the crayons to the hoops. TIP: Keep the unglued crayons arranged on the hoops to keep the spacing accurate.
- Tie the bow around the 2 crayons that you want at the top.
- Create a separate loop and glue the edges together to create the hanging loop.
- Personalize with the teacher’s name and hot glue them on.
- If very careful with the wreath, it should last for years to come!
DIY Eggshell Planters & Gardens

From Better Homes & Gardens
Eggshells contain an abundance of natural vitamins and minerals that help plants of all kinds grow stronger and live longer. One way to use the shells is to just throw them in a food processor and throw them in your garden’s soil, but also a great way to start a garden is inside of eggshells! Many people start this little project right after Easter – perfect timing with spring and to reuse the eggshells from Easter eggs!
Empty the shell completely by cracking the pointed end and breaking the shell down to where 2/3 to 3/4 of the shell is still there. Rinse the insides of spare egg residue, crack the bottom of the shell (for the roots to grow through and for oxygen), and stick it back in the carton. Fill the shell with planting soil, poke a hole with your finger for the seed or plant, and continue with more eggshells. Make sure to set your new garden near sunlight water as needed.
Martha Stewart Living Magazine says this is how to know when to move them from the shell to the real garden, “The first leaves to sprout will be the cotyledons or seed leaves, which supply nutrients to the young plant until the first true leaves (resembling those of the parent plant) appear. When plants have grown to about 3 inches and have at least two sets of true leaves, they are ready to be transplanted to the garden. (Remove them from the eggshells first.)”