
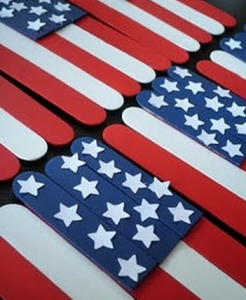
Patriotic Popsicle Sticks American Flag Kids Craft
I just love this craft because it is not only simple, but if you seal it, you can keep them for years to come!
You just need:
- Blue Paint
- White Paint
- Red Paint
- Popsicle Sticks
- Mod Podge (optional, for sealing)
- White Glue
- Cereal box or card board
- White star stickers
Once you have painted your popsicle sticks, you will need to have a small square of cardboard. I used an empty cardboard box for mine. Glue the dried, painted popsicle sticks directly to the cardboard so they have a nice foundation. Then layer on the second layer of painted popsicle sticks and secure with glue. Add the stars by painting them or using stickers.
Once dry, the flags can be glued onto another popsicle stick to “wave” or put into the ground as decorations. Another option is to tie them onto a string and make them into patriotic garland that you can use year after year!
This is a super cute holiday craft!
Check out this cute patriotic table cloth!
DIY Duct Tape Rose Pen Tutorial
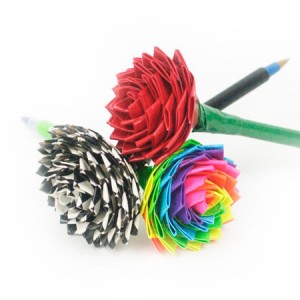
If you aren’t aware, there are dozens of designs in duct tape now. People are using it more than for just fixing pipes – they’re making projects like these really cute flower pens! This is like origami for duct tape. Make these for gifts, fun teacher presents, for decorations, and with tons of different combinations! Thanks to CraftFoxes for the tutorial. There is a visual tutorial if it will help with your craft! What You’ll Need:
- Green duct tape (for stems and leaves)
- Designed or colored duct tape (for petals)
- Plain pen
Directions:
- Take your pen and cover it in green tape lengthwise. This works best if you roll the pen across the tape, sticky-side up.
- To make petals, cut several strips of 2-inch long squares out of the colored or designed tape. Fold one edge over itself sticky side up, leaving some stickiness exposed on the side and bottom. It ends up looking like a sail on a boat because of the sticky edge left out instead of a perfect triangle.
- Take the other edge and fold it over, leaving only stickiness on the bottom of the strip.
- Wrap the petal tightly around the top of the pen stem.
- Repeat steps 2-5 with duct tape, wrapping the petals around the top. Continue until you’ve reached the size of rose you want.
- For the leaves under the base of the rose, repeat steps 2 – 4 with the green duct tape. Wrap these pieces around the stem at the base of the flower to cover up the tape edge.
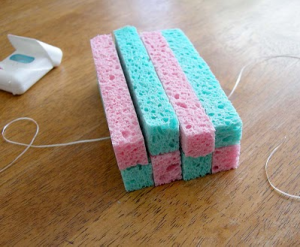
Sponge Balls Cheap Summer Fun
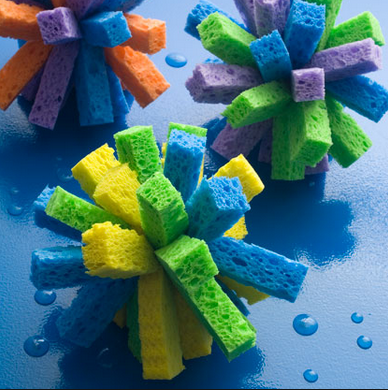
I always look for fun, easy and inexpensive things to do with the kids over the summer. These are perfect! You can grab the materials at your local Dollar Store or in the Dollar Bins at Target. I made a whole bucket of them for just a few bucks and they lasted for a while. The kids had a blast and we were able to stay cool during the sumer months.
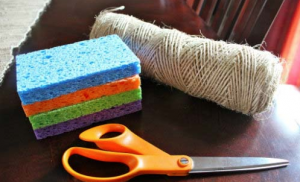
All you need are sponges, some twine and a knife or scissors to cut the sponges with. Then you just tie the strips together. It’s so easy and best of all the kids can help!
DIY Sidewalk Chalk Paint

We all love using sidewalk chalk, but have you heard of using sidewalk paint? It’s easy to make, and just like its chalk counterpart, you can jut rinse it off with water once you’re finished. Here’s the recipe from About.com. Thanks to One Perfect Day Blog for the cute pic!
What You’ll Need:
- 1/2 Cup Water
- 1/2 Cup Cornstarch
- Approximately 12 Drops of Food Coloring (Adjusted until you get your desired color)
- Jar With Lid
- Paint brushes, Foam Brushes, and/or sponges
Instructions:
- Measure the water, cornstarch, and food coloring and pour into a jar. Place the lid on the jar tightly, then shake jar until the paint is completely mixed.
- Repeat #1 for every color you want to use and paint with.
- The paint is now ready to use!
- Use paint brushes and foam brushes to make roads, games, and even huge murals on your sidewalk. You can also make fun shapes using sponges.
- If the paint gets a little too dry, simply add a little bit of water.
- When you’re done playing, rinse off with water or wait until it rains again. It will wash off skin and clothes, too!
Fun 2-Ingredient Cloud Dough
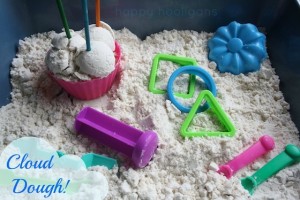
Sensory play is so much for for kids and they can find it in various ways. Some of the best ways are with flour, sand, playdoh, water, and this great idea that Happy Hooligans thought up called Cloud Dough (some call it Moon Dough). All you need is a bag of flour and baby oil! It has a great soft texture and has an added bonus of making skin nice and soft when playing with it!
In a large bowl, pour 1 cup of baby oil into 8 cups of flour. Stir well with a wisk or spoon. Have the kids help if you don’t mind getting a little flour on them. Put into a large container and give the kids all sorts of toys to manipulate the dough (Happy Hooligans has some great ideas). Store in a sealed container and it will last a long time! If it seems to harden a bit, just add a bit more baby oil. Have fun!