
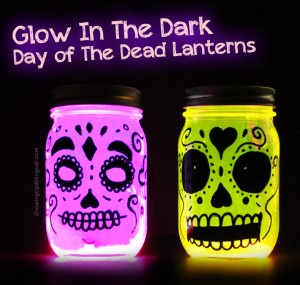
Easy Dia de los Muertos (Day of the Dead) Lantern Tutorial
As many know, Dia de los Muertos (or the Day of the Dead) is celebrated on November 1st every year in Mexico. It’s been celebrated for over 4,000 years – long before Mexico existed! It is a celebration of life and it is a loved tradition with beautiful decorations and altars, parades and music.
If you want to teach your children about Dia de los Muertos (or learn about it yourself) this website is full of information on the history, traditions, and current celebrations. Then create these Day of the Dead lanterns to celebrate the lives of loved ones in your life that have passed on with this tutorial from Growing Up Bilingual.
What You’ll Need:
- glass mason jars
- black sharpie or other permanent black marker
- glow in the dark sticks
Directions:
- To make these lanterns, just paint a fun sugar skull or calavera design on the front of the mason jar. You can Google ideas for inspiration.
- Cut a glow in the dark stick and pour the glow in the dark liquid inside the mason jar. Close the jar tightly and shake it making sure that the liquid covers all the inside of the mason jars. Put them out in the dark and enjoy the glowing calaveras!
Note: Make sure that you use gloves when you cut the glow in the dark sticks and do not let children handle them or cut them as the chemicals inside the glow stick can irritate skin and eyes. Some glow sticks also have glass inside so be careful when handling as there might be glass shards inside the glow stick. Proper safety materials like safety glasses and gloves should be used when recommended to protect eyes and skin.
DIY Glowing Fairies in a Jar
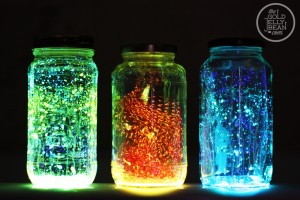
Most of us have seen the picture of fairies in a jar that went viral last year. We all found out that it was fake and photoshopped, much to many kids’ dismay. Here’s a REAL way to do it, no photoshop needed. BIG thanks to The Gold Jelly Bean for helping to make so many kids’ days brighter with this tutorial!!
What You’ll Need:
- Glass jar (cleaned one from spaghetti sauce or similar, or you can buy them at the dollar store)
- Glow sticks
- Rubber gloves
- Scissors
- Eye protector (like goggles or glasses)
- White tulle (optional, but looks better!)
Directions:
- Cut the tulle into a larger size than the jar and stick it inside. The tulle helps it look like the fairies are suspended in the jar, not just stuck on the sides of the glass.
- Put on rubber gloves and crack the glow stick to get the glow to activate, then stick the end of the glow stick into the jar and cut the top off. Be careful with this! There are glass and chemicals inside the stick, so be sure to not touch your eyes.
- Shake the stick all over the inside of the jar. This will take a while because it doesn’t just pour out, it may even get clogged. Use a new one, don’t try to get the glass out.
- After putting in the amount of glow liquid you want, put the cap on and shake. It will probably take 2-3 necklaces or 3-4 bracelet glow sticks to get the right amount.
- Turn out the lights and watch the amazement in your kids’ eyes!
DIY Cereal Box Stencil Halloween Candy Tote Bags
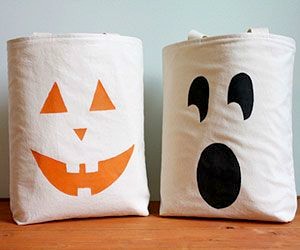
Update a classic fabric tote with easy-to-make stencils and sponge painting with this tutorial from Parents Magazine. Make these adorable tote bags and reuse them for years to come!
What You’ll Need:
- Fabric tote (get at any art supply store such as JoAnn’s or Michaels)
- Fabric paint
- Stencil brush or sponge
- Cereal box
- Crafts knife and cutting mat
- Masking tape
Directions:
- Cut one of the largest rectangles out from your cereal box.
- Either you or your child can sketch jack-o’-lantern shaped faces onto the box. Using a craft knife, an adult will now cut out the jack-o’-lantern shapes on a cutting mat.
- Next, tape your rectangle template with the faces cut out onto the fabric bag. Have your child dab on the paint using a stencil brush or sponge painting it as evenly colored as possible. You could also use the end of a sponge paint roller. NOTE: The trick to getting the paint on neatly is to hold the brush or sponge end perpendicular to the surface.
- Let dry fully for at least 12 hours (overnight would be best). To be safe, spray with waterproofing spray and then can be used in any Halloween weather for many years to come!
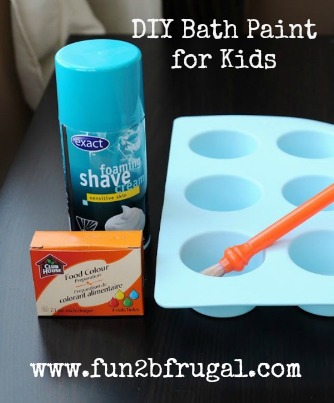
DIY Bath Paint for Kids
Have you spent tons of money on buying fun things to do for your kids or grandkids in the bath tub? With all the fancy toys, coloring crayons, paints etc they have on the market now. You could probably spend a pretty penny on just bath entertainment for kids alone. Here is a fun, quick, and of course frugal way to letting your kids have some bath time fun, and saving your money. Mommy is happy = Everyone is happy.
DIY Bath Paint for Kids
Needed:
1. Inexpensive Shaving Cream – buy whatever is on sale, or get some at your local Dollar Store.
2. Food Coloring
Directions:
1. Mix chosen food coloring into a small bowl of shaving cream. Or if you are going to make up more than one color a muffin tin works perfectly.
2. Give to child to have fun.
That’s it! How simple was that!!!!
Have fun!
DIY Elastic FOE Headbands Tutorial
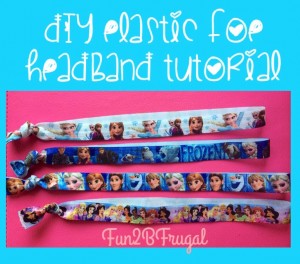
You can either spend $3 or more for one headband on Etsy or other shop, OR you can follow my directions to make adult and/or children’s sized elastic headbands for about $1 or less and in the design of color of your choice. I chose to do it on my own when I found an epic deal on Frozen and Disney Princess FOE for literally less than $1 per yard shipped on a Groopdealz or Jane steal, so I had to figure it out to surprise my girls and use my own pictures as the tutorial! The headbands literally took me less than 2 minutes to make 2-3 and look exactly like what you buy at the stores – and this is my first time making them :)
You can also make your own elastic hair ties with the tutorial I posted previously, and you can make ties with leftover FOE.
Note: Some shops take a long time to ship, so order in plenty of time if you are (or your child is) going to need to wear the headband for a special occasion.
What You’ll Need:
- Fold Over Elastic (FOE) ordered with the designs or colors you want (1 headband: 18″ for big kids & adults, 16″ for baby/toddler)
- Scissors
- Ruler or measuring tape
- Optional: Lighter or matches
Directions:
- Gather all supplies and decide which sized headbands you are making – adults and kids 4+ wear 18-in long FOE, while toddlers and babies wear 16-in long FOE. Use your best judgement on each. It’s better to cut too long then crop down than to cut too short and have to make them into hair ties.
- Measure out your first length of FOE. DO NOT STRETCH THE ELASTIC WHILE MEASURING! This will make the length inaccurate. Double check the length measurement again, then cut the elastic.
- Using the elastic you just cut as your guide, cut as many pieces of the FOE as you’d like to make into headbands.
- Fold in half the first headband and line up the edges. If they aren’t straight, cut them into a straight line.
- Now is the time you can decide to use a lighter or a match to melt the edges together to prevent fraying in the future. I didn’t do it, but I may choose to do it later.
- Holding both ends, tie the headband ends together as closely to the end as you can and tighten into as small of a knot as you can.
- Repeat 4-6 until you are finished with all your headbands. This should only take you a few minutes to make 10 or more headbands!