
Homemade No-Sew Fall Leaves Headband
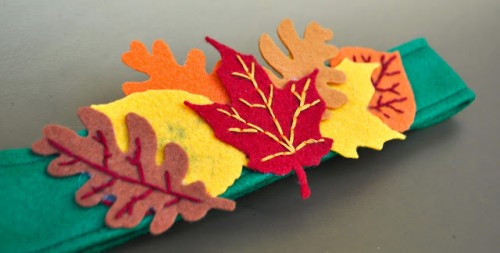
Want to get a little festive before Thanksgiving? Make these adorable and SIMPLE Fall Headbands — No sewing is required! Kids will love making these to wear for Thanksgiving.
What You’ll Need:
- Pre-cut felt leaves from art supply stores (or you can use different colors of felt and cut yourself)
- Embroidery floss and a needle (optional, or draw the veins on with a sharpie)
- Felt (for the headband)
- Glue gun
- Velcro
- Sewing machine (optional: helps it stay together better, but not necessary)
Directions:
- Stitch veins on 3-5 leaves (or draw them on with sharpie markers).
- Measure your child’s head and cut the headband out of felt. Make sure it’s about 4″ tall and leave about 2″ of overlap for the velcro. Fold over in half and hot glue or sew the headband together.
- Hot glue or sew the velcro to the ends of the headband.
- Hot glue the leaves however you’d like to the front of the headband. Use many different colors and leaf designs to make it super unique. Stitch on if you’d like for extra support.
Thanks to Make Life Lovely for the great idea!
DIY Nutter Butter Turkey Cookies

How cute are these Turkey cookie creations? These would be fun to make with your kids as a “craft” to do before Thanksgiving to bring as a treat to your family meal or as a treat to eat later this month. Thanks to Life with Moore Babies for the tutorial (visit the site for a step-by-step visual tutorial and pictures of her adorable babies!)!
Ingredients:
- Nutter Butters
- Oreos
- Regular size Reese’s Peanut Butter Cups
- Icing (LWMB Blog used decorating, but any icing that stands strong is fine)
- mini M&Ms
- jellybeans
Directions:
- Place icing on the back of a peanut butter cup and stick it to a Nutter Butter. Then using more icing to hold them in place, stand both the Nutter Butter and the peanut butter cup up on an Oreo.
Note: If you are doing this activity with kids, have them choose their own colored candies! It will make it more “theirs”. Messy is fun! :) - Now, add 2 mini M&Ms for eyes, an orange jelly bean for the beak, and a red jelly bean for the waddle on more frosting.
- Then squirt icing across the top of the peanut butter cup, so you can add jelly beans for feathers. Each of the blogger’s turkeys had five feathers.
- Also add icing then two yellow jelly beans at the bottom of the Nutter Butter for feet.
Recipe: DIY Turkey Cookie Pops
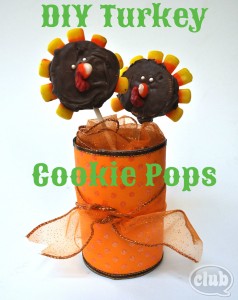
Here’s a simple and delicious “craft” from Chica Circle that you can do with the kids and give as gifts (or eat them yourselves!). Stop over at Chica Circle for the visual tutorial on these cookie pops, then also do the cute recycled aluminum can craft in the picture! Would be a great addition to the cookie pops to give as a gift!
Ingredients & What You’ll Need:
- chocolate (brown) and red candy melts
- candy corn
- popsicle sticks
- wax paper
- Oreo cookies (chocolate or vanilla)
- Candy pearls
Directions:
- Melt chocolate candy melts in a bowl for one minute and stir until smooth. Dip one end of lollipop stick in melted candy and stick in center of sandwich cookie.
- Place on wax paper and let cool in refrigerator for 5 minutes until hardened.
- Either dip cookie into melted candy or use a knife to spread on all sides of cookie. While chocolate is still soft, arrange 8 candy corn pieces along edge starting at the top on one side.
- Finish arranging all 8 candy corn pieces all the back of one side and place on wax paper, candy corn side down.
- For face, place one candy corn sticking up in center for beak. Place two candy pearl dots for eyes. Let harden in refrigerator again for 5 minutes.
- For the turkey’s wattle, place a few red candy melts into a small ziplock bag. Melt for about 20-30 seconds and squish in bag until smooth. Clip one end of bag and squeeze a tiny bit on one side of the candy corn. Let harden.
Fun & Fruity Turkey Tutorial
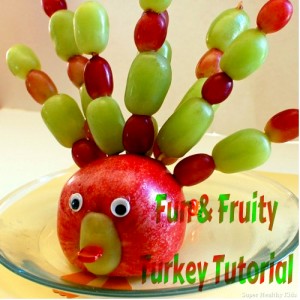
Get kids excited about Thanksgiving and make them a super healthy and delicious snack at the same time! These fruity turkeys are easy and fun.
What You’ll Need:
- Wooden skewers
- Bento toothpick and regular toothpicks
- Googly eyes
- Grapes and/or other fruits to add to the skewers.
Directions:
- Cut the side off from an apple to make it sit flat.
- Affix the googly eyes with peanut butter or use something else to make eyes. Use half of a grape as the beak and stick a Bento toothpick into it over the stem part of the apple.
- Put fruits on the skewers and stick them in the hind part of the apple to make the tail.
- Use toothpicks to stabilize the hind part of the apple since the skewers make it back-heavy.
- Give to kids and enjoy!
Thank you to Super Healthy Kids for the fun snack idea!
DIY Glitter Ballet Flats
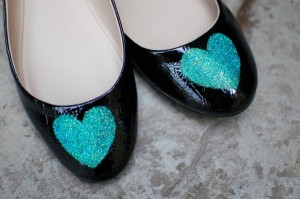
Don’t spend $50 on a pair of glitter flats, especially when you can buy cheap, plain ones and Mod Podge the sparkles onto them yourself for a couple of bucks! Follow this super simple tutorial from She Knows for your own pair.
What You’ll Need:
- Shoes (plain or some ones that might be a little scratched up and you can cover it!)
- Mod Podge
- Glitter
- Clear Con-Tact paper
- 2 paintbrushes
- Utility knife
- Bowl
- Acrylic spray sealer (optional)
Directions:
- Find a design or shape that you like and print it out. Lay the contact paper over it and tape it down to keep it secure.
- Using a utility knife, cut the shape out of the center. You will be using this interior part as the shape onto the shoe.
- take the back off the contact paper and lay it over where you want it to be on your shoe. Make sure they are straight and even with the one on the other shoe.
- Mix the Mod Podge with the glitter you want to use in about a 1 to 1 ratio. Paint a thin and even coat over the template.
- Allow to dry completely, then repeat as necessary to make sure it is fully opaque.
- Use an acrylic spray to seal the glitter on or use another thin coat of just mod podge.
- Remove the contact paper and allow to dry again. All done! A few minutes and you’ve got truly unique and adorable shoes!