
Layered Patriotic Non-Alcoholic Drink Recipe

When it comes to the beautiful layered drinks, whether they are adult beverages or not, the way to get the drinks to have the layered look depends on the sugar content of each of the types (colors) of beverages. The higher the sugar content, the lower it needs to be in the glass. Thanks to Made From Pinterest for the easy (and pretty!) recipe!
- To make this beautiful Red, White, and Blue Patriotic and non-alcoholic drink, you just need Cran-Apple juice (of any brand), Sobe White Pina Colada, and Gatorade G2 Blueberry Pomegranate (the last two drinks do make a difference for sugar content and color).
- Grab your pretty glass and fill it almost to the top with crushed ice.
- Pour the Cran-Apple juice down the side of glass as close as you can to leave as little red on the upper parts of the glass as possible. Fill the red juice as high as you’d like it.
- Then pour the Sobe Pina Colada with as much as you’d like of white. You’ll see the Cran-Apple juice stays low since it’s higher in sugar content.
- Finish off the top of your drink with the Blueberry Pomegranate Gatorade.
- Add the straws and any fun patriotic decorations you’d like. Enjoy!!
Patriotic Popsicle Sticks American Flag Kids Craft
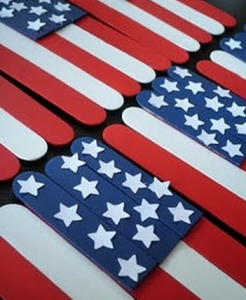
I just love this craft because it is not only simple, but if you seal it, you can keep them for years to come!
You just need:
- Blue Paint
- White Paint
- Red Paint
- Popsicle Sticks
- Mod Podge (optional, for sealing)
- White Glue
- Cereal box or card board
- White star stickers
Once you have painted your popsicle sticks, you will need to have a small square of cardboard. I used an empty cardboard box for mine. Glue the dried, painted popsicle sticks directly to the cardboard so they have a nice foundation. Then layer on the second layer of painted popsicle sticks and secure with glue. Add the stars by painting them or using stickers.
Once dry, the flags can be glued onto another popsicle stick to “wave” or put into the ground as decorations. Another option is to tie them onto a string and make them into patriotic garland that you can use year after year!
This is a super cute holiday craft!
Check out this cute patriotic table cloth!
DIY Duct Tape Rose Pen Tutorial
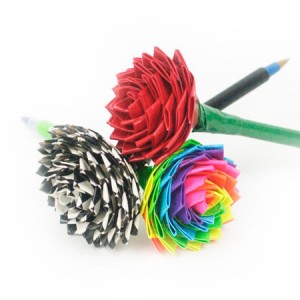
If you aren’t aware, there are dozens of designs in duct tape now. People are using it more than for just fixing pipes – they’re making projects like these really cute flower pens! This is like origami for duct tape. Make these for gifts, fun teacher presents, for decorations, and with tons of different combinations! Thanks to CraftFoxes for the tutorial. There is a visual tutorial if it will help with your craft! What You’ll Need:
- Green duct tape (for stems and leaves)
- Designed or colored duct tape (for petals)
- Plain pen
Directions:
- Take your pen and cover it in green tape lengthwise. This works best if you roll the pen across the tape, sticky-side up.
- To make petals, cut several strips of 2-inch long squares out of the colored or designed tape. Fold one edge over itself sticky side up, leaving some stickiness exposed on the side and bottom. It ends up looking like a sail on a boat because of the sticky edge left out instead of a perfect triangle.
- Take the other edge and fold it over, leaving only stickiness on the bottom of the strip.
- Wrap the petal tightly around the top of the pen stem.
- Repeat steps 2-5 with duct tape, wrapping the petals around the top. Continue until you’ve reached the size of rose you want.
- For the leaves under the base of the rose, repeat steps 2 – 4 with the green duct tape. Wrap these pieces around the stem at the base of the flower to cover up the tape edge.
DIY Dollar Store Rose Petal Skirt

Spring and summer weddings, Mother’s Day, and fun family parties are all coming up soon. Why not make yourself or your daughter(s) this really cute rose petal skirt that was created by Fave Crafts? It would be adorable with different colored petals, made into dresses, or a tunic. Be sure to check out her website to see a step-by-step picture tutorial to help with creating your new skirt!
What You’ll Need:
- 1-2 XL white men’s undershirt (brand new is best if you’re doing a white skirt, used but very clean is okay for other colored petals)
- Bagged fabric rose petals (buy at dollar or craft stores)
- Scissors
- Ruler
- Pins
- Sewing machine
Directions:
- Lay your t-shirt flat and cut off the bottom for your skirt piece. Cut a piece that’s long enough to make a skirt. She suggests to measure it against a skirt you already own that’s a length you like. The skirt will already has a hem since it’s made from the bottom of the t-shirt, so you hardly have any work left.
- Next, sew the petals onto the skirt piece. Place one petal at a time, sewing them in a straight line, one right next to each other. Keep going until your skirt is covered completely by petals.
- For the top row, sew the petals upside down the iron them down so that the stitching doesn’t show.
- Now you need to make a waist band. To make this foldover waistband, first measure a pair of foldover pants you already own (if you have them) or measure another pair of pants.
- Now, cut more fabric from your t-shirt to use as your waistband. Cut double the width that you want your waistband to end up being (she cut 6 inches wide to make a 3 inch waistband). The length of your is what you measured from your pants.
- Sew this newly cut fabric into a tube, then fold the tube in half over itself so that the wrong sides are facing each other.
- Now put your skirt piece around yourself or whoever the skirt is going to be wearing it. If it’s way larger than your waistband, sew a basting stitch all the way around the top of your skirt piece and pull the threads to gather it until the circumference of your skirt’s waist is the same as your waistband.
- Put the skirt inside of the waistband so the raw sides of the waistband and gathered edge of the skirt are together, and the top of the waistband is facing down. Now, pin the waistband to the skirt.
- Sew around the top of your skirt to attach the waistband to the skirt piece. Then flip the waistband right side up, remove the basting stitch (if it’s showing), and enjoy!
DIY Patriotic Beaded Earrings
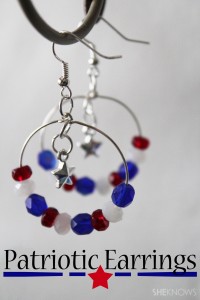
Get an extra little splash of red, white, and blue with these simple earrings from She Knows. The jewelry only takes a few minutes to make, can be worn for years, and given as gifts or a party favor. For a visual step-by-step tutorial, visit the She Knows link above.
What You’ll Need:
- Round-nosed pliers
- Jewelry pliers
- 2 Silver earring hoops
- 6 Red beads
- 6 Blue beads
- 6 White beads
- 2 Star charms
- 6 Jump rings
- 2 Earring wires
Directions:
- String the beads onto the earring hoop. Make a pattern of red-white-blue. Repeat the pattern three times.
- Using the round-nosed pliers, make a curve on the straight side of the earring wire so that it points up.
- Hook the curve onto the loop on the other end of the earring hoop. Using round-nosed pliers, twist curve into a vertical loop.
- Use two jump rings to suspend the star charm by attaching one jump ring to the top of the charm, then use a second jump ring to connect the first jump ring to the vertical loop you created in the last step.
- Use a third jump ring to connect the earring wire to the vertical loop.
- Repeat the steps above to make a second earring.
- Wear and ENJOY!