
Candy Corn Home Decor
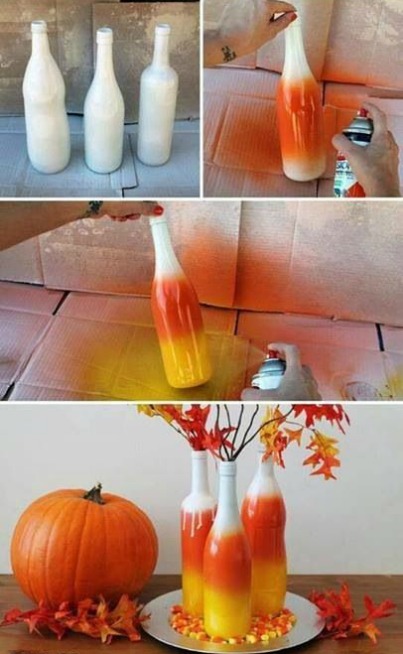
Have some empty wine bottles laying around and you are in need of some cute Halloween Home Decor? This is the perfect DIY Project for you. Super Simple, Easy & Cute all in one package.
Materials:
Empty Wine Bottles
Glossy Spray Paint – White, Orange & Yellow
Fall Foliage
Directions:
1. Make sure Wine Bottles are completely clean & dry.
2. Spray entire bottle with White Spray Paint.
3. Spray 3/4 way up with orange
4. Spray 1/2 way up with Yellow
5. Let dry completely.
6. Fill with Fall Foliage
7. Arrange on your mantle or as a centerpiece for your table!
Happy Fall!!!
Candy Corn Mousse Cups

Halloween is only a couple of days away! You can make some super fun desserts to give out to the kids’ friends or just as a dessert for the next few days. You can use them for Thanksgiving, too! Here’s how to make your own Candy Corn Mousse Cups:
INGREDIENTS
1 package (8 oz.) cream cheese, softened
½ cup powdered sugar
¼ cup milk or cream
1 teaspoon vanilla
1 small container (8 oz.) Cool Whip, thawed
orange and yellow food color
candy corn
DIRECTIONS
Beat cream cheese in the bowl of a stand mixer until fully smooth. Slowly add powdered sugar, add milk and then vanilla. Continue mixing about 1 minute on medium speed. Fold cool whip into cream cheese mixture; stir until fully combined. Scoop about 1/3 of the cheesecake mousse into a bowl; mix with orange food coloring. Color another third of the mixture yellow. Leave the remaining third white. Beginning with the yellow mousse, pipe or spoon the mixture into each glass. Repeat with the orange and white. Garnish with candy corn. Then ENJOY!
Yield: 8 mini servings. We halved the recipe and were able to fill 4 shot glasses.
DIY Scented Bath Bombs
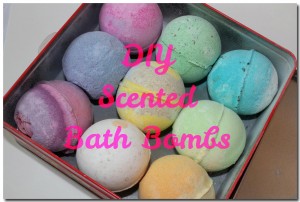
Women are super in love with bath bombs (or bath fizzies) right now. I have a lot of friends that buy them at LUSH and they’re $5 EACH. So, they’re paying $5 every time they take a bath. That’s crazy to me. Here is a really simple, natural way to make your own bath bombs from Vitacost at home in minutes and for literally a few cents each bomb!
What You’ll Need:
- ½ cup of citric acid
- 1 cup of baking soda
- 3 oz. witch hazel
- Small spray bottle
- Rubber ice cube trays or molds
- Essential oil of your choice (lavender works really well)
- ½ cup of Epsom salt or sea salt
- Cocoa butter
Directions:
- Stir together the citric acid, Epsom or sea salt, and the baking soda until very well blended. Make sure all of your dry ingredients are well combined, or your bomb may turn into more of a dud.
- Fill the spray bottle with the witch hazel and a small amount of cocoa butter. This will help bind the bomb together, and also help with moisture.
- Add a few drops of your favorite essential oil.
- Spray the liquid mixture into the dry ingredients, stirring well, until it starts to clump. When the mixture holds shape, quickly transfer it to your mold.
- Let your bombs dry for a short time (about 10 to 15 minutes), then remove them from the mold. Try lightly tapping the underside if they don’t come out easily.
- Let bombs dry overnight before use.
- Then just plop your bomb into the bathtub and be whisked away to a land of bliss!
DIY $3 Dessert & Treat Stand
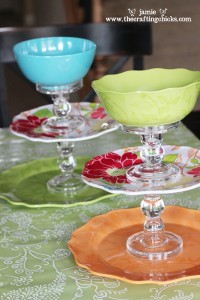
I showed you how to make one for Christmas, but why only have these simple and cheap stands for the holidays? You can make them and use them year round! Get everything either at the Dollar Store or Thrift Store, mix and match the colors, designs, and materials for your tastes and make them shabby chic! You can make them with a plate or a bowl on top, or you can make it with only 2 tiers instead of three. Thanks to Jamie at The Crafting Chicks for the cute and easy tutorial!
What You’ll Need:
- 2 candlestick holders
- A larger plate or platter
- A slightly smaller plate
- A bowl or another platter
- Permanent craft glue (like E6000 or Gorilla Glue)
Directions:
- Use a liberal amount of glue on the bottom of the first candlestick holder and stick it to the bottom plate in the middle (either measure to find exact middle or eyeball).
- Glue top of candlestick holder and place the littler plate on it.
- Repeat with the next candlestick holder and bowl.
- Allow to dry for an hour before use, then enjoy!
HAND WASH AND DRY ONLY!
Recipe: Red, White & Blue-Berry Trifle
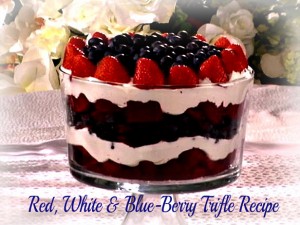
If you’re looking for a delicious dessert for Memorial Day or Independence Day that has simple ingredients and LOTS of fresh and juicy summer berries, you will love this Red, White & Blue-Berry Trifle. Make it any time of year!
Ingredients:
- 1 box red velvet cake mix (Note: Instead of red velvet cake, use 1 box chocolate cake & a bottle of red food coloring)
- 1 (16oz) tub whipped topping
- 2 pints blueberries, washed
- 1 pint strawberries, tops cut off, washed
Directions:
- Bake red velvet cake mix according to package directions. Allow to cool.
- With a serrated knife, cut the cake into 1-inch square pieces.
- Line the bottom of the trifle bowl with half of the cake squares.
- Using a spatula, spread about a 2-inch layer of whipped topping on top of the cake squares.
- Layer about 1 1/2 pints of the blueberries on top of whipped topping.
- Layer the remaining cake pieces on top of the blueberries to create a second layer of cake.
- Using a spatula, spread remaining whipped topping over the top layer of cake.
- Decorate the perimeter (along the bowl sides) with the strawberries by placing the strawberries cut side down.
- Sprinkle the remaining blueberries on top of the trifle inside the strawberry perimeter.