
DIY $3 Wall Projector

Watching a huge movie on the side of a garage or inside on a large wall is so much fun. It’s just like going to a drive-in, but not everyone has hundreds of dollars to buy one. Here’s a genius hack that only costs $3 and uses your smartphone. If you want visuals on this tutorial click that link above.
What You’ll Need:
- Shoebox or small box
- Small magnifying glass
- Paperclip
- Smartphone Stanley knife
- Duct tape
- Optional: Black paint
Directions:
- Figure out the center of your box. Place your magnifying glass in the middle of the “height side” of the box (where the heel or toes would be) and trace around the lens.
- Use the knife to cut out the circle.
- Stick the magnifying glass into the hole from the inside and duct tape it in securely. Tape all the way around the edges of the circle, too. This will prevent light from getting in.
- To prevent even more light from getting inside the box, paint the inside black until completely opaque and allow to dry.
- Poke a hole at the back of the box and stick your phone charger through it.
- Using a pair of pliers, bend the paperclip into a stand for your phone, or use one you already have.
- The picture of your phone will appear upside down on the wall since it’s reflected through the magnifying glass. To fix it: For an iPhone go to Settings > General > Accessibility and turn on Assistive Touch. Then touch the floating orb thing that’s on your screen and select Device > Rotate Screen. For Android, Screen Rotation Control app or the Ultimate Rotation Control app will flip it correctly.
- Dim the lights,place your phone on its stand in the box, then move the phone back and forth in the box to find your focus point.
- Close the box, turn out the lights, and watch the movie on the large, flat area of your choice! SIMPLE!
Recipe: Vanilla Ice Cream Made With Real Snow!

Many of us in the United States are dealing with insane winter weather, including blizzards and more snow than we’ve seen in years. Take advantage of the piles of white stuff by making it into ice cream! Big hit with kids and adults and only takes 20 minutes. A big bonus – It’s Gluten-Free! Here’s how to do it:
Ingredients:
- 1 gallon CLEAN snow
- 2 cups of whole milk or half and half
- 1 cup sugar
- 2 tsp vanilla
Directions:
- Combine milk or half and half with the sugar and vanilla.
- Stir until the sugar is dissolved and add it to the fresh snow, then eat!
OR
- One 14 oz. can sweetened condensed milk
- 1 tsp vanilla
- 2 quarts fresh snow
- Combine together and eat!
Thanks to Polka Dot Poplars for the recipes and picture!
Recycled Magazine Bows Tutorial
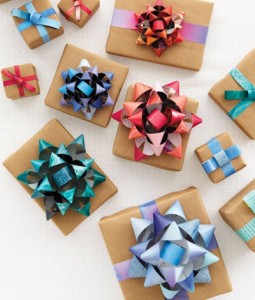
Instead of recycling your magazines, reuse them! Here is an easy tutorial for bows that you can use year round.
What You Need:
- 1 page of magazine per bow you plan on making
- Double-sided tape
Directions:
- Cut the page lengthwise into nine 3/4-inch wide strips of these heights: 3 at 11 inches long, 3 at 10 inches long, 2 at 9 inches long, and 1 at 3 1/2 inches long.
- Twist each strip to form loops at both ends and make a circle out of the smallest.
- Secure the ends with double-sided tape.
- Layer and stick, starting with the longest strips. End with the circle in the center.
Thanks to Whole Living for the tutorial. For pictures of each step, go here.
Recipe: Natural, Organic Dog Treats

My dogs love their treats, but they’re so filled with “junk”! Instead of giving them boxed treats for their Christmas present (or every day!), try this yummy treat recipe. It’s so natural that we humans can eat it!
Ingredients:
- 2 cups of 100% organic whole wheat flour (or wheat germ, spelt, rolled oats, or a mixture of these)
- Fido’s K9 Yogurt Icing (add water and food coloring according to directions on package)
- 2x 4oz jars of pureed organic baby food (beef, blueberry, sweet potato, chicken, etc. Whatever sounds good)
IMPORTANT NOTE: Make sure there are no onions/onion powder in it. Also, avoid any with artificial preservatives (should be easy, most are just pureed veggies and water).
Directions:
- Preheat oven to 350°.
- Mix together to form a stiff dough. Add extra flour or water as needed.
- On a lightly floured surface, roll out dough to about a 1/4 inch thick. Use cookie cutters to cut into fun shapes or a pizza cutter to make cubes.
- Line a cookie sheet with parchment paper, place treats about 1/2 inch apart. Bake for 20 – 25 minutes. Allow to cool completely then add Fido’s K9 Yogurt Icing and allow to harden before storing in a paper bag (storing in an air-tight container will make them soft, but they’re still edible).
Consider adding grated carrots or sweet potatoes, a little bit of parsley (which helps with bad breath), blueberries, or some peanut butter to your next batch!
Thank you to Curbly for the treat recipe
Homemade Candy Cane Sugar Scrub
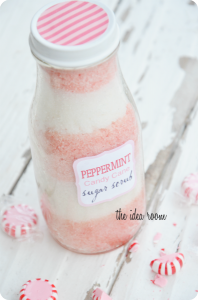
If you’re looking to make easy and inexpensive gifts for your loved ones this year, this Peppermint Candy Cane Sugar Scrub “recipe” is perfect. It smells so good and it is a lot like the expensive department store brands.
What You’ll Need:
- 2 cups of granulated sugar
- 1/3 cup almond or coconut oil
- Peppermint essential oil
- Raspberry juice or red food coloring
- Jar or container to hold it
- 2 bowls
- A piece of printer paper
Directions:
- Slowly pour the almond or coconut oil into the sugar until the consistency is soft and not too oily. It may take less than the amount of you have set aside, to watch for consistency.
- Add a few drops of peppermint essential oil to the mixture and stir together.
- Separate the mixture into 2 bowls of equal amounts.
- Add the food coloring or juice to 1 of the bowls of mixture.
- Roll the printing paper into a funnel (a regular funnel is too small for the mixture to flow through) and pour the colored mixture. Press down with spoon.
- Repeat with white, then colored, etc. until it is used up and creates a candy cane effect.
- Put on the cap and decorate with a bow!
- Go here for the label if you’d like to use it for your bottle or jar.
Thank you SO MUCH to The Idea Room for this tutorial. SUCH a great and healthy idea.