
DIY 5-Minute Fashion Pearl Statement Necklace
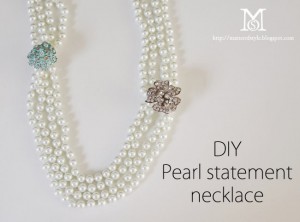
Statement necklaces are so popular right now, and the pearl ones are super expensive. They are obviously faux, but even then, they can be upwards of $30 or more. Make them into a statement necklace by yourself with just a few inexpensive pieces that you can find at craft stores, thrift stores, or even around the house in only 5 minutes! Thanks to A Matter of Style for the super cute tutorial!
What You’ll Need:
- Four pearl necklaces about 26″ long (or a long string of pearls cut into four 26″ long strands and a double string clasp, both from craft stores)
- Two fashion costume rings (at least one adjustable in size)
- 2 pieces of metallic wire
Directions:
- Put a strand of pearls through one of the rings (doubled up). Then put the other necklace through the same ring, so there are four lines of pearls through one ring.
- Do the same on the opposite side of the strands with the other ring.
- Fasten the rings to the strings with the metallic wire.
- If you are making the necklace yourself, attach the strings to the clasp, otherwise make sure that the necklace is long enough to fit over your head.
- Wear the necklace and keep the rings slightly asymmetrical, one lower than the other.
DIY Threaded Rhinestone Hoop Earrings

You can buy your own pair of fun threaded rhinestone earrings for $5-$15 each pair, but that gives you just ONE pair. If you want to get a pair for many different outfits or for different seasons, then you’ll go broke! Spend a few minutes and make them yourself with this tutorial from Just B.
What You’ll Need:
- Rhinestone chain (can be purchased at art supply or craft stores)
- Hoop earrings (in the same metal color as whatever the rhinestone chain comes on)
- Embroidery floss (whichever color you’d like!)
- Hot glue gun

Directions:
- Cut the rhinestone chain into 2 strips of the length of about half of the hoop earring.
- Lightly apply hot glue to the rhinestone chain and place onto the bottom half of the hoop (or if you’d like to show more rhinestone, then put it more toward the front of the hoop). Doesn’t need to be neat since the thread will be going over the glued part.
- Tie a knot around the earring on the BACK of the hoop with the floss. Put it between the first 2 rhinestones.
- Wrap the floss between each rhinestone (back and forth) making sure to wrap the side of the floss that sticks out from the knot back into the rhinestones. You don’t want to cut the end because the floss will unravel.
- When you reach the end, switch directions and go back toward the other side of the rhinestone chain. This should cover the whole chain.
- When you’re back to the other end, double knot the end of the floss and snip. Since this is the back of the earring, it will be barely noticeable.
- Put them on -TAH-DAH!!! Makes a great gift. So easy you could make DOZENS of them.
DIY Jewelry Cleaner

Never buy jewelry cleaner again! You can make it yourself for a fraction of the price with this recipe. The below jewelry cleaner works well for gold-filled, brass, German (nickel) silver, sterling silver, freshwater pearls, shell cameos and mother of pearl.
What You’ll Need:
- 1 tablespoon salt
- 1 tablespoon baking soda
- 1 tablespoon dish detergent
- 1 cup water
- 1 piece aluminum foil
Directions:
- Heat water in the microwave for 1 or 2 minutes.
- Cut a piece of aluminum foil that roughly covers the bottom of a small bowl (like a cereal bowl).
- Pour hot water into bowl. Place salt, soda, and dish-washing liquid into bowl. Place jewelry on top of foil and let it sit for 5 to 10 minutes. If it has dirt or debris in the little crevices of your jewelry, use a very soft toothbrush to reach in and clean.
- Rinse jewelry in cool water and dry jewelry completely with soft cloth. Discard solution after use and make a new batch next time.
Recipe: Homemade Nutella (Even Better Than Packaged!)
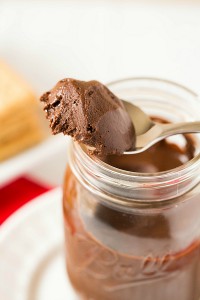
If you love Nutella and want to try to make it yourself? The recipe below by Brown Eyed Baker is amazingly somehow better than the Nutella you buy at the store!
Recipe makes: 1½ cups Prep time: 15 minutes Cook time: 15 minutes
Ingredients:
- 2 cups (or 8 ounces) hazelnuts
- 1 cup powdered sugar
- ⅓ cup Dutch-processed cocoa powder
- 2 tablespoons hazelnut oil
- 1 teaspoon vanilla extract
- ⅛ teaspoon salt
Directions:
1. Preheat oven to 375* F. Spread the hazelnuts out on a single layer on a rimmed baking sheet and roast until dark brown and fragrant, 12 to 15 minutes, rotating the baking sheet halfway through baking. Keep a close eye on them, as they can go from perfect roasted to burnt in a short amount of time. Transfer the hazelnuts to a medium-sized bowl.
2. Once the hazelnuts are cool enough to handle, place a second bowl upside-down on top of the bowl with the hazelnuts. Shake vigorously for about 30 seconds to remove the skins of the hazelnuts. It may take a few times to get all of the skins off; each time, remove the hazelnuts that have lost their skin to the bowl of a food processor, then continue shaking.
3. Process the hazelnuts in a food processor until their oil is released and they form a smooth, loose paste, 2 to 5 minutes, scraping down the bowl often.
4. Add the powdered sugar, cocoa powder, hazelnut oil, vanilla extract and salt and process until fully incorporated, scraping the bowl as needed, about 2 minutes. The mixture will loosen and become glossy. Transfer the spread to a jar with a tight-fitting lid or an airtight container. You can store it in the refrigerator or at room temperature for up to 1 month.
How to Clean a Microfiber Couch
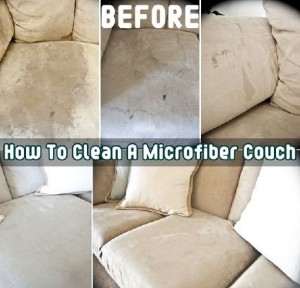
We have microfiber couches we bought right after our oldest daughter was born. She had severe GERD, then food issues, then twins were born right after that… anyway, our couches are beyond help. We need new ones, but maybe if we had seen this awesomeness, we could have saved our expensive microfiber couches, that we were assured were stain resistant. HAHA! Save yours after the stomach flu! Here’s how, for a couple of bucks with all items you can get at the dollar store!:
What You’ll Need:
- Empty spray bottle (you can get these at the dollar store)
- Several WHITE sponges (ONLY white – any other color will transfer onto your couch and make a worse stain)
- WHITE bristle brush scrubber (ONLY WHITE – see above)
- Plain rubbing alcohol (water stains microfiber, as we know, and alcohol evaporates faster so it won’t stain)
Directions:
- Pour alcohol into spray bottle, then spray the rubbing alcohol onto the microfiber, completely saturating the stained area.
- Using the white SPONGE (not brush), start scrubbing the stain right away. Scrub hard!! It will take muscle to get the stain out of microfiber. You will start to see the stain coming off onto the white of the sponge if you’re doing it well.
- If the sponge is dirty on both sides, move on to another, clean white sponge. If you continue to use a dirty one, you’ll just transfer the stain back into the microfiber.
- Once the stain is onto your sponge and off the fabric (using your best guess since it will be wet and hard to see if it’s stain or just wet), allow the fabric to dry fully. It will be hard to the touch, but that’s okay. Leave it for now.
- If the area that was stained is still dirty, repeat #1-4 until the stain is completely gone.
- Once the stain is gone and fabric is completely dry, using a swirling motion, fluff back up the microfiber fabric until it looks normal again.
EASY right? Almost too easy. I am so glad to have found this and happy to be able to share it with you! :)