
Fun & Fruity Turkey Tutorial
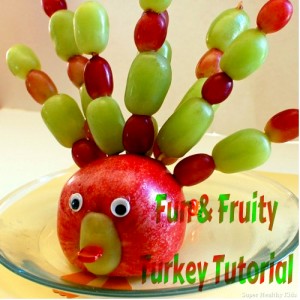
Get kids excited about Thanksgiving and make them a super healthy and delicious snack at the same time! These fruity turkeys are easy and fun.
What You’ll Need:
- Wooden skewers
- Bento toothpick and regular toothpicks
- Googly eyes
- Grapes and/or other fruits to add to the skewers.
Directions:
- Cut the side off from an apple to make it sit flat.
- Affix the googly eyes with peanut butter or use something else to make eyes. Use half of a grape as the beak and stick a Bento toothpick into it over the stem part of the apple.
- Put fruits on the skewers and stick them in the hind part of the apple to make the tail.
- Use toothpicks to stabilize the hind part of the apple since the skewers make it back-heavy.
- Give to kids and enjoy!
Thank you to Super Healthy Kids for the fun snack idea!
DIY Glitter Ballet Flats
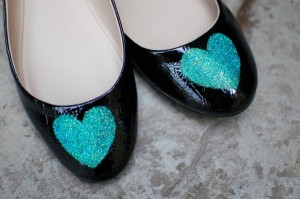
Don’t spend $50 on a pair of glitter flats, especially when you can buy cheap, plain ones and Mod Podge the sparkles onto them yourself for a couple of bucks! Follow this super simple tutorial from She Knows for your own pair.
What You’ll Need:
- Shoes (plain or some ones that might be a little scratched up and you can cover it!)
- Mod Podge
- Glitter
- Clear Con-Tact paper
- 2 paintbrushes
- Utility knife
- Bowl
- Acrylic spray sealer (optional)
Directions:
- Find a design or shape that you like and print it out. Lay the contact paper over it and tape it down to keep it secure.
- Using a utility knife, cut the shape out of the center. You will be using this interior part as the shape onto the shoe.
- take the back off the contact paper and lay it over where you want it to be on your shoe. Make sure they are straight and even with the one on the other shoe.
- Mix the Mod Podge with the glitter you want to use in about a 1 to 1 ratio. Paint a thin and even coat over the template.
- Allow to dry completely, then repeat as necessary to make sure it is fully opaque.
- Use an acrylic spray to seal the glitter on or use another thin coat of just mod podge.
- Remove the contact paper and allow to dry again. All done! A few minutes and you’ve got truly unique and adorable shoes!
Easy Dia de los Muertos (Day of the Dead) Lantern Tutorial
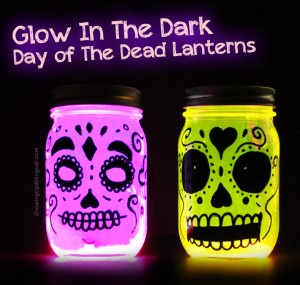
As many know, Dia de los Muertos (or the Day of the Dead) is celebrated on November 1st every year in Mexico. It’s been celebrated for over 4,000 years – long before Mexico existed! It is a celebration of life and it is a loved tradition with beautiful decorations and altars, parades and music.
If you want to teach your children about Dia de los Muertos (or learn about it yourself) this website is full of information on the history, traditions, and current celebrations. Then create these Day of the Dead lanterns to celebrate the lives of loved ones in your life that have passed on with this tutorial from Growing Up Bilingual.
What You’ll Need:
- glass mason jars
- black sharpie or other permanent black marker
- glow in the dark sticks
Directions:
- To make these lanterns, just paint a fun sugar skull or calavera design on the front of the mason jar. You can Google ideas for inspiration.
- Cut a glow in the dark stick and pour the glow in the dark liquid inside the mason jar. Close the jar tightly and shake it making sure that the liquid covers all the inside of the mason jars. Put them out in the dark and enjoy the glowing calaveras!
Note: Make sure that you use gloves when you cut the glow in the dark sticks and do not let children handle them or cut them as the chemicals inside the glow stick can irritate skin and eyes. Some glow sticks also have glass inside so be careful when handling as there might be glass shards inside the glow stick. Proper safety materials like safety glasses and gloves should be used when recommended to protect eyes and skin.
Recipe: Pumpkin Bread Truffles
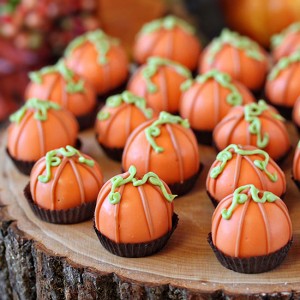
If you like the taste of pumpkin bread, then you will love these truffles from GHK! Decorate them like mini pumpkins to for a beautiful Fall dessert.
Ingredients:
- 9×5-in. (about 1 lb) loaf of cooled pumpkin bread (can be store bought or homemade)
- 1 cup (about 8.5 oz) cream cheese frosting
- 24 oz orange candy coating
- 2 Tbsp chocolate chips or chocolate candy coating
- 2 oz green candy coating
Directions:
- Break apart the pumpkin bread into small bits into a large bowl, then work gently between your fingers until it is in tiny crumbled pieces.
- Add the frosting to the pumpkin bread crumbs then stir together until well-combined and no streaks of frosting remain. The mixture should be moist and hold together if you squeeze it into a ball between your fingers. If it is too dry, add another spoonful of frosting to get it to the best consistency. Keep adding frosting until the mixture is at the right consistency.
- Use a small 1″ candy scoop or a spoon to scoop out small balls of the pumpkin bread mixture. Roll the dough between your palms until perfectly round, then place them on a parchment or waxed paper covered baking sheet.
- Stick the balls in the refrigerator and chill them for 2 to 3 hours or until firm.
- Put orange candy coating in a medium microwave-safe bowl and microwave until melted, stirring every 30 seconds to prevent overheating.
- Use dipping tools or a fork to dip a pumpkin bread truffle into the orange candy coating. Let the excess candy drip back into the bowl, then place the truffle back on the baking sheet. Repeat until all of the truffles are dipped.
- Melt the chocolate chips or chocolate candy coating in the microwave, then stir the melted chocolate into the remaining melted orange coating to make a deeper orange color. Transfer the dark orange coating to a paper cone, piping bag fitted with a small round tip, or a plastic bag with a small hole cut in the corner. Draw piping of intersecting lines across the top of the truffles to create pumpkin creases.
- Melt the green candy coating in a microwave-safe bowl, then transfer it to a paper cone, piping bag fitted with a small round tip, or a plastic bag with a small hole cut in the corner. Pipe curls of green coating on top of each pumpkin to look like vines.
- Refrigerate the truffles briefly to set the candy coating.
- For the best taste and texture, serve the Pumpkin Bread Truffles at room temperature, and store extra truffles in an airtight container in the refrigerator for up to 2 weeks.
Recipe: No-Bake Pumpkin Spice Cheesecake Enchiladas with Caramel Drizzle
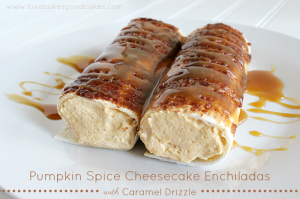
It’s Pumpkin Spice EVERYTHING time! I bet you never thought you’d see Pumpkin Spice Cheesecake Enchiladas!!! Well, here it is and it’s a fairly easy recipe, too. Thank you to Jamie at Love Bakes Good Cakes for this awesome recipe! Go over and tell her thank you from us. Also, check out her other pumpkin recipes. She has a ton!
Ingredients: (9-12 servings)
- 1 pkg (8 oz.) of cream cheese, softened
- 1 cup of canned pumpkin
- 1/2 cup of sugar
- 1/2 tsp of pumpkin pie spice
- 2½ cups pf Cool Whip, thawed
- 18-24 flour tortillas
- 6 tbsp of butter, melted
- 2 tsp of sugar
- 2 tsp of cinnamon
- Caramel sauce
Directions:
- In a large bowl, beat the cream cheese, pumpkin, sugar and pumpkin pie spice with an electric mixer on medium speed until well blended. Then gently stir in the whipped topping.
- Divide the cream cheese mixture evenly between the tortillas. Roll each tortilla up and put on serving plates.
- In a small bowl, combine the butter, sugar and cinnamon. Brush the mixture over the over the rolled tortillas.
- Top with caramel sauce, and either serve immediately, or cover and place in refrigerator until ready to serve. It’s that simple!