
DIY Napkin Rings
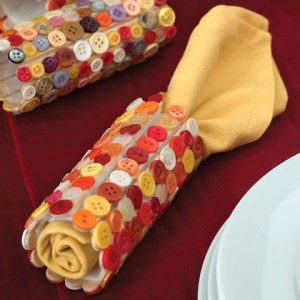
These napkin rings are so cute, easy and CHEAP! You can make them for any or all holidays you choose from things you can buy at the dollar store or craft store.
What You’ll Need:
- Felt
- Popsicle sticks
- Tacky glue
- Small paintbrush
- Buttons in assorted colors (you can buy them by the bag in many craft stores)
Directions:
- For each napkin ring, cut a 4- by 5 1/2-inch piece of felt.
- Starting at one short end of the rectangle, glue on 12 Popsicle sticks (it’s less messy if you use a small paintbrush to spread the glue), lining them up side by side. You should end up with a margin of uncovered felt at the end.
- Once the glue dries, form a ring by gluing the overlapped felt together.
- Now comes the fun part: glue on rows of buttons, Let the glue dry completely.
- When it’s time to use the rings, roll up napkins. Insert one in each ring.
Thanks to Spoonful for the easy craft!
Easy DIY Braided Bracelets
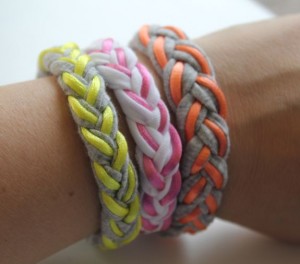
Create these super fashionable braided bracelets with old t-shirts and a few other things for SUPER CHEAP! These would make great presents. You can personalize them and mix and match to any outfit. These sell for upwards of $60 EACH at department stores, and you can make them for pennies!
What You’ll Need:
- Old cotton or jersey T-shirt you don’t mind cutting up. You can pick up a shirt at a thrift store. White, gray and black make good base colors for pastel or neon cord.
- 1 yard of rat tail cord for each bracelet you make. You can find lots of fun colors at JoAnn’s for 50-99 cents a yard and many dollar stores carry it, too. Get different colors for different bracelets!
- Little magnets to magnetize the bracelet closed (you can get these at the dollar store or craft store for about $2 for 10).
- Hot glue or Elmer’s glue (using both works the best!)
- Rubber band (to hold the pieces together)
Directions:
- Cut the shirt into 1-inch wide strips about a foot long.
- Cut the rat tail cord into three 10-inch strips.
- Put all 6 of the pieces together and hold at the very end with a rubber band and anchor to the table or something to help hold steady.
- Separate the pieces so they are three parts, with each part having 1 strip of shirt and 1 strip of cord then start braiding!
- When you get to the end, snip both ends of the braid so they are even, and glue one end to a magnet.
- Wrap the bracelet around your wrist and measure for size (trim if needed), then glue the other end to a magnet.
- Wrap a piece of t-shirt over the magnet to cover it and glue the two ends of it together (but not to the bracelet itself). This can be moved when you need to take the bracelet off by sliding it down the bracelet.
A big thanks to Henry Happened for this easy bracelet tutorial!
DIY Sparkling Leaves Garland
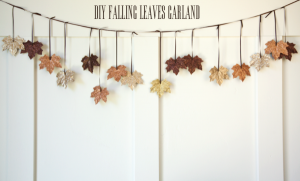
Spruce up your home and get ready for Autumn with this easy to make sparkling falling leaves garland. This is a great craft to do with kids and get them excited for Fall!
What You’ll Need:
- Artificial leaves (can be purchased at Dollar Tree or craft stores)
- Paintbrush
- Elmers Glue
- Glitter (natural colors)
- Hole punch
- Ribbon
Directions:
- Pick out about 10-12 leaves that are the nicest (or however long you want to make your garland).
- Doing 1 leaf at a time, paint a medium layer of glue over a leaf and cover with glitter. Let dry and shake off remaining glitter.
- Use hole punch and punch a hole in the middle at the bottom of each leaf so they will hang upside down.
- Tie a long string of ribbon in each leaf and hang from a long string of ribbon to create the garland. Hang and enjoy!
Thank you to Boxwood Clippings for the great decorating idea!
Kids Recycled Cardboard & Yarn Snowflakes
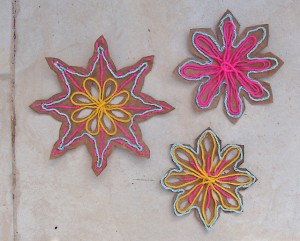
It’s snowing already in many places in the country. Besides green and red decorations, what else can we create and have our kids be involved? Snowflakes of course! This is a simple and adorable craft made from recycled cardboard and any yarn you’d like.
Materials:
- cereal box (or any thin) paperboard or cardboard
- yarn in any colors
- kid’s washable glue (like Elmer’s)
- glitter, rhinestones, beads, buttons, etc.
Directions:
- Make snowflakes from squares of paper and trace them onto the cardboard.
- Cut out the shapes (for small details use tiny manicure scissors or a craft knife. It’s not necessary, but it’s a pretty addition).
- Squeeze glue onto the cardboard snowflake in the pattern you’d like to place and decorate with your yarn.
- Carefully lay the yarn down into the glue and add additional glue and details as desired.
- Decorate however you’d like! Go nuts!
- Hang and enjoy!
Thanks to Creative Jewish Mom for the idea!
DIY Spider Pops
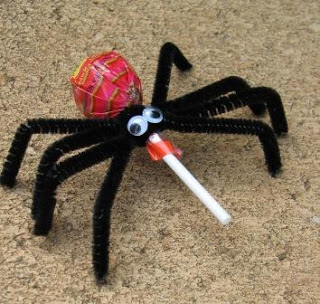
Trying to think of what to take to your child’s classroom for the annual Halloween Party? Take these Cute Spider Pops, the kids will surely enjoy! Get the scoop on how to make them HERE! What an inexpensive, yet adorable way to share sweets treats this Halloween!