
DIY Kiss-mas Tree Craft
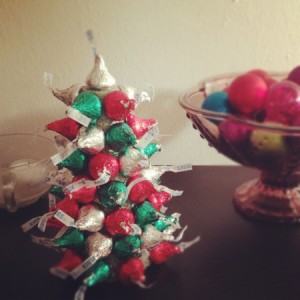
This craft is so insanely simple and adorable that you’ll want to do them every year and for different holidays (Easter trees, anyone?)! Here’s what do:
What You’ll Need:
- Styrofoam tree form from a craft store
- Hot glue gun
- Hershey Kisses
Directions:
- The styrofoam trees come in many sizes, so choose whichever you like best! Try them all for fun.
- Starting at the very top, put a dab of the hot glue on the styrofoam where you are putting the kiss.
- Work your way down from the top in circles, swirling the way down the to the bottom.
- Experiment with different decorations (ribbon, glitter, etc.) and different candies for the “star at the top” of the tree.
Let us know how yours looks and what you find works best! Thanks to Sweet Nothings NYC for the tutorial!
Handmade Icicle Ornaments
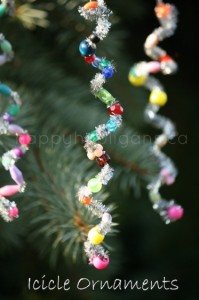
Looking for a simple, fun, and festive art project for the kids? These Icicle Ornaments are exactly that, plus it is a cute and sparkly sensory experience for the kids while decorating the tree!
What You’ll Need:
- metallic pipe cleaners
- pony beads
- thread (for hanging on the tree)
- pencil
Directions:
- To help keep the beads from falling off the end, bend the tip of each of the pipe cleaners around a few times.
- Put fun colored beads along the pipe cleaner. Leave space between them so you can see the sparkly metallic.
- Loop the pipe cleaner around the pencil to give it the spiral look.
- Loop a thread through the top bead and tie in a knot. Hang on the tree. It’s that simple!
Thanks to Happy Hooligans for the adorable idea!
Handmade Puzzle Wreath Picture Frame
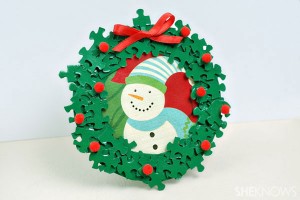
If you’re like us, we have tons of random puzzle pieces all over. If you’re not, then go to your thrift shop and get a 100 piece puzzle for $1 or so. Either way, this is a fun and thrifty gift that the kids can make, and when you fill with a picture, the grandparents will love for years to come!
What You’ll Need:
- paint brush
- glue
- red pom poms
- red ribbon
- a small round picture frame (craft store or dollar store)
- puzzle pieces
- green craft paint
- newspaper or something else to protect your work surface
Directions:
- Lay your puzzle pieces on the protected surface, and paint one side of each of your puzzle pieces green. Allow the puzzle pieces to dry. Double check that they are painted well enough to be opaque. If not, then put on another layer and let dry.
- Start gluing the puzzle pieces around the frame. Glue a single layer and allow that layer to dry completely before adding more layers. Add more puzzle pieces until the frame is completely covered and green.
- Once the puzzle pieces are dry, glue red pom poms around the frame, then tie a bow with red ribbon and glue it to the top of the frame to make it look like a wreath. Put chosen picture inside and gift. That’s it!
DIY Thanksgiving Handprint “Glitter Globe” Turkey

Here is a cute and creative twist on the classic children’s hand print turkey craft using construction paper and baby food jars to make a “glitter globe”. It can be used as place cards or as decoration year after year.
What You’ll Need:
- Tacky Adhesive Glue
- Glitter (brown or gold, or go crazy!)
- Scissors
- Yellow felt (or construction paper is fine)
- Googly eyes
- Pencil
- Scrapbook or construction paper in fall colors
- Cleaned, label-free baby food jar(s) with lids on
Directions:
- Trace child’s hand on construction paper and cut hand out to be your template. Do it for each child if more than one.
- Trace and cut out multiple hand prints with template, alternating paper colors. You’ll need 3 to 5 hand prints per craft.
- Add a dot of glue at the bottom of one hand print. Place another hand print on top of the first, but tilted slightly to the right. Repeat until you created a fan of “feathers”.
- Put baby food jar on the table lid down and place glue to the back of the jar. Press feather of hand prints on and hold to secure.
- Glue googly eyes to the front of the jar.
- Cut out small triangle of yellow felt or construction paper for the beak and glue under eyes.
- When all is nearly dry, fill jar with water, then pour in glitter. Put glue around the rim of jar and put the lid back on tightly.
Big thanks to LovetoCreate for the idea!
DIY: Peanut Butter Pumpkins
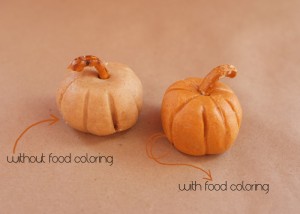
Making these adorable and easy peanut butter pumpkins are a delicious way to celebrate Fall. They would be great to have as a part of Thanksgiving appetizers or meals, too! I can only imagine that they could be made using almond or other nut butters, too! Kids could get into the fun to make them.
What You’ll Need (makes 12 pumpkins):
• ¾ cup creamy peanut butter
• ¼ cup unsalted butter, softened
• ½ teaspoon vanilla extract
• orange (or red & yellow to mix) food coloring (optional)
• 2 cups confectioners’ sugar
• wax paper
• toothpicks
• mini pretzels
Directions:
- Mix together the butter and peanut butter
- Add the vanilla and 2-3 drops of orange or a drop of red and drop of yellow (they look great without the coloring, too, if you opt for that. See picture above.)
- Slowly add in the confectioners’ sugar with a spatula until the consistency is fairly thick
- Divide the mixture into 12 balls (or less if you want larger pumpkins), then roll them into balls and place on wax paper
- Make creases and shape the pumpkins with a toothpick
- Break apart the mini pretzels and put a piece into each pumpkin as its “stem”
Eat the pumpkins alone or with pretzels! Thanks to Fossil Blog for the idea :)