
*HOT* Free Disney Decal Sticker + Free Shipping
(Give it a second to load if you don”t see the banner above. This HOT offer is back! Limited signups)
Click on the Banner Above to request for a FREE Disney Personalized Family Decal + Free Shipping for your family. It’s pretty fun to make. To get your Free Decal, here what to do:
- Click on the banner above
- Click “Get Started” and following the steps to create each family member’s character.
- Once finished, click on “Order Your Free Decal” button. You also have the option to download a digital version of your design. :)
- Enter email and follow steps on screen.
You can fully customize the decal with number of family members, the clothing, accessories, background, and more to represent your family in a really fun way. Remember the order you make the characters is the order they appear on the decal.
To claim your Free Decal, Click on the banner at the very top of this page to get started.
Recipe: Mini Pumpkin Pie Sliced Cookies

Make these adorable fall & Thanksgiving themed treats that are the perfect size for snacking! They’re also pretty simple to make.
What You Need:
- Circle cookie cutter
- Pumpkin orange 20-second icing
- Stiff-ish crust colored piping icing (You may have to mix ivory with a little bit of warm brown}
- Stiff white piping icing
Directions:
- Cut circles out of cookie dough (sugar or whatever you choose) and cut into pie slices. For these in the picture, it is a 4″ circular cutter. The size of the circle you choose will change the size of the “pies” you make. Then bake as directed and let cool.
- Flood the wedges with the pumpkin orange icing and let dry.
- For the “crust” on top, use a #101 tip near the left corner of the cookie, thin side up. Use a loose M shape until you get to the other side. To clean it up or make it look sharper, use a toothpick.
- To make the “dollop of whipped cream” on top, use a star tip with a #16 or #18.
- Put on a Thanksgiving serving tray that you can make for less than $2, and voila! A cheap and delicious Thanksgiving gift for friends and family.
Thank you to Sweet Sugar Belle for the great cookie decoration idea!
Homemade No-Sew Fall Leaves Headband
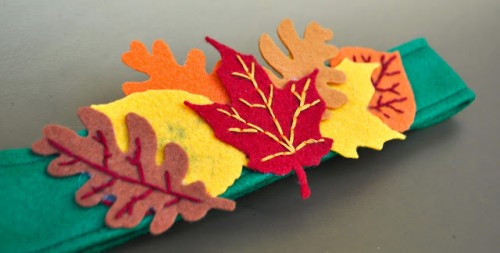
Want to get a little festive before Thanksgiving? Make these adorable and SIMPLE Fall Headbands — No sewing is required! Kids will love making these to wear for Thanksgiving.
What You’ll Need:
- Pre-cut felt leaves from art supply stores (or you can use different colors of felt and cut yourself)
- Embroidery floss and a needle (optional, or draw the veins on with a sharpie)
- Felt (for the headband)
- Glue gun
- Velcro
- Sewing machine (optional: helps it stay together better, but not necessary)
Directions:
- Stitch veins on 3-5 leaves (or draw them on with sharpie markers).
- Measure your child’s head and cut the headband out of felt. Make sure it’s about 4″ tall and leave about 2″ of overlap for the velcro. Fold over in half and hot glue or sew the headband together.
- Hot glue or sew the velcro to the ends of the headband.
- Hot glue the leaves however you’d like to the front of the headband. Use many different colors and leaf designs to make it super unique. Stitch on if you’d like for extra support.
Thanks to Make Life Lovely for the great idea!
DIY Nutter Butter Turkey Cookies

How cute are these Turkey cookie creations? These would be fun to make with your kids as a “craft” to do before Thanksgiving to bring as a treat to your family meal or as a treat to eat later this month. Thanks to Life with Moore Babies for the tutorial (visit the site for a step-by-step visual tutorial and pictures of her adorable babies!)!
Ingredients:
- Nutter Butters
- Oreos
- Regular size Reese’s Peanut Butter Cups
- Icing (LWMB Blog used decorating, but any icing that stands strong is fine)
- mini M&Ms
- jellybeans
Directions:
- Place icing on the back of a peanut butter cup and stick it to a Nutter Butter. Then using more icing to hold them in place, stand both the Nutter Butter and the peanut butter cup up on an Oreo.
Note: If you are doing this activity with kids, have them choose their own colored candies! It will make it more “theirs”. Messy is fun! :) - Now, add 2 mini M&Ms for eyes, an orange jelly bean for the beak, and a red jelly bean for the waddle on more frosting.
- Then squirt icing across the top of the peanut butter cup, so you can add jelly beans for feathers. Each of the blogger’s turkeys had five feathers.
- Also add icing then two yellow jelly beans at the bottom of the Nutter Butter for feet.
Easy DIY Kids’ Turkey Shirt

Don’t go to Etsy and buy your kids a shirt to wear at Thanksgiving! Instead of paying $30 per shirt, you can make this adorable 2-sided turkey shirt for just a couple of dollars. You can personalize it with different colors and add a bow for a girl if wanted.
Supplies Needed:
1 Shirt or Onesie
6 different prints of scraps of fabric
Piece of cardboard
Fusible interfacing (this is wonder under)
Turkey Template
Buttons (if desired)
Sewing Machine
Iron
Thread
Damp towel
Directions:
1. Iron the fabric onto the template and cut them out. Leave 1 of the designs of fabric as the turkey’s body.
2. Peel the fabric from the interfacing and arrange as you desire.
3. Place a piece of cardboard between the 2 layers of shirt and a damp towel on top of the turkey and iron everything well.
4. Stitch around the feathers and body. Add buttons for the eyes, stitches for feet, and a piece of cloth for a beak if you want to add more detail.
Thanks to Dwellings By DeVore for the directions and cute picture!
Recipe: Caramel Apple Nachos
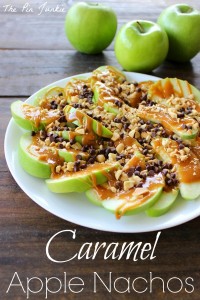
Apple season is at its finest right now – so is “having too much candy around the house” season! Combine these into this delicious snack or dessert idea from The Pin Junkie. Of course, you can always change candy and apple types, and add or take off some of the toppings. The apple nachos would also be good with chocolate syrup or pre-made caramel sauce.ENJOY!
Ingredients:
- 2 green granny smith apples, cored & sliced
- half a bag of caramel
- 1 teaspoon water
- 1/4 cup chopped peanuts
- 2 Tablespoons mini chocolate chips (or M&Ms)
Directions:
1. Unwrap all individual caramels. Place them in a saucepan with one teaspoon of water over medium-low heat. Stir the caramel constantly until caramels are completely melted.
2. Drizzle melted caramel over sliced apples.
3. Sprinkle with chopped peanuts and mini chocolate chips.
DIY Easy Fall Rosette Wreath
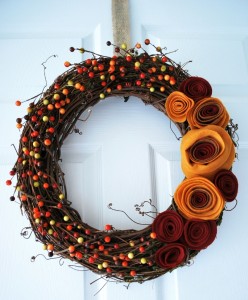
Make this colorful seasonal wreath for less than $10!
Here’s how:
- Start by downloading this rosette template from to cut swirl shapes out of felt.
- Tightly roll the ends of each flower together and secure them with double-sided tape.
- Arrange your rosettes on a grapevine wreath and attach them with a hot glue gun.
- Add sprigs of fall berries and secure with hot glue to complete the look.
For the full tutorial, visit Crafting Mom!
Recipe: Disneyland’s Apple Pie Caramel Apples
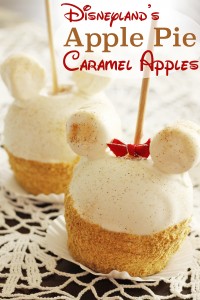
These Apple Pie Caramel Apples are a huge hit! I was able to find a recipe to make them at home, and it’s not as hard as it looks.
Ingredients:
- 4 large Granny Smith apples
- 5 to 6 cups caramels (or appx. 1 bag Kraft Caramel bits)
- 7 to 8 cinnamon graham crackers (or 1 prepared pie crust)
- 1 .5 lbs. melting chocolates (or chocolate chips)
- cinnamon & sugar to taste (appx 2 Tbsp sugar + 1/8 tsp. cinnamon)
- 8 large marshmallows (optional: to make “ears”)
Directions:
- To get the wax coating off from the apples, scrub apples and dry with a dishcloth or paper towel. To get the wax completely off, drop them in boiling water for a few seconds then scrub off.
- Refrigerate apples for a few hours until they are fully cold.
- Melt caramel in the microwave (in a microwave-safe dish) for 30 seconds at a time until caramel is nice and melted (or follow directions on package if using Bits). If you are using unwrapped caramels, you can also put caramels in a small crockpot on high heat until melted.
- Place caramel apple sticks or popsicle sticks into the top of each apple and dip each apple into the caramel until fully coated, rotating the apple as needed. Let excess caramel drip off and them place the apples on wax paper. Refrigerate for at least 3 hours until caramel is completely cooled onto the apples.
- In a food processor, process graham crackers (or pie crust) until well blended. If using a pie crust, add a little cinnamon and sugar to the mixture. Place in a bowl and set aside.
- Melt chocolate in a microwave-safe dish in the microwave until chocolate is just melted and there are no lumps. Dip each apple in the chocolate and allow chocolate to set for a few seconds. When chocolate has slightly set, roll the bottom half in processed pie or cracker crumbs. Sprinkle each entire apple with cinnamon and sugar and set aside.
- Optional: Once the chocolate on the apples have set, roll each marshmallow in the chocolate and place onto the apples to make Mickey’s “ears”. Sprinkle with cinnamon and sugar and hold in place until the ears set.
A HUGE thanks to Favorite Family Recipes for the awesome recipe and picture!