
Homemade Candy Cane Sugar Scrub
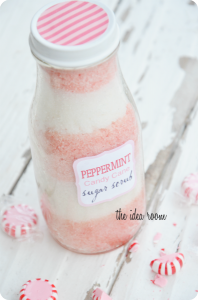
If you’re looking to make easy and inexpensive gifts for your loved ones this year, this Peppermint Candy Cane Sugar Scrub “recipe” is perfect. It smells so good and it is a lot like the expensive department store brands.
What You’ll Need:
- 2 cups of granulated sugar
- 1/3 cup almond or coconut oil
- Peppermint essential oil
- Raspberry juice or red food coloring
- Jar or container to hold it
- 2 bowls
- A piece of printer paper
Directions:
- Slowly pour the almond or coconut oil into the sugar until the consistency is soft and not too oily. It may take less than the amount of you have set aside, to watch for consistency.
- Add a few drops of peppermint essential oil to the mixture and stir together.
- Separate the mixture into 2 bowls of equal amounts.
- Add the food coloring or juice to 1 of the bowls of mixture.
- Roll the printing paper into a funnel (a regular funnel is too small for the mixture to flow through) and pour the colored mixture. Press down with spoon.
- Repeat with white, then colored, etc. until it is used up and creates a candy cane effect.
- Put on the cap and decorate with a bow!
- Go here for the label if you’d like to use it for your bottle or jar.
Thank you SO MUCH to The Idea Room for this tutorial. SUCH a great and healthy idea.
DIY: Peanut Butter Pumpkins
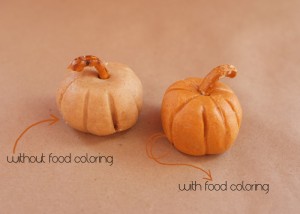
Making these adorable and easy peanut butter pumpkins are a delicious way to celebrate Fall. They would be great to have as a part of Thanksgiving appetizers or meals, too! I can only imagine that they could be made using almond or other nut butters, too! Kids could get into the fun to make them.
What You’ll Need (makes 12 pumpkins):
• ¾ cup creamy peanut butter
• ¼ cup unsalted butter, softened
• ½ teaspoon vanilla extract
• orange (or red & yellow to mix) food coloring (optional)
• 2 cups confectioners’ sugar
• wax paper
• toothpicks
• mini pretzels
Directions:
- Mix together the butter and peanut butter
- Add the vanilla and 2-3 drops of orange or a drop of red and drop of yellow (they look great without the coloring, too, if you opt for that. See picture above.)
- Slowly add in the confectioners’ sugar with a spatula until the consistency is fairly thick
- Divide the mixture into 12 balls (or less if you want larger pumpkins), then roll them into balls and place on wax paper
- Make creases and shape the pumpkins with a toothpick
- Break apart the mini pretzels and put a piece into each pumpkin as its “stem”
Eat the pumpkins alone or with pretzels! Thanks to Fossil Blog for the idea :)
Tissue Paper Christmas Tree
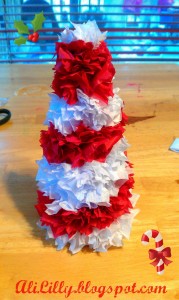
Make this super cute and easy Christmas decoration out of just a few cheap necessities. You can do this craft with older children as well, or if you use Elmer’s glue, you can do it with younger children (it just takes longer because the glue has to dry).
What You’ll Need:
- tissue paper
- printer paper
- scissors
- pencil
- tape
- hot glue (or Elmer’s glue)
Instructions:
- Fold several pieces of tissue paper into a thin long strip and cut inch wide strips from it. Then unwind the strips and cut squares from it.
- Use a piece of printer paper to create a cone (shaped like a a Christmas tree), tape it together, and trim the bottom so it can be flat to stand later. Draw wide lines around the cone to use as a guide if you want to make a candy cane tree.
- Push a square of tissue paper over the eraser of a pencil so it’s shaped like a U. Dab hot glue onto paper and press onto the cone. Keep doing this over and over pushing the pieces of paper together closely.
- Fluff up, trim ones that are too long, and fill in bald spots as you go. You’ll think of lots of ways to create trees: green with colored ornaments, stars, and more!
Thanks to AliLilly for the great idea!
DIY Sparkling Leaves Garland
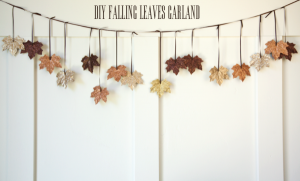
Spruce up your home and get ready for Autumn with this easy to make sparkling falling leaves garland. This is a great craft to do with kids and get them excited for Fall!
What You’ll Need:
- Artificial leaves (can be purchased at Dollar Tree or craft stores)
- Paintbrush
- Elmers Glue
- Glitter (natural colors)
- Hole punch
- Ribbon
Directions:
- Pick out about 10-12 leaves that are the nicest (or however long you want to make your garland).
- Doing 1 leaf at a time, paint a medium layer of glue over a leaf and cover with glitter. Let dry and shake off remaining glitter.
- Use hole punch and punch a hole in the middle at the bottom of each leaf so they will hang upside down.
- Tie a long string of ribbon in each leaf and hang from a long string of ribbon to create the garland. Hang and enjoy!
Thank you to Boxwood Clippings for the great decorating idea!
Red Swarovski Crystal Necklace

Perfect stocking stuffer for a bargain at $1.19 and FREE shipping! Beautiful Rose Red Lady Swarovski Elements Crystal Four Leaf Clover Pendent Necklace for a beautiful woman in your life.