
Recipe: “Stained Glass” Sugar Cookies

This is the coolest and most creative use of hard candies I’ve seen since the DIY Christmas platters using peppermint candies I posted back in December. They’re beautiful, fun to look at, easy to make, and completely, 100% edible! Make them for your next potluck, for holidays, or just for fun. I can’t wait to hear how you like them!
Ingredients & Tools:
- Jolly Ranchers Hard Candies (Any hard candy will work, but cannot be sugar-free candy)
- Your favorite sugar cookie recipe (either premade or made from scratch, both work)
- 2 sizes of cookie cutters (these were hearts, but you can use your choice of 2 of the same shape, but different sizes)
- Baking sheet
- Wire racks
- Waxed paper
Directions:
- Roll out sugar cookie dough and cut out the cookies with a large cookie cutter. Use a spatula to move them to the baking sheet.
- Using the small cookie cutter, remove the centers of the large cookies that are on the baking sheet.
- Place 2 Jolly Ranchers (or other hard candy) of different colors inside the new empty center of the cookies. Choosing 2 different colors gives the stained glass look.
- Bake cookies with candy centers according to your cookie recipe’s instructions.
- Let the cookies cool on the baking sheet for 5 minutes to allow the candy center to harden before you then transfer them to wire racks to cool completely.
- Once fully cooled, you can move them onto a plate or into a storage container, but to prevent the hard candies from sticking together place waxed paper between layers of cookies. Enjoy!
Recipe: Lemon-Poppy Seed Zucchini Bread

For a refreshing change from regular zucchini bread, bake this lemon-poppy seed version from Southern Living Magazine. It’s perfect for summer and rated 5-stars!
Ingredients (Makes three 5- x 3-inch loaves):
- 1/2 cup butter, softened
- 1 1/3 cups sugar
- 3 large eggs
- 1 1/2 cups all-purpose flour
- 1/2 teaspoon salt
- 1/8 teaspoon baking soda
- 1/2 cup sour cream
- 1 cup shredded zucchini
- 1 tablespoon lemon zest
- 2 teaspoons poppy seeds
Directions:
- Preheat oven to 325°. Beat butter at medium speed with a heavy-duty electric stand mixer until creamy. Gradually add sugar, beating until light and fluffy. Add eggs, 1 at a time, beating just until blended after each egg is added.
- Stir together flour, salt, and baking soda. Add to butter mixture alternately with sour cream, beginning and ending with flour mixture. Beat at low speed just until blended after each addition. Stir in zucchini and next 2 ingredients. Spoon batter into 3 greased and floured 5×3-inch disposable aluminum foil loaf pans (about 1 1/3 cups batter per pan).
- Bake at 325° for 40 to 45 minutes or until a wooden pick inserted in center comes out clean. Cool in pans on wire racks 10 minutes; remove from pans to wire racks, and cool completely (about 30 minutes).
Picture via Living Rancho Deluxe.
Candy Corn Mousse Cups

Halloween is only a couple of days away! You can make some super fun desserts to give out to the kids’ friends or just as a dessert for the next few days. You can use them for Thanksgiving, too! Here’s how to make your own Candy Corn Mousse Cups:
INGREDIENTS
1 package (8 oz.) cream cheese, softened
½ cup powdered sugar
¼ cup milk or cream
1 teaspoon vanilla
1 small container (8 oz.) Cool Whip, thawed
orange and yellow food color
candy corn
DIRECTIONS
Beat cream cheese in the bowl of a stand mixer until fully smooth. Slowly add powdered sugar, add milk and then vanilla. Continue mixing about 1 minute on medium speed. Fold cool whip into cream cheese mixture; stir until fully combined. Scoop about 1/3 of the cheesecake mousse into a bowl; mix with orange food coloring. Color another third of the mixture yellow. Leave the remaining third white. Beginning with the yellow mousse, pipe or spoon the mixture into each glass. Repeat with the orange and white. Garnish with candy corn. Then ENJOY!
Yield: 8 mini servings. We halved the recipe and were able to fill 4 shot glasses.
Recipe: Cinnamon-Masarpone Pudding

Pudding is all grown up! No longer do we adults need to suffer will the peel off lids! With this recipe from PureWow, we can devour a grown-up version of a kids’ favorite. Recipe makes 6-8 servings.
Ingredients:
Pudding –
- ½ cup sugar
- 1½ tablespoons cornstarch
- 1 cup whole milk
- 3 egg yolks
- 1 teaspoon pure vanilla extract
- ½ teaspoon ground cinnamon, plus extra for garnish
- 2 cups mascarpone cheese
Topping –
- 1 cup heavy cream
- 3 tablespoons granulated sugar
- 1 cup fresh berries (like blackberries, raspberries, and strawberries)
Directions:
Place 6 to 8 small bowls onto a baking sheet. In a small mixing bowl, whisk sugar with the cornstarch to combine.
In a medium pot, combine milk with the sugar mixture and whisk to combine. Bring to a simmer over medium heat.
While the milk is heating up, whisk the egg yolks in a medium bowl. When the milk has reached a simmer, slowly pour it over the eggs, whisking constantly. Continue whisking for a few moments after all the milk has been added, then return the mixture to the pot.
Cook the pudding over medium-low heat, whisking constantly, until the mixture begins to bubble from the very center of the pot. This will be at least 1 to 2 minutes more.
Remove the pot from the heat and add in the vanilla, cinnamon and mascarpone cheese. Mix until completely smooth.
Pour the pudding into the prepared vessels. Cover the tray with plastic wrap and refrigerate until cool (at least 30 minutes).
When ready to serve, whip the heavy cream with the sugar to medium peaks. Place 1 tablespoon whipped cream on top of each pudding and garnish with a sprinkle of cinnamon and some fresh berries.
Recipe: Nutella Banana Bread
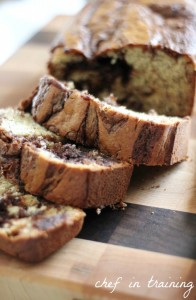
Nutella added INTO banana bread? Yes! It’s a simple recipe to make such delicious bread that you’ll never go back to “regular” banana bread again. Thanks to Chef In Training for the yummy recipe!
Ingredients:
- 1 cup sugar
- 2 large eggs
- 1 1/4 cup mashed ripe bananas
- 1 tsp. vanilla
- 1/3 cup milk
- 3/4 heaping cup Nutella
- 2 cups flour
- 3/4 tsp. baking soda
- 1/2 tsp. salt
- 1/4 cup softened butter
Directions:
- Preheat oven to 350 degrees and spray an 8×4-inch loaf pan with nonstick spray.
- Whisk together flour, baking soda and salt in a medium sized bowl.
- Beat sugar and butter in another large bowl with an electric mixer at medium speed until fully blended. Add the eggs, one at a time, beating well after each one. Add banana, milk and vanilla, then beat until blended. Add the flour mixture from the other bowl and beat at low speed just until flour is mixed in, but not too blended.
- Put the Nutella into a small dish and warm in the microwave for 15 seconds. Add 1 cup of the banana bread batter to the Nutella in the bowl and stir them together until well blended.
- Add this newly made Nutella batter, then the plain banana bread batter in alternating layers into the bread pan. Lightly swirl the two types of batter with a knife.
- Bake at 350 degrees for 50 to 60 minutes. The bread will seem a little underbaked, but that’s what makes it so good and moist! Let the bread cool for at least 15 minutes in the pan before taking it out of the pan to cool completely.